Kenmore 9802 Use and Care Guide
Kenmore 9802 - Elite 30 in. Electric Range Manual
 |
View all Kenmore 9802 manuals
Add to My Manuals
Save this manual to your list of manuals |
Kenmore 9802 manual content summary:
- Kenmore 9802 | Use and Care Guide - Page 1
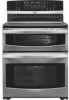
EL Electric IT ange I_ ® Estufa el6trica Models, Modelos 790. 9802;',.. ,.,J,,.,, = Color number, nL_mero de color iii:iiiii_i!_ii _iiiilJiiiiii_ ...i.li.i..... Sears Roebuck and Co., Hoffman Estates, IL 60179 U.S.A. WWW, SeaFs,COITI P/N 318205200 Rev. B (0809) - Kenmore 9802 | Use and Care Guide - Page 2
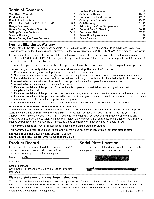
Location 2 IMPORTANT SAFETY INSTRUCTIONS 3-4 Range Features 5 Before Setting Sears Service 40 Kenmore Elite Limited Warranty When installed, operated and maintained according to all instructions save these instructions This Use & Care Manual contains general operating instructions for your - Kenmore 9802 | Use and Care Guide - Page 3
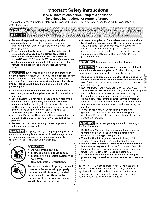
electrical power to the appliance at the circuit breaker or fuse box. • User Servicing. Do not repair or replace any part of the appliance unless specifically recommended in the manuals. All other servicing packed with wall oven. • See Installation Instructions. To reduce the risk of tipping, the - Kenmore 9802 | Use and Care Guide - Page 4
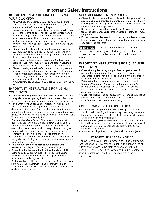
service without breaking due to the sudden change in temperature. Check the manufacturer's recommendations for cooktop use. • When flaming foods under a ventilating hood, turn the fan On. iMPORTANT iNSTRUCTiONS this manual. Improper installation of these liners may result in risk of electric shock, - Kenmore 9802 | Use and Care Guide - Page 5
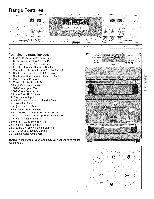
Tur_,oBo v _Lo v _L_ 000 000 ;TA_ ® _Lo A FA H4 A e_Out_, Warmer 8 zone R_ght _e_r Right VL) Fro_t ©@© ©©_ ©©© Your electric range includes: 1. Electronic Oven Control with Timer 2. Glass Touch Sensitive Control Panel 3. Left Front Element Control & Display 4. Left Rear Element - Kenmore 9802 | Use and Care Guide - Page 6
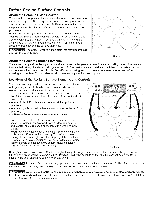
Call checklist section of this Use and Care Guide. Note: Radiant elements have a limiter that (Refer to page 12 for correct cookware instructions). Figure 2 Note: (White glass cooktops only) Due to the high spoon holders or plastic wrappings on top of the range when it is in use. These items could - Kenmore 9802 | Use and Care Guide - Page 7
activate the Cooktop Lockout feature which will lock all surface elements from being accidentally turned ON. This feature will only lock the cooktop. iNSTRUCTiONS PRESS To turn the Cooktop Lockout Feature ON: 1. BE SURE ALL surface element controls are set to the OFF position. 2. Press and hold - Kenmore 9802 | Use and Care Guide - Page 8
pads is designed to replace conventional control knobs. The available ESEC Window Display Settings The ESEC control will display heat levels ranging from Hi (Figure 1) to Lo (Figure 6) and OFF (Figure 7). The settings between 9.0 (Figure 2) and 3.0 (Figure 3) decrease or increase in increments of - Kenmore 9802 | Use and Care Guide - Page 9
before it has cooled sufficiently. Do not place plastic items such as salt and pepper shakers, spoon holders or plastic wrappings on top of the range when it is in use. These items could melt or ignite. Potholders, towels or wooden spoons could catch fire if placed too close to the - Kenmore 9802 | Use and Care Guide - Page 10
cooled sufficiently. Do not place aluminum foil or plastic items such as salt and pepper shakers, spoon holders or plastic wrappings on top of the range when it is in use. These items could melt or ignite. Potholders, towels or wooden spoons could catch fire if placed too close to the - Kenmore 9802 | Use and Care Guide - Page 11
cooled sufficiently. Do not place aluminum foil or plastic items such as salt and pepper shakers, spoon holders or plastic wrappings on top of the range when it is in use. These items could melt or ignite. Potholders, towels or wooden spoons could catch fire if placed too close to the - Kenmore 9802 | Use and Care Guide - Page 12
Surface Cooking Selecting Surface Cooking Cookware Correct h3corl_ect Cookware should have flat bottoms that make good contact with the entire surface heating element. Check for flatness by rotating a ruler across the bottom of the cookware (See Figure 1 ). Be sure to follow the recommendations - Kenmore 9802 | Use and Care Guide - Page 13
To replace an oven rack in the lower oven, fit the rack onto the guides on the oven walls. Tilt the front of the rack upward ac_ and slide of cooking as per the table below. Installing Oven Rack Supports in Upper Oven To install oven rack support, insert it into the two brackets on the oven wall - Kenmore 9802 | Use and Care Guide - Page 14
, become familiar with the various features and functions of the oven as described below. Detailed instructions for each feature and function follow later in this Use & Care Guide. NOTICE : The illustrations and instructions contained in this document only refer to the lower oven operations. These - Kenmore 9802 | Use and Care Guide - Page 15
preset at the factory for the 12 hour operation. When the range is first plugged in, or when the power supply to the range has been interrupted, the timer in the display will flash. Press _. The display will stop flashing, INSTRUCTIONS To set the clock (example below for 1:30) PR ESS 1. Press - Kenmore 9802 | Use and Care Guide - Page 16
control is left on for more than 11 hours and 59 minutes. The oven can be programmed to override this feature for Continuous Baking. INSTRUCTIONS PRESS DISPLAY To set the control for Continuous Bake or 12 Hour Energy Saving features 1. Press and hold _ for 7 seconds (Fig. 1). After 10 seconds - Kenmore 9802 | Use and Care Guide - Page 17
. If desired the control can be programmed for silent operation and later returned to operating with all the normal sounds and beeps. INSTRUCTIONS To change control from normal sound operation to silent control operation 1. Press and hold _ for 6 seconds (Fig. 2). After 6 seconds, a beep will sound - Kenmore 9802 | Use and Care Guide - Page 18
or Celsius, The oven has been preset at the factory to display in Fahrenheit. Note: Both ovens will be changed at the same time, iNSTRUCTiONS To change display from Fahrenheit Celsius to Fahrenheit to Celsius or 1. Press _ and hold for 7 seconds. A beep will sound, "550" v will appear, "LOWER - Kenmore 9802 | Use and Care Guide - Page 19
Bake The BAKE _ pad controls normal baking. The oven can be programmed to bake at any temperature from 170 ° F to 550 ° F (77 ° C to 288 ° C). INSTRUCTIONS PR ESS DISPLAY To set the Bake Temperature to 350°F 1. Arrange interior oven racks and place food in oven. 2. Press rO_v_O•z_j 3. Press - Kenmore 9802 | Use and Care Guide - Page 20
to the "Adjusting Oven Temperature" section. Baking Problems and Solutions Chart Baking Problems Cookies and biscuits burn on the bottom. Causes the oven rack. If the water level is uneven, refer to the installation instructions for leveling the range. • Be sure to allow 5.1 cm to l0.2 cm (2" to - Kenmore 9802 | Use and Care Guide - Page 21
Time feature. The automatic timer of the Cook Time feature will turn the oven OFF after cooking for the desired amount of time you selected. INSTRUCTIONS PR ESS DISPLAY To program the oven to begin baking immediately and to shut off automatically (example : Bake at 350°F for 30 minutes) 1. Be - Kenmore 9802 | Use and Care Guide - Page 22
hour display mode the Delayed Timed Bake or Delayed Timed Convection Bake cycle can never be set to start more than 12 hours in advance. INSTRUCTIONS PRESS DISPLAY To program the oven for a delayed BAKE start time and to shut off automatically (example: baking at 350°F for 30 minutes and - Kenmore 9802 | Use and Care Guide - Page 23
and water can cause a grease fire to spread and cause personal injury. INSTRUCTIONS PRESS To set the oven to broil at 550°F 1. Place the broiler pan with the Searing Grill. Place Searing Grill on top of Broiler Pan and insert for meats and steaks (See Fig. 6). Electric Range Broiling Table - Kenmore 9802 | Use and Care Guide - Page 24
at any time. Note: The Cakes, Breads or Pizza features may be programmed like the example provided above. It is recommended to follow the recipe instructions with the food item package. QOQ (_ Fig. 1 Fig. 2 Recommended foods to be cooked in each category Fig. 3 CONV ROAST (lower oven only) Meat - Kenmore 9802 | Use and Care Guide - Page 25
of Convection Bake: --Multiple rack baking. --Some foods cook faster, saving time and energy. --No special pans or bakeware needed. ii.i.l INSTRUCTIONS To set the oven for Convection Bake and temperature to 350°F 1. Arrange interior oven racks and place food in oven. 2. Press (_. 2. Press - Kenmore 9802 | Use and Care Guide - Page 26
Convection Bake keypad. Cook Time or Delay Start function may be added. Note: This feature is only avalaible in the lower oven. INSTRUCTIONS Using Convection Convert (Bake) feature to automatically adjust oven temperature (e×ample: setting oven for 350°F): 1. Arrange interior oven racks and place - Kenmore 9802 | Use and Care Guide - Page 27
. Below is a list of preparation and cooking tips you should review for best possible results using Slow Cook: Completely thaw all frozen feature. Add any cream or cheese sauces during the last hour of cooking. INSTRUCTIONS To Program the Oven to begin baking Cook feature 1. Place the food in - Kenmore 9802 | Use and Care Guide - Page 28
this information the control can calculate the time when cooking will complete and can then start the Warm & Hold feature automatically. INSTRUCTIONS PRESS DISPLAY To set Warm & Hold 1. Arrange interior oven racks and place food in oven. 2. Press @. Fig. 1 3. Press _. "HLd" will appear - Kenmore 9802 | Use and Care Guide - Page 29
so at this time. If not, skip this step and continue to Fig. 2 ..... step 6. Refer to the Cook Time or Delay Start section for complete instructions. Remember the oven will shut down after using Cook Time or Delay Start and therefore may only be Fig. 3 used once during the Sabbath/Jewish - Kenmore 9802 | Use and Care Guide - Page 30
will not work with any other function including a Delay Start, a Clean Cycle or a Broil setting. NOTE: This feature can only store one recipe at a time. iNSTRUCTiONS To Program the Oven to Begin Baking immediately and record a Recipe (example: for a Bake mode at 425°C) 1. Place the food in the oven - Kenmore 9802 | Use and Care Guide - Page 31
cleaning. ,, Wear rubber gloves when cleaning any exterior parts of the oven manually. ,, DO NOT clean the oven door gasket. The woven material of the probe, searing grill, broiler pan and broiler pan insert, all ustensils and any aluminum foil. Remove the oven racks and oven rack supports from - Kenmore 9802 | Use and Care Guide - Page 32
to use a 2 hour self-clean cycle for light soils, a 3 hour cycle for average soils, and a 4 hour cycle for heavy soils (to assure satisfactory results). iNSTRUCTiONS To avoid possible burns use care when opening the oven door after the Self-Cleaning cycle. Stand to the side of the oven when opening - Kenmore 9802 | Use and Care Guide - Page 33
is higher or lower than the recommended temperature. The baking results should help you to decide how much of an adjustment is needed. iNSTRUCTiONS PR ESS To adjust the oven temperature 1. Press iLow';;_ 2. Press and hold _ for 6 seconds. The preset adjustment number will appear and "UPPER - Kenmore 9802 | Use and Care Guide - Page 34
General Care & Cleaning Cleaning Various Parts of Your Range Before cleaning any part of the oven, be sure all controls are turned OFF and a good seal. Care should be taken not to rub, damage or remove this gasket. Follow the instructions under the Cooktop Cleaning & Maintenance in this Use & Care - Kenmore 9802 | Use and Care Guide - Page 35
Prior to using your cooktop for the first time, apply the recommended CookTop® Cleaning Creme to the ceramic surface (on the web visit www.sears.com for replacement cooktop cleaner, item number 40079). Buff with a non-abrasive cloth or no=scratch cleaning pad. This will make cleaning easier when - Kenmore 9802 | Use and Care Guide - Page 36
Care & Cleaning section in this Use & Care Guide. Hinge SU e lever hook Lock engaged for supports. Keep pulling the bottom of the door toward you while rotating the top of the door toward the range to completely disengage the hinge levers (Figure 2). 4. To clean oven door, follow the instructions - Kenmore 9802 | Use and Care Guide - Page 37
. Contact Sears or another qualified servicer. Service wiring not complete. Contact Sears or another qualified servicer. Power outage. Check house lights to be sure. Call your local electric company. Short in cord/plug. Replace cord/plug. Controls are not set properly. See instructions under Setting - Kenmore 9802 | Use and Care Guide - Page 38
vent. Before You Call Solutions to Common Problems POSSIBLE CAUSE / SOLUTION Lightweight or warped the broiler. Preheat broil element for quick searing operation. Meat not properly prepared. Remove excess instructions. Self-cleaning cycle was interrupted. Follow steps Cycle" in the Use & care Guide - Kenmore 9802 | Use and Care Guide - Page 39
phone support from a Sears representative on all products. Think of us as a ,4alking owner's manual,,. [] Power surge protection against electrical damage due covered repair service and related installed parts. Enhorabuena por haber hecho una compra inteligente. Su nuevo producto Kenmore®esta - Kenmore 9802 | Use and Care Guide - Page 40
parts, accessories and owner's manuals that you need to do-it-yourself. For Sears professional installation of home Sears Parts & Repair Service Center 1-800-488-1222 (U.S.A.) 1-800-469-4663 (Canada) www.sears.com www.sears.ca To purchase a protection agreement on a product serviced by Sears
-
 1
1 -
 2
2 -
 3
3 -
 4
4 -
 5
5 -
 6
6 -
 7
7 -
8
-
9
-
10
-
11
-
12
-
13
-
14
-
15
-
16
-
17
-
18
-
19
-
20
-
21
-
22
-
23
-
24
-
25
-
26
-
27
-
28
-
29
-
30
-
31
-
32
-
33
-
34
-
35
-
36
-
37
-
38
-
39
-
40
 |
 |

E
L
I
T
I_
®
Electric
ange
Estufa
el6trica
Models, Modelos
790.
9802;',..
,,J,,,
.,.
= Color number,
nL_mero de color
iii:iiiii_i!_ii
_iiiilJiiiiii_
..........
ilii
.......
Sears
Roebuck
and
Co.,
Hoffman
Estates,
IL
60179
U.S.A.
P/N 318205200
Rev.
B
(0809)
WWW,
SeaFs,COITI