Kenwood CA-PLT98 Operation Manual - Page 2
Instructions
 |
View all Kenwood CA-PLT98 manuals
Add to My Manuals
Save this manual to your list of manuals |
Page 2 highlights
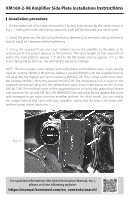
XM160-2-98 Amplifier Side Plate Installation Instructions Installation procedure 1. On the brake side of the bike, remove the 3 factory bolts shown by the white arrows in Fig. 1.1, noting the brake side fairing support bracket will be removed, and not re-used. 2. Install the plate into the bike using the factory fasteners just removed, noting it's best to loosely install all 3 fasteners before tightening. 3. Using the supplied "hook and loop" material, secure the amplifier to the plate so it's oriented with the power harness at the bottom. The extra length of that amp will sit below the main plate by approx.. 1/2" and to the left (brake side) by approx. 1/2", so the outer fairing will go back on. You will need to adjust accordingly. NOTE: This kit includes a wire harness with white/black and red/black wires. If you already have an existing XM160-2-98 and are adding a second XM160-2-98, the supplied harness will plug into the "bypass out" on the existing XM160-2-98. This is what sends music from the existing XM160-2-98 to the second XM160-2-98. The white/black pair of wires on the supplied harness will plug into the yellow/black wires (clutch side input) on the second XM160-2-98. The red/black wires on the supplied harness will plug into green/black (brake side input) on the second XM160-2-98. KENWOOD lids and lower fairing speaker kits come with harnesses to get music from the amplifier to them. For other installs, you can modify the output harness that came with your amplifier, noting that the blue is the brake side, and the brown is the clutch side. Fig 1.1 For updated information (the latest Instruction Manual, etc.), please visit the following website: https://manual.kenwood.com/en_contents/search/
-
 1
1 -
 2
2
 |
 |
