Kenwood CA-POD14LC Operation Manual - Page 3
Liquid Cooled Lower Fairing Speaker Adaptors Installation - Cont.
 |
View all Kenwood CA-POD14LC manuals
Add to My Manuals
Save this manual to your list of manuals |
Page 3 highlights
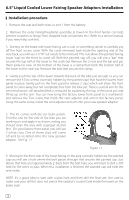
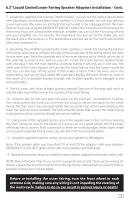
6.5" Liquid Cooled Lower Fairing Speaker Adaptors Installation - Cont. 7. Locate the supplied wire harness. On the harness, you will see the main 4-wire harness with blue/black, and brown/black wires covered in a black sheath. You will also see two 2-wire harnesses (the wires are all black) that each need to be unplugged from the main harness. If you are using the KENWOOD XM160-2, follow the instruction in that manual for the wiring. If you are using another brand of amplifier, you can cut the 4-pin plug off and wire your amplifier into our harness. The blue/black wire pair are for the brake side and the black wire is the positive (+). The brown/black wire pair are for the clutch side and the black wire is positive (+). 8. Assuming the amplifier powering the lower speakers is inside the fairing, the balance of the main wire harness will pass through on the brake side of the fairing where the main factory wires pass. Have the opposite end of the main harness go so it ends up on top of the crash bar as close to the center as you can. Locate the 2-wire harness marked "brake side" and plug it into the main harness connector noting it will only go in one way. The other side of the same harness will go into the lower fairing. Pass the larger connector first. You can also tear off the sticker if that makes it easier. Once the wires are in the lower fairing, take up the slack along the crash bar, keeping the main harness as close to the center of it as possible (leaving enough wire to allow speaker to be plugged in and removed easily). 9. The kit comes with strips of black gummy material. Take one of the strips and use it to seal the hole around the wire on the outside of the lower fairing. 10. Snap the arm for the vent back into place on the pivot pin. Re-install the 3 factory Torx head screws (by hand just until they are snug) to secure the panel to the lower fairing. The "bar" and 2 nuts removed earlier that secure the top of the lower fairing to the crash bar will now be re-installed. The bolt removed earlier that secures the lower fairing to the bottom of the crash bar should also be re-installed. 11. Using some of the supplied zip ties, secure the speaker wire to the crash bar, keeping the main harness as close to the center of it as you can. It's a good idea to trim the excess off the zip ties as close to flush as possible so there are no sharp edges. When done, install and secure the painted fairing lower cap with the 7/16" nut removed earlier. 12. Using the supplied machine screws, secure your speaker to the adaptor. Note: If the speaker grilles you have don't fit or don't fit the adaptors with your speakers, KENWOOD CA-GRL14UT grilles will fit with most speakers and look great. 13. Repeat the previous steps to install the lower speaker adaptor for the bike's other side. NOTE: Now is the best time to use zip ties to properly secure and "clean up" any wiring. It's always a good idea to remove excess from the zip ties by cutting them as close to flush as possible so there are no sharp edges. Before re-installing the outer fairing, turn the front wheel to each extreme side, making sure any wiring is not impeding the steering of the motorcycle. Failure to do so can result in serious injury or death! 3
-
 1
1 -
 2
2 -
 3
3 -
 4
4
 |
 |
