Kenwood KVT-725DVD User Manual
Kenwood KVT-725DVD Manual
 |
View all Kenwood KVT-725DVD manuals
Add to My Manuals
Save this manual to your list of manuals |
Kenwood KVT-725DVD manual content summary:
- Kenwood KVT-725DVD | User Manual - Page 1
D'INSTALLATION MONITOR MIT DVD RECEIVER INSTALLATION-HANDBUCH MONITOR MET DVD-ONTVANGER INSTALLATIE HANDLEIDING MONITOR CON RICEVITORE DVD MANUALE DI INSTALLAZIONE MONITOR CON RECEPTOR DVD MANUAL DE INSTALACIÓN MONITOR COM RECEPTOR DVD MANUAL DE INSTALAÇÃO © PRINTED IN JAPAN B54-4435-00/00 (E)(AI) - Kenwood KVT-725DVD | User Manual - Page 2
English Before Installation Accessories 1 2 3 4 5 6 7 ..........1 8 ..........1 9 ..........1 0 ..........1 ..........1 ..........2 ..........4 ..........4 ..........2 ..........1 2CAUTION The use of any accessories except for those provided might result in damage to the unit. Make sure only to - Kenwood KVT-725DVD | User Manual - Page 3
Installation Procedure 1. To prevent a short circuit, remove the key from the ignition and disconnect the - battery. 2. Make the proper input and output wire connections for each unit. 3. Connect the speaker wires of the wiring harness. 4. Connect the wiring harness wires in the following order: - Kenwood KVT-725DVD | User Manual - Page 4
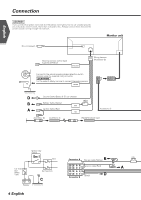
English Connection 2WARNING If you connect the ignition wire (red) and the battery wire (yellow) to the car chassis (ground), you may cause a short circuit, that in turn may start a fire. Always connect those wires to the power source running through the fuse box. Do not connect. Monitor unit - Kenwood KVT-725DVD | User Manual - Page 5
the terminal that is grounded when either the telephone rings or during conversation. NOTE To connect the KENWOOD navigation system, consult your navigation manual. External amplifier control cable (Pink / Black) EXT.CONT Ground cable (Black) - (To car chassis) To "EXT. AMP. CONT." terminal of the - Kenwood KVT-725DVD | User Manual - Page 6
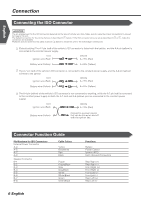
wire (Yellow) Connect to a power source that can be turned on and off with the ignition key. Connector Function Guide Pin Numbers for ISO Connectors External Power Connector A-4 A-5 A-7 A-8 Speaker Connector B-1 B-2 B-3 B-4 B-5 B-6 B-7 B-8 Cable Colour Yellow Blue/White Red Black Purple Purple - Kenwood KVT-725DVD | User Manual - Page 7
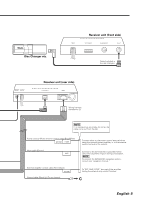
System Connection Receiver unit (front side) PREOUT TO TV TUNER I/F TO NAVIGATION I/F TO 5L-I/F FRONT REAR SUB WOOFER ¶ Front Preout Audio left output (White) Audio right output (Red) ¶ Rear Preout Audio left output (White) Audio right output (Red) ¶ Sub-woofer (Mono) Preout Audio left output - Kenwood KVT-725DVD | User Manual - Page 8
English Installation Installation for Monitor/Player Unit Screw (M4X8) (commercially available) Firewall or metal support Self-tapping screw (commercially available) Bend the tabs of the mounting sleeve with a screwdriver or similar utensil and attach it in place. Metal mounting strap ( - Kenwood KVT-725DVD | User Manual - Page 9
Removing Monitor/Player Unit ■ Removing the Hard Rubber Frame 1. Engage the catch pins on the removal tool 6 and remove the two locks on the lower level. Lower the frame and pull it forward as shown in the figure. 2. When the lower level is removed, remove the upper two locations. The frame can be - Kenwood KVT-725DVD | User Manual - Page 10
French Avant l'installation Accessoires 1 2 3 4 5 6 7 ..........1 8 ..........1 9 ..........1 0 ..........1 ..........1 ..........2 ..........4 ..........4 ..........2 ..........1 2ATTENTION L'utilisation d'accessoires autres que les accessoires fournis pourrait endommager l'appareil. Assurez- - Kenwood KVT-725DVD | User Manual - Page 11
Procédure d'installation 1. Afin d'empêcher un court circuit, retirez la clé du contact et déconnectez la batterie -. 2. Effectuez correctement les connexions d'entrée et sortie de chaque appareil. 3. Connectez les câbles de haut-parleur du faisceau de câbles. 4. Connectez les fils du câblage de - Kenwood KVT-725DVD | User Manual - Page 12
French Connexion 2AVERTISSEMENT Si vous connectez le câble d'allumage (rouge) et le câble de batterie (jaune) au châssis de la voiture (masse), vous risquez de causer un court-circuit qui peut provoquer un incendie. Connectez toujours ces câbles à la source d'alimentation de la boîte à fusible. Ne - Kenwood KVT-725DVD | User Manual - Page 13
Changeur de disque, etc. PREOUT Récepteur (avant) TO TV TUNER I/F TO NAVIGATION I/F TO 5L-I/F Câble (inclus avec le changeur de disque) Récepteur (Vue arrière) AV INPUT FM /AM AV OUTPUT ANTENNA POWER TO MONITOR I/F Faisceau de câbles (Accessoire 1) REMARQUE Si aucune connexion n'est - Kenwood KVT-725DVD | User Manual - Page 14
(Jaune) Connectez à une source d'alimentation qui peut être allumée et éteinte à l'aide de la clé de contact. Guide des connecteurs Numéros de broche pour connecteurs ISO Connecteur d'alimentation externe A-4 A-5 A-7 A-8 Connecteur de haut-parleurs B-1 B-2 B-3 B-4 B-5 B-6 B-7 B-8 Couleur - Kenwood KVT-725DVD | User Manual - Page 15
Connexion du système Récepteur (avant) PREOUT TO TV TUNER I/F TO NAVIGATION I/F TO 5L-I/F FRONT REAR SUB WOOFER ¶ Présortie avant Sortie Audio gauche (Blanc) Sortie Audio droite (Rouge) ¶ Présortie arrière Sortie Audio gauche (Blanc) Sortie Audio droite (Rouge) ¶ Sortie préampli. sub-woofer ( - Kenwood KVT-725DVD | User Manual - Page 16
French Installation Installation pour unité moniteur/lecteur Tôle pare-feu ou support métallique Vis (M4X8) (disponibles dans le commerce) Vis à tôle (disponibles dans le commerce) Armature de montage métallique (disponible dans le commerce) Tordre les pattes du - Kenwood KVT-725DVD | User Manual - Page 17
Retrait de l'unité moniteur/lecteur ■ Retrait du cadre en caoutchouc dur 1. Engagez les loquets sur l'outil de démontage 6 et enlevez les deux crochets inférieurs. Baissez le cadre et tirez-le vers l'avant comme montré sur l'illustration. 2. Quand la partie inférieure est retirée, retirez les deux - Kenwood KVT-725DVD | User Manual - Page 18
Vor der Installation Zubehör 1 2 3 4 5 6 7 ..........1 8 ..........1 9 ..........1 0 ..........1 ..........1 ..........2 ..........4 ..........4 ..........2 ..........1 2ACHTUNG Verwenden Sie nur dieses Original-Zubehör, um Beschädigungen Ihres Autoradios zu vermeiden. Verwenden Sie nur das mit - Kenwood KVT-725DVD | User Manual - Page 19
Hinweise zum Einbaun 1. Um einen Kurzschluss zu vermeiden, ziehen Sie bitte den Zündschlüssel und trennen Sie die --Batterie ab. 2. Verbinden Sie die Ein- und Ausgangskabel der einzelnen Geräte. 3. Verbinden Sie die Lautsprecheranschlüsse mit dem Kabelbaum. 4. Schließen Sie die Kabelbaum-Drähte in - Kenwood KVT-725DVD | User Manual - Page 20
Anschluss 2WARNUNG Wenn Sie ein Zündungskabel (rot) und ein Batteriekabel (gelb) an das Chassis des Autos (Erde) anschließen, könnten Sie einen Kurzschluss verursachen, der zu einem Brand führt. Schließen Sie diese Kabel immer an eine Stromquelle an, die durch den Sicherungskasten führt. Nicht - Kenwood KVT-725DVD | User Manual - Page 21
Disc-Wechsler etc. PREOUT Receiver-Gerät (Vorderseite) TO TV TUNER I/F TO NAVIGATION I/F TO 5L-I/F Kabel (Lieferbestandteil des Disc-Wechslers) Receiver-Gerät (Ansicht von hinten) AV INPUT FM /AM AV OUTPUT ANTENNA POWER TO MONITOR I/F Anschluß-Kabelbaum (Zubehör 1) Anmerkung Wenn keine - Kenwood KVT-725DVD | User Manual - Page 22
Anschluss Anschließen des ISO-Steckers 2ACHTUNG Die Stiftbelegung für die ISO-Stecker hängt von dem Typ Ihres Fahrzeugs ab. Nehmen Sie unbedingt die richtigen Anschlüsse vor, um Beschädigung des Gerätes zu vermeiden. Der Standard-Anschluß für den Kabelbaum ist nachfolgend unter 1 beschrieben. - Kenwood KVT-725DVD | User Manual - Page 23
Systemanschluss Receiver-Gerät (Vorderseite) PREOUT TO TV TUNER I/F TO NAVIGATION I/F TO 5L-I/F FRONT REAR SUB WOOFER ¶ Vorderer Vorausgang Linker Audio-Ausgang (Weiß) Rechter Audio-Ausgang (Rot) ¶ Hinterer Vorausgang Linker Audio-Ausgang (Weiß) Rechter Audio-Ausgang (Rot) ¶ Subwoofer (Mono) - Kenwood KVT-725DVD | User Manual - Page 24
Deutsch Installation Installation der Monitor-/Player-Einheit Motortrennwand oder Metallstütze Schraube (M4 × 8) (Im Fachhandel erhältliches Teil) Sichern Sie das Einbaugehäuse, indem Sie die Metall-Laschen mit einem Schraubenzieher umbiegen. Blechschraube (Im Fachhandel erhältliches Teil) - Kenwood KVT-725DVD | User Manual - Page 25
Entfernen des Monitor-/Player-Einheit ■ Ausbau des Hartgummirahmens 1. Die Anschlagstifte des Ausbauwerkzeugs einrasten 6 und die beiden Verriegelungen der unteren Hälfte ausbauen. Wie in der Abbildung gezeigt, den Rahmen senken und nach vorn ziehen. Anschlag Verriegelung Zubehör 6 2. Nach Ausbau - Kenwood KVT-725DVD | User Manual - Page 26
Vóór de installatie Toebehoren 1 2 3 4 5 6 7 ..........1 8 ..........1 9 ..........1 0 ..........1 ..........1 ..........2 ..........4 ..........4 ..........2 ..........1 2LET OP Het gebruik van andere accessoires dan de bijgeleverde toebehoren kan het toestel beschadigen. Gebruik uitsluitend de - Kenwood KVT-725DVD | User Manual - Page 27
Handelingen voor het installeren 1. Trek de sleutel uit het contactslot en koppel de -aansluiting los van de accu om kortsluiting te voorkomen. 2. Verbind de juiste in- en uitgangskabels van ieder toestel. 3. Sluit de luidsprekerkabels van de bedradingsbundel aan. 4. Sluit de kabels van de - Kenwood KVT-725DVD | User Manual - Page 28
Aansluitingen 2WAARSCHUWING Als u de bougiekabel (rood) en de accukabel (geel) aansluit op het chassis van de wagen (massa), kan een kortsluiting en als gevolg daarvan brand ontstaan. Sluit deze kabels altijd aan op de stroombron die door de zekeringkast loopt. Niet aansluiten. Monitor-eenheid - Kenwood KVT-725DVD | User Manual - Page 29
Disc-wisselaar etc. PREOUT Ontvanger (voorzijde) TO TV TUNER I/F TO NAVIGATION I/F TO 5L-I/F Kabel (in de disc-wisselaar inbegrepen) Ontvanger (Achteraanzicht) AV INPUT FM /AM AV OUTPUT ANTENNA POWER TO MONITOR I/F Bedradingsbundel (Toebehoren 1) OPMERKING Zorg dat de kabel niet uit het - Kenwood KVT-725DVD | User Manual - Page 30
Aansluitingen Verbinden van de ISO aansluiting 2WAARSCHUWING De penopstelling van de ISO aansluitingen is afhankelijk van het type van uw auto. Voorkom beschadiging en kontroleer dat de juiste verbindingen worden gemaakt. De basisverbinding van de bedradingsbundel is in stap 1 hieronder beschreven - Kenwood KVT-725DVD | User Manual - Page 31
Systeemaansluiting Ontvanger (voorzijde) PREOUT TO TV TUNER I/F TO NAVIGATION I/F TO 5L-I/F FRONT REAR SUB WOOFER ¶ Voor-voorversterkeruitgang Linkse audio-uitgang (Wit) Rechtse audio-uitgang (Rood) ¶ Achter-voorversterkeruitgang Linkse audio-uitgang (Wit) Rechtse audio-uitgang (Rood) ¶ - Kenwood KVT-725DVD | User Manual - Page 32
Installatie Installatie voor Monitor/Weergaveapparaat Schroef (M4 × 8) (in de handel verkrijgbaar) Hitteschild of metalen steun Zelf-tappende schroef (in de handel verkrijgbaar) Buig de lipjes van de bevestigingshuls met een schroevedraaier of dergelijk en bevestig op zijn plaats. Metalen - Kenwood KVT-725DVD | User Manual - Page 33
Verwijderen van het beeldscherm/Weergaveapparaat ■ Verwijderen van het harde rubberframe 1. Gebruik de klempennen op het gereedschap voor het verwijderen 6 en verwijder de twee vergrendelingen onder. Breng het frame omlaag en trek naar voren zoals u in de afbeelding ziet. Klem Vergrendeling - Kenwood KVT-725DVD | User Manual - Page 34
Prima dell'installazione Accessorio 1 2 3 4 5 6 7 ..........1 8 ..........1 9 ..........1 0 ..........1 ..........1 ..........2 ..........4 ..........4 ..........2 ..........1 2ATTENZIONE L'uso di accessori all'infuori di quelli forniti potrebbe causare danni all'apparecchio. Accertarsi di usare - Kenwood KVT-725DVD | User Manual - Page 35
Procedimento per l'installazione 1. Per prevenire un corto circuito, rimuovete la chiave di avviamento e scollegate la batteria -. 2. Eseguire correttamente i collegamenti dei cavi di ingresso e di uscita per ciascuna unità. 3. Collegare i cavi provenienti dai diffusori ai relativi terminali del - Kenwood KVT-725DVD | User Manual - Page 36
Collegamento 2AVVERTENZA Se collegate il cavo di accensione (rosso) e il cavo della batteria (giallo) al telaio (terra), causate un corto circuito, che a sua volta potrebbe causare un incendio. Collegate sempre questi cavi alla linea di alimentazione che attraversa la scatola dei fusibili. Non - Kenwood KVT-725DVD | User Manual - Page 37
commutato a massa quando il telefono squilla o durante la conversazione. NOTA Per il collegamento del sistema di navigazione KENWOOD, consultare il manuale di navigazione. Al terminale "EXT.AMP.CONT." dell'amplificatore dotato della funzione di controllo di amplificazione esterna. C Italiano 37 - Kenwood KVT-725DVD | User Manual - Page 38
Collegamento Collegamento del connettore ISO 2AVVERTENZA La disposizione dei terminali per i connettori ISO dipende dal tipo di veicolo di cui si è in possesso. Accertarsi di eseguire i collegamenti corretti per evitare danni all'apparecchio. Il collegamento default per il fascio dei fili è - Kenwood KVT-725DVD | User Manual - Page 39
Collegamento di sistema Unità di ricezione (parte frontale) PREOUT TO TV TUNER I/F TO NAVIGATION I/F TO 5L-I/F FRONT REAR SUB WOOFER ¶ Uscita pre frontale Uscita Audio sinistra (Bianco) Uscita Audio destra (Rossa) ¶ Uscita pre posteriore Uscita Audio sinistra (Bianco) Uscita Audio destra ( - Kenwood KVT-725DVD | User Manual - Page 40
Installazione Installazione del monitor/riproduttore Parete tagliafiamma o supporto metallico Vite (M4 × 8) (disponibile in commercio) Vite autofilettante (disponibile in commercio) Fascetta di montaggio metallica (disponibile in commercio) Piegare le linguette della flangia di montaggio con un - Kenwood KVT-725DVD | User Manual - Page 41
Rimozione dell'unità monitor/riproduttore ■ Rimozione della cornice di gomma dura 1. Agganciare le sporgenze sull'attrezzo di rimozione 6 e sbloccare i due fermi sul lato inferiore. Abbassare il telaio e tirarlo in avanti come mostrato nell'illustrazione. Fermo Sporgenza Accessorio 6 2. Quando si - Kenwood KVT-725DVD | User Manual - Page 42
Antes de la instalación Accesorios 1 2 3 4 5 6 7 ..........1 8 ..........1 9 ..........1 0 ..........1 ..........1 ..........2 ..........4 ..........4 ..........2 ..........1 2PRECAUCIÓN El uso de accesorios distintos de los suministrados podría causar daños en la unidad. Asegúrese de utilizar ú - Kenwood KVT-725DVD | User Manual - Page 43
Procedimiento de instalación 1. Para prevenir cortocircuitos, retire la llave del encendido y desconecte la batería -. 2. Inserte correctamente el conector de cada cable en el lugar de la unidad que le corresponda. 3. Conecte los cables de los altavoces al conector ISO. 4. Conecte la alimentación - Kenwood KVT-725DVD | User Manual - Page 44
Conexiòn 2ADVERTENCIA Si usted conecta el cable de encendido (rojo) y el cable de la batería (amarillo) al chasis del vehículo (tierra), puede ocasionar un cortocircuito, que puede provocar un incendio. Conecte siempre esos cables a la fuente de alimentación que pasa por la caja de fusibles. No - Kenwood KVT-725DVD | User Manual - Page 45
ículo. Conecte al terminal puesto a masa ya sea al sonar el teléfono o durante la conversación. NOTA Para ligar o sistema de navegação KENWOOD, consulte o seu manual de navegação. Al terminal "EXT.AMP.CONT." del amplificador con la función de control del amplificador externo. C Spanish 45 - Kenwood KVT-725DVD | User Manual - Page 46
Conexiòn Conexión del conector ISO 2PRECAUCIÓN La disposición de las patillas de los conectores ISO depende según el tipo de vehículo. Asegúrese de efectuar las conexiones de manera apropiada para evitar que se dañe la unidad. El ajuste de fábrica para la conexión del mazo de conductores se - Kenwood KVT-725DVD | User Manual - Page 47
Conexión del sistema Unidad receptora (lado delantero) PREOUT TO TV TUNER I/F TO NAVIGATION I/F TO 5L-I/F FRONT REAR SUB WOOFER ¶ Salida de preamplificador delantera Salida de audio izquierda (Blanco) Salida de audio derecha (Rojo) ¶ Salida de preamplificador trasera Salida de audio izquierda - Kenwood KVT-725DVD | User Manual - Page 48
Instalación Instalación para el monitor/unidad de reproductor Muro cortafuego o soporte de metal Tornillo (M4X8) (disponible en el comercio) Tornillo autorroscante (disponible en el comercio) Correa de montaje metálico (disponible en el comercio) Doble las lengüetas del manguito de montaje con un - Kenwood KVT-725DVD | User Manual - Page 49
Desinstalación de monitor/reproductor ■ Extracción del Marco 1. Enganche la uña de la herramienta de extracción 6 y libere los cierres provistos en dos lugares de la parte inferior. Tal como se muestra en la figura, baje el marco y extráigalo hacia adelante. Fiador loquet Accesorio 6 2. Después - Kenwood KVT-725DVD | User Manual - Page 50
Portuguese Antes da instalação Acessórios 1 2 3 4 5 6 7 ..........1 8 ..........1 9 ..........1 0 ..........1 ..........1 ..........2 ..........4 ..........4 ..........2 ..........1 2CUIDADO O uso de quaisquer acessórios que não sejam os fornecidos pode resultar em danos ao aparelho. Certifique - Kenwood KVT-725DVD | User Manual - Page 51
Procedimentos para Instalação 1. Para evitar um curto circuito, remova a chave da ignição e desligue o polo - da bateria. 2. Faça as ligações apropriadas dos cabos de entrada e saída de cada aparelho. 3. Ligue os cabos de cablagem dos alto-falantes. 4. Ligue a cablagem pela ordem seguinte: massa, - Kenwood KVT-725DVD | User Manual - Page 52
Portuguese Conexões 2ADVERTÊNCIA Se ligar o cabo de ignição (vermelho) e o cabo de bateria (amarelo) ao chassis do carro (massa), poderá causar um curto circuito, que por sua vez pode originar um fogo. Ligue sempre estes cabos à alimentação que passar pela caixa de fusíveis. Não ligue. Unidade do - Kenwood KVT-725DVD | User Manual - Page 53
-se ao terminal que está ligado à terra quando tanto o telefone toca quanto durante a conversa. NOTA Para ligar o sistema de navegação KENWOOD, consulte o seu manual de navegação. Cabo de controlo do amplificador externo (cor rosa/preto) EXT.CONT Fio massa (Preto) (para o chassis do carro) Para - Kenwood KVT-725DVD | User Manual - Page 54
Portuguese Conexões Conexão do Conector ISO 2CUIDADO A disposição dos pinos nos conectores ISO depende do tipo do veículo. Certifique-se que fez as conexões correctamente para evitar danos ao aparelho. A conexão de pré-definida da rede de fios está descrita no nº 1 abaixo. Se os pinos do conector - Kenwood KVT-725DVD | User Manual - Page 55
Ligação do sistema Unidade receptora (lado da frente) PREOUT TO TV TUNER I/F TO NAVIGATION I/F TO 5L-I/F FRONT REAR SUB WOOFER ¶ Preout Dianteiro Entrada audio esquerda (Branco) Entrada audio direita (Vermelho) ¶ Preout Traseiro Entrada audio esquerda (Branco) Entrada audio direita (Vermelho) - Kenwood KVT-725DVD | User Manual - Page 56
Portuguese Instalação Instalação para Écran/Unidade de leitor Anteparo à prova de fogo ou suporte de metal Parafuso (M4X8) (disponível no comércio) Parafuso de rôsca (disponível no comércio) Correia de metal (disponível no comércio) Vergue as linguetas da gaveta para montagem com uma chave de - Kenwood KVT-725DVD | User Manual - Page 57
Remoção da unidade Écran/Leitor ■ Removendo a armação de borracha dura 1. Prenda os pinos da alhete na ferramenta de remoção 6 e retire as duas trancas de baixo. Baixe a armação e puxe-a para frente como na ilustração. 2. A armação pode ser removida pelo lado de cima da mesma maneira. A armação pode - Kenwood KVT-725DVD | User Manual - Page 58
- Kenwood KVT-725DVD | User Manual - Page 59
- Kenwood KVT-725DVD | User Manual - Page 60
-
 1
1 -
 2
2 -
 3
3 -
 4
4 -
 5
5 -
 6
6 -
 7
7 -
8
-
9
-
10
-
11
-
12
-
13
-
14
-
15
-
16
-
17
-
18
-
19
-
20
-
21
-
22
-
23
-
24
-
25
-
26
-
27
-
28
-
29
-
30
-
31
-
32
-
33
-
34
-
35
-
36
-
37
-
38
-
39
-
40
-
41
-
42
-
43
-
44
-
45
-
46
-
47
-
48
-
49
-
50
-
51
-
52
-
53
-
54
-
55
-
56
-
57
-
58
-
59
-
60
 |
 |

© PRINTED IN JAPAN B54-4435-00/00 (E)(AI)
KVT-725DVD
KVT-725DVD-B
MONITOR WITH DVD RECEIVER
MANUEL D'INSTALLATION
MONITOR MIT DVD RECEIVER
INSTALLATION-HANDBUCH
MONITOR CON RICEVITORE DVD
MANUALE DI INSTALLAZIONE
MONITOR MET DVD-ONTVANGER
INSTALLATIE HANDLEIDING
MONITOR CON RECEPTOR DVD
MANUAL DE INSTALACIÓN
MONITOR COM RECEPTOR DVD
MANUAL DE INSTALAÇÃO
INSTALLATION MANUAL
MONITEUR AVEC RÉCEPTEUR DVD