Kenwood KVT-727DVD User Manual 1
Kenwood KVT-727DVD Manual
 |
View all Kenwood KVT-727DVD manuals
Add to My Manuals
Save this manual to your list of manuals |
Kenwood KVT-727DVD manual content summary:
- Kenwood KVT-727DVD | User Manual 1 - Page 1
KVT-827DVD KVT-727DVD KVT-627DVD MONITOR WITH DVD RECEIVER INSTALLATION MANUAL MONITEUR AVEC REPTEUR DVD MANUEL D'INSTALLATION MONITOR MIT DVD RECEIVER INSTALLATION-HANDBUCH MONITOR MET DVD-ONTVANGER INSTALLATIE HANDLEIDING MONITOR CON RICEVITORE DVD MANUALE DI INSTALLAZIONE MONITOR CON RECEPTOR DVD - Kenwood KVT-727DVD | User Manual 1 - Page 2
Accessories 1 2 3 * 4 5 6 7 8 9 2 | English 0 ..........1 ! ..........1 @ ..........1 1 1 ..........1 * KVT-827DVD/727DVD only ..........2 ..........4 ..........4 ..........2 ..........1 ..........1 ..........1 ..........2 - Kenwood KVT-727DVD | User Manual 1 - Page 3
be turned on and off with the ignition key. If you connect the ignition wire to a power source with a constant voltage supply, as with battery wires, the battery may die. • If the console has a lid, make sure to install the unit so that the faceplate will not hit the lid when closing and - Kenwood KVT-727DVD | User Manual 1 - Page 4
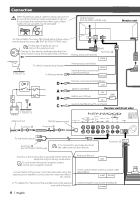
wiring, use care not to exceed the minimum cable bend radius of 30 mm. If you exceed the minimum bend limit, optical fibers within the optical cable may be damaged. 30R Optical output (KVT conversation. To connect the Kenwood navigation system, consult your navigation manual. Connect either to the - Kenwood KVT-727DVD | User Manual 1 - Page 5
I/F TO 5L I/F Accessory 2 TV ANTENNA INPUT Optical input (KVT-827DVD/727DVD only) Connection cable (Included in the Navigation system) TV UNIT Dimmer control wire (Orang/White) D Ignition wire (Red) A Ground wire (Black) - C (To car chassis) B Battery wire (Yellow) E Ground wire (Black) - - Kenwood KVT-727DVD | User Manual 1 - Page 6
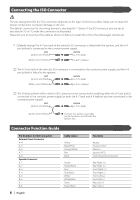
illustrated. Please be sure to reconnect the cable as shown 2 below to install this unit to the Volkswagen vehicles etc. 1 (Default setting) The A-7 Red) Battery wire (Yellow) Connect to a power source that can be turned on and off with the ignition key. Connector Function Guide Pin Numbers - Kenwood KVT-727DVD | User Manual 1 - Page 7
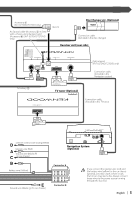
VIDEO L FM /AM ANTENNA AV INPUT 1 VIDEO L AV OUTPUT R L R-CAM V-IN R R VIDEO CENTER SUB [MONO] PRE OUTPUT REAR FRONT L L R R POWER (KVT-827DVD/727DVD) ■ Front Preout • Audio left output (White) • Audio right output (Red) ■ Rear Preout • Audio left output (White) • Audio right - Kenwood KVT-727DVD | User Manual 1 - Page 8
for AV Equipments FM /AM ANTENNA AV INPUT VIDEO L AV OUTPUT L R-CAM V-IN R R VIDEO SUB L R PRE OUTPUT REAR FRONT L L R R POWER (KVT-627DVD) ■ Front Preout • Audio left output (White) • Audio right output (Red) ■ Rear Preout • Audio left output (White) • Audio right output (Red - Kenwood KVT-727DVD | User Manual 1 - Page 9
support Screw (M4X8) (commercially available) Self-tapping screw (commercially available) Metal mounting strap (commercially available) Bend the tabs of the mounting sleeve with a screwdriver or similar utensil and attach it in place. Accessory 6 Make sure that the unit is installed securely - Kenwood KVT-727DVD | User Manual 1 - Page 10
Removing Monitor Unit ■ Removing the Hard Rubber Frame (escutcheon) 1. Engage the catch pins on the removal tool 7 and remove the two locks on the lower level. Lower the frame and pull it forward as shown in the figure. Removal Tool (Accessory 7) Catch Lock 2. When the lower level is removed, - Kenwood KVT-727DVD | User Manual 1 - Page 11
unit holder (Accessory @). Double-stick tape (included) Remote control holder @ To prevent the Remote control unit from dropping down under your foot, install it using the Remote control unit holder.If the Remote control unit drops down under driving pedals, it will interfere with your driving - Kenwood KVT-727DVD | User Manual 1 - Page 12
Accessoires 1 2 3 * 4 5 6 7 8 9 12 | Français 0 ..........1 ! ..........1 @ ..........1 1 1 ..........1 * KVT-827DVD/727DVD uniquement ..........2 ..........1 ..........1 ..........1 ..........2 ..........2 ..........4 ..........4 - Kenwood KVT-727DVD | User Manual 1 - Page 13
d'alimentation avec une alimentation de tension constante, comme avec des fils de batterie, la batterie peut mourir. • Si la console a un couvercle, assurez-vous d'installer l'unité de manière à ce que la façade ne touche pas le couvercle lors de l'ouverture et de la fermeture. • Si le fusible saute - Kenwood KVT-727DVD | User Manual 1 - Page 14
R R POWER Accessoire 5 Vers le système du subwoofer Accessoire # (KVT-827DVD/727DVD uniquement) Si aucune connexion n'est faite, ne laissez pas le soit pendant une conversation. Pour connecter le système de navigation KENWOOD, consultez le manuel du système de navigation. Connectez soit à - Kenwood KVT-727DVD | User Manual 1 - Page 15
disque) Récepteur (arrière) TO NAVIGATION I/F TO TV TUNER I/F OPTICAL IN TO MONITOR I/F TO 5L I/F Accessoire 2 TV ANTENNA INPUT Entrée optique. (KVT-827DVD/727DVD uniquement) Câble de connexion (Compris dans le système de navigation) Syntoniseur (en option) Câble de connexion (Compris dans le - Kenwood KVT-727DVD | User Manual 1 - Page 16
-vous de reconnecter le câble comme indiqué ci-dessous 2 pour installer cet appareil dans les véhicules Volkswagen, etc. 1 (Réglage par allumage (Rouge) Voiture Broche A-7 (Rouge) Câble de batterie (Jaune) Guide des connecteurs Connectez à une source d'alimentation qui peut être allumée et - Kenwood KVT-727DVD | User Manual 1 - Page 17
Connexion pour les équipements vidéo (KVT-827DVD/727DVD) AV INPUT 2 VIDEO L FM /AM ANTENNA AV INPUT 1 VIDEO L AV OUTPUT R L R-CAM V-IN R R VIDEO CENTER SUB [MONO] PRE OUTPUT REAR FRONT L L R R POWER ■ Pré- - Kenwood KVT-727DVD | User Manual 1 - Page 18
équipements vidéo FM /AM ANTENNA AV INPUT VIDEO L AV OUTPUT L R-CAM V-IN R R VIDEO SUB L R PRE OUTPUT REAR FRONT L L R R POWER (KVT-627DVD) ■ Pré-sortie avant • Sortie audio gauche (Blanc) • Sortie audio droite (Rouge) ■ Pré-sortie arrière • Sortie audio gauche (Blanc) • Sortie - Kenwood KVT-727DVD | User Manual 1 - Page 19
Installation du moniteur Tôle pare-feu ou support métallique Vis (M4X8) (disponibles dans instable, il pourrait ne pas bien fonctionner (par ex., le son pourrait sauter). Installation du récepteur 1.Fixer les attaches d'installation 0 sur les côtés de l'unité de dissimulation à l'aide de vis à tê - Kenwood KVT-727DVD | User Manual 1 - Page 20
Retrait du moniteur ■ Retrait du cadre en ébonite (écusson) 1. Engagez les loquets sur l'outil de démontage 7 et enlevez les deux crochets inférieurs. Baissez le cadre et tirez-le vers l'avant comme montré sur l'illustration. 2. Quand la partie inférieure est retirée, retirez les deux crochets supé - Kenwood KVT-727DVD | User Manual 1 - Page 21
Installation de la télécommande ■ Installez le support de télécommande (Accessoire @). Adhésif double face (compris) Support de télécommande@ Pour éviter que la télécommande ne tombe sous vos pieds, installez-la en utilisant le support de télécommande. Si la télécommande tombe sous les pédales, - Kenwood KVT-727DVD | User Manual 1 - Page 22
Zubehör 1 2 3 * 4 5 6 7 8 9 22 | Deutsch 0 ..........1 ! ..........1 @ ..........1 1 1 ..........1 * Nur beim KVT-827DVD/727DVD ..........2 ..........1 ..........1 ..........1 ..........2 ..........2 ..........4 ..........4 - Kenwood KVT-727DVD | User Manual 1 - Page 23
Installationsverfahren 1.Um einen Kurzschluss zu vermeiden, ziehen Sie bitte den Zündschlüssel und trennen Sie die --Batterie ab. 2.Schließen Sie die Ein- und Ausgangskabel der einzelnen Geräte an. 3.Schließen Sie die Lautsprecherkabel des Kabelbaums an. 4.Nehmen Sie den Anschluss B des Kabelbaums - Kenwood KVT-727DVD | User Manual 1 - Page 24
L FRONT L R R POWER Zubehör 5 Zum Subwoofer-System Zubehör # (nur beim KVT-827DVD/ 727DVD) Wenn keine Anschlüsse durchgeführt werden, lassen Sie das Kabel bitte nicht wenn das Telefon klingelt oder telefoniert wird. Um das Kenwood-Navigationssystem anzuschließen, schlagen Sie bitte in Ihrem - Kenwood KVT-727DVD | User Manual 1 - Page 25
I/F TO TV TUNER I/F OPTICAL IN TO MONITOR I/F TO 5L I/F Zubehör 2 TV ANTENNA INPUT Optischer Eingang (nur beim KVT-827DVD/727DVD) Anschlusskabel (im Lieferumfang des Navigationssystems enthalten) Fernseh-Tuner (optional) Anschlusskabel (im Lieferumfang des FernsehTuners enthalten) TO MONITOR - Kenwood KVT-727DVD | User Manual 1 - Page 26
Anschluss des ISO-Steckers Die Stiftbelegung für die ISO-Stecker hängt von dem Typ Ihres Fahrzeugs ab. Nehmen Sie unbedingt die richtigen Anschlüsse vor, um eine Beschädigung des Gerätes zu vermeiden. Der Standardanschluss für den Kabelbaum wird unten unter 1 beschrieben. Falls die ISO- - Kenwood KVT-727DVD | User Manual 1 - Page 27
AM ANTENNA AV INPUT 1 VIDEO L AV OUTPUT R L R-CAM V-IN R R VIDEO CENTER SUB [MONO] PRE OUTPUT REAR FRONT L L R R POWER (KVT-827DVD/727DVD) ■ Vorderer Vorausgang • Linker Audioausgang (weiß) • Rechter Audioausgang (rot) ■ Hinterer Vorausgang • Linker Audioausgang (weiß) • Rechter - Kenwood KVT-727DVD | User Manual 1 - Page 28
FM /AM ANTENNA AV INPUT VIDEO L AV OUTPUT L R-CAM V-IN R R VIDEO SUB L R PRE OUTPUT REAR FRONT L L R R POWER (KVT-627DVD) ■ Vorderer Vorausgang • Linker Audioausgang (weiß) • Rechter Audioausgang (rot) ■ Hinterer Vorausgang • Linker Audioausgang (weiß) • Rechter Audioausgang (rot - Kenwood KVT-727DVD | User Manual 1 - Page 29
ist. Falls das Gerät nicht stabil ist, könnte dies zu einer Fehlfunktion führen (beispielsweise könnte der Ton springen). Installation für das Receiver-Gerät 1.Die Installationshalterungen 0 mit den SemsBolzen 8 an beiden Seiten des versteckten Gerätes befestigen. Installationshalterungen (Zubeh - Kenwood KVT-727DVD | User Manual 1 - Page 30
Abnehmen des Monitor-Gerätes ■ Abnehmen des Hartgummi-Rahmens (Schließblech) 1. Die Anschlagstifte des Ausbauwerkzeugs einrasten 7 und die beiden Verriegelungen der unteren Hälfte ausbauen. Wie in der Abbildung gezeigt, den Rahmen senken und nach vorn ziehen. Ausbauwerkzeug (Zubehör 7) Anschlag - Kenwood KVT-727DVD | User Manual 1 - Page 31
Installation der Fernbedienung ■ Installieren Sie den Fernbedienungshalter (Zubehör @). Doppelseitiges Klebeband (im Lieferumfang enthalten) Fernbedienungshalter @ Installieren Sie die Fernbedienung unter Verwendung des Fernbedienungshalters, um ein Herunterfallen der - Kenwood KVT-727DVD | User Manual 1 - Page 32
Toebehoren 1 2 3 * 4 5 6 7 8 9 32 | Nederlands 0 ..........1 ! ..........1 @ ..........1 1 1 ..........2 ..........1 ..........1 ..........1 ..........2 ..........1 * Uitsluitend voor KVT-827DVD/727DVD ..........2 ..........4 ..........4 - Kenwood KVT-727DVD | User Manual 1 - Page 33
de bedradingsbundel en sluit hem op de externe spanningsconnector op uw auto aan. 6.Sluit de stekker van de bedradingsbundel op het toestel aan. 7.Installeer het toestel in uw auto. 8.Sluit de --aansluiting van de accu weer aan. 9.Druk op de terugsteltoets. 2WAARSCHUWING • Als u de ontstekingskabel - Kenwood KVT-727DVD | User Manual 1 - Page 34
-827DVD/727DVD) Monitor Een optische kabel (toebehoren 3) wordt aan een chassis bevestigd met behulp van een bedradingsbundelriem (toebehoren $). (uitsluitend voor KVT-827DVD/727DVD) Uit het oogpunt van veiligheid is het beslist noodzakelijk de kabel van de parkeersensor aan te sluiten. (Zwart - Kenwood KVT-727DVD | User Manual 1 - Page 35
) TO NAVIGATION I/F TO TV TUNER I/F OPTICAL IN TO MONITOR I/F TO 5L I/F Toebehoren 2 TV ANTENNA INPUT Optische ingang (uitsluitend voor KVT-827DVD/727DVD) Aansluitkabel (Inbegrepen bij het navigatiesysteem) TV-tuner (optioneel) Aansluitkabel (Inbegrepen bij de TV-tuner) TO MONITOR UNIT Kabel - Kenwood KVT-727DVD | User Manual 1 - Page 36
Aansluiten van de ISO-connector De penopstelling voor de ISO-connectors is afhankelijk van het type van uw auto. Voorkom beschadiging en zorg dat u de juiste aansluitingen maakt. De standaardaansluiting voor de bedradingsbundel is in stap 1 hieronder beschreven. Maak de aansluitingen zoals getoond - Kenwood KVT-727DVD | User Manual 1 - Page 37
ANTENNA AV INPUT 1 VIDEO L AV OUTPUT R L R-CAM V-IN R R VIDEO CENTER SUB [MONO] PRE OUTPUT REAR FRONT L L R R POWER (KVT-827DVD/727DVD) ■ Preout-uitgangsaansluiting voor • Audio-uitgang links (wit) • Audio-uitgang rechts (rood) ■ Preout-uitgangsaansluiting achter • Audio-uitgang - Kenwood KVT-727DVD | User Manual 1 - Page 38
FM /AM ANTENNA AV INPUT VIDEO L AV OUTPUT L R-CAM V-IN R R VIDEO SUB L R PRE OUTPUT REAR FRONT L L R R POWER (KVT-627DVD) ■ Preout-uitgangsaansluiting voor • Audio-uitgang links (wit) • Audio-uitgang rechts (rood) ■ Preout-uitgangsaansluiting achter • Audio-uitgang links (wit - Kenwood KVT-727DVD | User Manual 1 - Page 39
Installatie voor de monitor Hitteschild of metalen steun Schroef (M4 × 8) (in de handel verkrijgbaar) Zelf-tappende schroef (in de handel verkrijgbaar) Metalen bevestigingsriem (in de handel verkrijgbaar) Buig de lipjes van de bevestigingshuls met een schroevendraaier of dergelijke en bevestig op - Kenwood KVT-727DVD | User Manual 1 - Page 40
Verwijderen van de monitor ■ Verwijderen van het hardrubber frame (plaatje) 1. Gebruik de klempennen op het gereedschap voor het verwijderen 7 en verwijder de twee vergrendelingen onder. Breng het frame omlaag en trek naar voren zoals u in de afbeelding ziet. Uitbouwgereedschap (toebehoren 7) Klem - Kenwood KVT-727DVD | User Manual 1 - Page 41
Installatie van de afstandsbediening ■ Plaats de houder van de afstandsbediening (toebehoren @). Dubbelklevende tape (inbegrepen) Houder van afstandsbediening @ Plaats de afstandsbediening in de houder om te voorkomen dat de afstandsbediening valt en onder uw voeten terechtkomt. Als de - Kenwood KVT-727DVD | User Manual 1 - Page 42
Accessori 1 2 3 * 4 5 6 7 8 9 42 | Italiano 0 ..........1 ! ..........1 @ ..........1 1 1 ..........1 * Solo KVT-827DVD/727DVD ..........2 ..........4 ..........4 ..........2 ..........1 ..........1 ..........1 ..........2 - Kenwood KVT-727DVD | User Manual 1 - Page 43
Procedimento per l'installazione 1.Per evitare corto circuiti, rimuovere la chiave di accensione e scollegare la batteria -. 2.Eseguire correttamente i collegamenti dei cavi di ingresso e di uscita per ciascuna unità. 3.Collegare i cavi provenienti dagli altoparlanti al relativo cablaggio elettrico - Kenwood KVT-727DVD | User Manual 1 - Page 44
fissato con un telaio tramite un fascio di cavi (Accessorio $) (solo KVT-827DVD/ 727DVD) Ai fini della sicurezza, assicurarsi di collegare il cavo del Per informazioni sul collegamento del sistema di navigazione KENWOOD, consultare il manuale di navigazione. Collegare al terminale di controllo - Kenwood KVT-727DVD | User Manual 1 - Page 45
(parte posteriore) TO NAVIGATION I/F TO TV TUNER I/F OPTICAL IN TO MONITOR I/F TO 5L I/F Accessorio 2 TV ANTENNA INPUT Ingresso ottico (solo KVT-827DVD/727DVD) Cavo di collegamento (in dotazione con il sistema di navigazione) Sintonizzatore TV (opzionale) Cavo di collegamento (in dotazione con - Kenwood KVT-727DVD | User Manual 1 - Page 46
Collegamento del connettore ISO La disposizione dei terminali per i connettori ISO dipende dal tipo di veicolo di cui si è in possesso. Accertarsi di eseguire i collegamenti corretti per evitare danni all'unità. Il collegamento predefinito per il cablaggio è descritto al punto 1 di seguito. Se i - Kenwood KVT-727DVD | User Manual 1 - Page 47
Collegamento per l'apparecchiatura AV (KVT-827DVD/727DVD) AV INPUT 2 VIDEO L FM /AM ANTENNA AV INPUT 1 VIDEO L AV OUTPUT R L R-CAM V-IN R R VIDEO CENTER SUB [MONO] PRE OUTPUT REAR FRONT L L R R POWER ■ Preuscita - Kenwood KVT-727DVD | User Manual 1 - Page 48
FM /AM ANTENNA AV INPUT VIDEO L AV OUTPUT L R-CAM V-IN R R VIDEO SUB L R PRE OUTPUT REAR FRONT L L R R POWER (KVT-627DVD) ■ Preuscita anteriore • Uscita sinistra audio (bianco) • Uscita destra audio (rosso) ■ Preuscita posteriore • Uscita sinistra audio (bianco) • Uscita destra - Kenwood KVT-727DVD | User Manual 1 - Page 49
Installazione per l'unità monitor Parete antincendio o supporto metallico Vite (M4 × 8) (disponibile in commercio) Piegare le linguette della flangia di montaggio con un cacciavite o un utensile simile e fissarle in posizione. Vite autofilettante Fascetta di montaggio Accessorio 6 (disponibile - Kenwood KVT-727DVD | User Manual 1 - Page 50
Rimozione dell'unità monitor ■ Rimozione della struttura in gomma dura (escutcheon) 1. Agganciare le sporgenze sull'attrezzo di rimozione 7 e sbloccare i due fermi sul lato inferiore. Abbassare il telaio e tirarlo in avanti come mostrato nell'illustrazione. Strumento di rimozione (Accessorio 7) - Kenwood KVT-727DVD | User Manual 1 - Page 51
Installazione dell'unità telecomando ■ Installare il supporto del telecomando (Accessorio @). Nastro a doppia aderenza (in dotazione) Supporto del telecomando @ Per evitare che il telecomando cada sotto i piedi, installarlo utilizzando l'apposito supporto. Se il telecomando cade sotto i pedali, - Kenwood KVT-727DVD | User Manual 1 - Page 52
Accesorios 1 2 3 * 4 5 6 7 8 9 52 | Español 0 ..........1 ! ..........1 @ ..........1 1 1 ..........1 * Sólo para KVT-827DVD/727DVD ..........2 ..........1 ..........1 ..........1 ..........2 ..........2 ..........4 ..........4 - Kenwood KVT-727DVD | User Manual 1 - Page 53
5.Tome el conector A del cableado preformado y conéctelo al conector de altavoz de su vehículo. 6.Conecte el mazo de cables a la unidad. 7.Instale la unidad en el automóvil. 8.Conecte nuevamente la batería -. 9.Haga una reposición del sistema (reset). 2ADVERTENCIA • Si conecta el cable de encendido - Kenwood KVT-727DVD | User Manual 1 - Page 54
L R R POWER Accesorio 5 Al sistema del subwoofer Acessório # (sólo para KVT-827DVD/ 727DVD) Si no se efectúan las conexiones, no deje que el cable la conversación. Para conectar el sistema de navegación KENWOOD, consulte el manual de navegación.. Cable de silenciador (marrón) MUTE Conecte - Kenwood KVT-727DVD | User Manual 1 - Page 55
(lado trasero) TO NAVIGATION I/F TO TV TUNER I/F OPTICAL IN TO MONITOR I/F TO 5L I/F Accesorio 2 TV ANTENNA INPUT Entrada óptica (sólo para KVT-827DVD/727DVD) Cable de conexión (Incluido en el sistema de navegación) Sintonizador de TV (optativo) Cable de conexión (Incluido con el sintonizador - Kenwood KVT-727DVD | User Manual 1 - Page 56
Conexión del conector ISO La disposición de las patillas de los conectores ISO depende del tipo de vehículo. Asegúrese de efectuar las conexiones de manera apropiada para evitar que se dañe la unidad. El ajuste de fábrica para la conexión del mazo de cableado se describe más abajo en 1. Si las - Kenwood KVT-727DVD | User Manual 1 - Page 57
FM /AM ANTENNA AV INPUT 1 VIDEO L AV OUTPUT R L R-CAM V-IN R R VIDEO CENTER SUB [MONO] PRE OUTPUT REAR FRONT L L R R POWER (KVT-827DVD/727DVD) ■ Salida de preamplificador delantera • Salida izquierda de audio (blanca) • Salida derecha de audio (roja) ■ Salida de preamplificador - Kenwood KVT-727DVD | User Manual 1 - Page 58
AV FM /AM ANTENNA AV INPUT VIDEO L AV OUTPUT L R-CAM V-IN R R VIDEO SUB L R PRE OUTPUT REAR FRONT L L R R POWER (KVT-627DVD) ■ Salida de preamplificador delantera • Salida izquierda de audio (blanca) • Salida derecha de audio (roja) ■ Salida de preamplificador trasera • Salida - Kenwood KVT-727DVD | User Manual 1 - Page 59
una posición inestable, es posible que no funcione correctamente (por ejemplo, el sonido puede interrumpirse). Instalación para la unidad receptora 1.Instale los soportes de instalación 0 a los lados de la unidad escondida utilizando los pernos 8. Pernos sems (M4 × 8 mm) (Accesorio 8) Soportes de - Kenwood KVT-727DVD | User Manual 1 - Page 60
Extracción del monitor ■ Extracción del marco duro de goma (eserina) 1. Enganche la uña de la herramienta de extracción 7 y libere los cierres provistos en dos lugares de la parte inferior. Tal como se muestra en la figura, baje el marco y extráigalo hacia adelante. Herramienta de extracción ( - Kenwood KVT-727DVD | User Manual 1 - Page 61
Instalación de la unidad de mando a distancia ■ Instale el soporte del mando a distancia (accesorio @). Cinta adhesiva por los dos lados (suministrada) Soporte de lmando a distancia @ Para impedir que el mando a distancia caiga bajo - Kenwood KVT-727DVD | User Manual 1 - Page 62
Acessórios 1 2 3 * 4 5 6 7 8 9 62 | Português 0 ..........1 ! ..........1 @ ..........1 1 1 ..........1 * Apenas KVT-827DVD/727DVD ..........2 ..........4 ..........4 ..........2 ..........1 ..........1 ..........1 ..........2 - Kenwood KVT-727DVD | User Manual 1 - Page 63
do seu veículo. 5.Ligue o conector A da cablagem ao conector de energia externa do seu veículo. 6.Ligue o conector da cablagem à unidade. 7.Instale o aparelho no seu carro. 8.Torne a ligar o polo - da bateria. 9.Pressione o botão de reiniciar. 2ADVERTÊNCIA • Se ligar o cabo de ignição (vermelho - Kenwood KVT-727DVD | User Manual 1 - Page 64
R POWER Acessório 5 Para o sistema de subwoofer Acessório # (Apenas KVT-827DVD/ 727DVD) Se não tiver sido feita nenhuma conexão, não deixe o cabo fora a comunicação. Para ligar o sistema de navegação KENWOOD, consulte o seu manual de navegação. Fio de emudecimento (castanho) MUTE Ligue - Kenwood KVT-727DVD | User Manual 1 - Page 65
receptora (lado de trás) TO NAVIGATION I/F TO TV TUNER I/F OPTICAL IN TO MONITOR I/F TO 5L I/F Acessório 2 TV ANTENNA INPUT Entrada óptica (Apenas KVT-827DVD/727DVD) Cabo de ligação (Incluído no sistema de navegação) Sintonizador TV (opcional) Cabo de ligação (Incluído no sintonizador TV) TO - Kenwood KVT-727DVD | User Manual 1 - Page 66
Conexão do conector ISO A disposição dos pinos nos conectores ISO depende do tipo do veículo. Certifique-se que fez as conexões correctamente para evitar danos ao aparelho. A conexão pré-definida da cablagem está descrita em 1 abaixo. Se os pinos do conector ISO forem definidos tal como está - Kenwood KVT-727DVD | User Manual 1 - Page 67
VIDEO L FM /AM ANTENNA AV INPUT 1 VIDEO L AV OUTPUT R L R-CAM V-IN R R VIDEO CENTER SUB [MONO] PRE OUTPUT REAR FRONT L L R R POWER (KVT-827DVD/727DVD) ■ Preout dianteiro • Saída esquerda áudio (branco) • Saída direita áudio (vermelho) ■ Preout traseiro • Saída esquerda áudio - Kenwood KVT-727DVD | User Manual 1 - Page 68
a equipamentos AV FM /AM ANTENNA AV INPUT VIDEO L AV OUTPUT L R-CAM V-IN R R VIDEO SUB L R PRE OUTPUT REAR FRONT L L R R POWER (KVT-627DVD) ■ Preout dianteiro • Saída esquerda áudio (branco) • Saída direita áudio (vermelho) ■ Preout traseiro • Saída esquerda áudio (branco) • Sa - Kenwood KVT-727DVD | User Manual 1 - Page 69
Instalação para unidade monitora Anteparo à prova de fogo ou suporte de metal Parafuso (M4X8) (disponível no comércio) Vergue as linguetas da gaveta para montagem com uma chave de fenda ou ferramenta similar e prenda-a no lugar. Parafuso auto-roscante (disponível no comércio) Braçadeira de - Kenwood KVT-727DVD | User Manual 1 - Page 70
Remover a unidade monitora ■ Remover a armação de borracha dura (emblema) 1. Prenda os pinos da alheta na ferramenta de remoção 7 e retire as duas trancas de baixo. Baixe a armação e puxe-a para frente como na ilustração. Ferramenta de remoção (acessório 7) Lingueta Tranca 2. Depois do nível - Kenwood KVT-727DVD | User Manual 1 - Page 71
Fita adesiva de duas faces (incluída) Suporte de controlo remoto @ Para evitar que a unidade de controlo remoto caia para baixo dos seus pés, instale-a usando o suporte da unidade de controlo remoto. Caso a unidade de controlo remoto caia para baixo dos pedais de condução, interferirá com a condu - Kenwood KVT-727DVD | User Manual 1 - Page 72
-
 1
1 -
 2
2 -
 3
3 -
 4
4 -
 5
5 -
 6
6 -
 7
7 -
8
-
9
-
10
-
11
-
12
-
13
-
14
-
15
-
16
-
17
-
18
-
19
-
20
-
21
-
22
-
23
-
24
-
25
-
26
-
27
-
28
-
29
-
30
-
31
-
32
-
33
-
34
-
35
-
36
-
37
-
38
-
39
-
40
-
41
-
42
-
43
-
44
-
45
-
46
-
47
-
48
-
49
-
50
-
51
-
52
-
53
-
54
-
55
-
56
-
57
-
58
-
59
-
60
-
61
-
62
-
63
-
64
-
65
-
66
-
67
-
68
-
69
-
70
-
71
-
72
 |
 |

©
B54-4465-00/00 (EV/E2V)
KVT-827DVD
KVT-727DVD
KVT-627DVD
MONITOR WITH DVD RECEIVER
INSTALLATION MANUAL
MONITEUR AVEC REPTEUR DVD
MANUEL D'INSTALLATION
MONITOR MIT DVD RECEIVER
INSTALLATION-HANDBUCH
MONITOR MET DVD-ONTVANGER
INSTALLATIE HANDLEIDING
MONITOR CON RICEVITORE DVD
MANUALE DI INSTALLAZIONE
MONITOR CON RECEPTOR DVD
MANUAL DE INSTALACION
MONITOR COM RECEPTOR DVD
MANUAL DE INSTALAÇAO