Kenwood LZH-70W Installation Manual - Page 4
Installation procedure - monitor
 |
View all Kenwood LZH-70W manuals
Add to My Manuals
Save this manual to your list of manuals |
Page 4 highlights
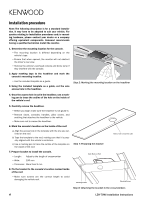
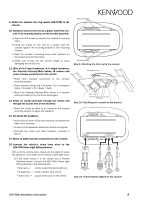
Installation procedure Note: The following description is for a standard installation. It may have to be adapted to suit your vehicle. For queries relating to installation procedures and/or mounting hardware, please contact your dealer or a company offering equivalent components. Kenwood recommends having a qualified technician install the monitor. 1. Determine the mounting location for the console. • The mounting location is differed depending on the vehicle's type. • Ensure that when opened, the monitor will not obstruct the driver's rear view. • Remove the vehicle's overhead console and dome lamp if they interfere with the console. 2. Apply masking tape to the headliner and mark the console's mounting location. • Use the included template as a guide. 3. Using the included template as a guide, cut the wire access hole in the headliner. Step 2: Marking the mounting location on the headliner 4. Once the access hole is cut in the headliner, use a marking pen to trace the outline of the hole on the inside of the vehicle's roof. 5. Carefully remove the headliner. • Before you begin make sure the headliner is not glued-in. • Remove visors, consoles, handles, pillar covers, and anything that attaches the headliner to the vehicle. • Make sure not to crease the headliner. 6. Mark the console's location on the inside of the roof: a) Align the access hole in the template with the one you outlined on the roof. b) Tape the template to the roof, making sure that it is properly aligned with the vehicle's centerline. c) Use a marking pen to trace the outline of the template on the inside of the roof. 7. Prepare bracket to install the console. • Length: Adjust to the length of crossmember • Wide: 190 mm • Thickness: More than 9 mm 8. Fix the bracket to the console's location marked inside of the roof. • Make sure screws are the correct length to avoid damaging the vehicle roof. Step 7: Preparing the bracket Guide Marks on Roof Mounting Screws Make a hole to install the cable Mounting Screws Step 8: Attaching the bracket to the crossmembers 4 LZH-70W Installation Instructions
-
 1
1 -
 2
2 -
 3
3 -
 4
4 -
 5
5 -
 6
6 -
 7
7 -
 8
8 -
 9
9 -
 10
10 -
11
-
12
-
13
-
14
-
15
-
16
-
17
-
18
-
19
-
20
-
21
-
22
-
23
-
24
-
25
-
26
-
27
-
28
-
29
-
30
-
31
-
32
-
33
-
34
-
35
-
36
-
37
-
38
-
39
-
40
-
41
-
42
-
43
-
44
 |
 |
