KitchenAid KBFN402EPA Installation Guide - Page 5
Installation Requirements - kbfn502epa
 |
View all KitchenAid KBFN402EPA manuals
Add to My Manuals
Save this manual to your list of manuals |
Page 5 highlights
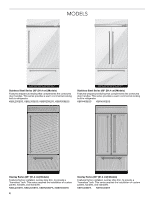
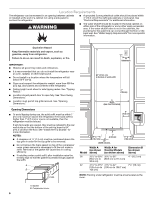
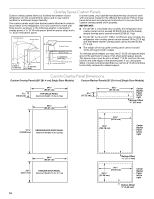
Stainless Steel Series (42" [106.7 cm] Models) Overlay Series (42" [106.7 cm] Models) Features wraparound styling that complements the contoured door Features factory-installed, overlay style trim, to provide a handles. This series provides a warm commercial-looking built-in "frameless" look. This series requires the installation of custom refrigerator. panels, handles, and standoffs. KBFN402ESS, KBFN502ESS KBFN402EPA, KBFN502EPA INSTALLATION REQUIREMENTS Tools and Parts IMPORTANT: ■ Installer: Leave Installation Instructions with the homeowner. Parts Needed ■ #8 x 3" (7.6 cm) wood screws (longer screws may be needed) (6) ■ Homeowner: Keep Installation Instructions for future reference. Save these Installation Instructions for the local electrical inspector's use. Tools Needed Gather the required tools and parts before starting installation. Read and follow the instructions provided with any tools listed here. ■ Cordless drill ■ Torx®† T15 and T27 screwdrivers ■ Drill bits nut driver ■ Adjustable wrenches (2) and ¹⁄₂" open-end wrenches ■ 2" x 4" x 32" (5 cm x 10 cm x 81 cm) wood board(s) (1 or 2) ■ Order factory panels, make custom panels or consult a qualified cabinetmaker or carpenter to make the panels. Overlay Series: Make custom panels, or consult a qualified cabinetmaker or carpenter to make the panels. See "Installation Requirements" for more information. Architect® Series is shipped complete. ■ If you are connecting the water line directly to copper tubing and not to a shutoff valve, you need a ferrule, a union, and a ¹⁄₄" compression fitting. ■ Phillips screwdriver hex key ■ Small level and socket drivers ■ Appliance dolly ■ Tape measure ■ Utility knife †®TORX is a registered trademark of Saturn Fasteners, Inc. 5
-
 1
1 -
 2
2 -
 3
3 -
 4
4 -
 5
5 -
 6
6 -
 7
7 -
 8
8 -
 9
9 -
 10
10 -
 11
11 -
12
-
13
-
14
-
15
-
16
-
17
-
18
-
19
-
20
-
21
-
22
-
23
-
24
-
25
-
26
-
27
-
28
-
29
-
30
-
31
-
32
-
33
-
34
-
35
-
36
-
37
-
38
-
39
-
40
-
41
-
42
-
43
-
44
-
45
-
46
-
47
-
48
-
49
-
50
-
51
-
52
-
53
-
54
-
55
-
56
-
57
-
58
-
59
-
60
-
61
-
62
-
63
-
64
-
65
-
66
-
67
-
68
-
69
-
70
-
71
-
72
 |
 |
