KitchenAid KBFN506EBS Owners Manual - Page 9
Water Filter Indicator on some models, Changing the Water Filter, Using the Ice Maker Without
 |
View all KitchenAid KBFN506EBS manuals
Add to My Manuals
Save this manual to your list of manuals |
Page 9 highlights
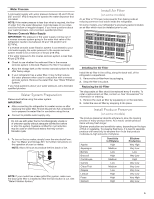
Water Filter Indicator (on some models) The water filter indicator, located on the control panel, will help you know when to change the water filter. A replacement water filter should be ordered when "Order Filter" is displayed. It is recommended that you replace the filter when "Replace Filter" is displayed or when water flow to your water dispenser and/or ice maker decreases noticeably. See "Changing the Water Filter" later in this section. After changing the water filter, press and hold FILTER RESET for 3 seconds until the "Order Filter" or "Replace Filter" indicator light disappears. Changing the Water Filter The water filter is located in the base grille below the freezer compartment door. It is not necessary to remove the base grille to remove the filter. 1. Remove the filter by pressing the eject button and pulling straight out on the filter cap. NOTES: ■■ Avoid twisting the cap when removing the filter because this could cause the cap to come off. If this occurs, replace the cap and pull the filter straight out. ■■ There will be water in the filter. Some spilling may occur. A B A. Eject button B. Filter cap 2. Remove the cap by turning it counterclockwise until it stops. IMPORTANT: Do not discard the cap. It is part of your refrigerator. Keep the cap to use with the replacement filter. 3. Align the ridge on the cap with the arrow on the new filter, and then turn the cap until it snaps into place. A B 5. Place the cap (removed in Step 2) on the new filter. Align the ridge on the cap with the arrow on the filter. Turn the cap clockwise until it snaps into place. B C A A. Eject button B. Arrow on filter C. Ridge on cap 6. Push the new filter into the opening in the base grille. As the filter is inserted, the eject button will depress. The eject button will pop back out when the filter is fully engaged. 7. Pull gently on the cap to check that the filter is securely in place. 8. Flush the water system. Depending on your model, see "Water and Ice Dispensers" or "Ice Maker and Storage Bin." Using the Ice Maker Without a Water Filter You can operate the ice maker without a water filter. Your ice will not be filtered. 1. Remove the filter by pressing the eject button and pulling on the cap. See "Changing the Water Filter" earlier in this section. 2. Remove the cap by turning it counterclockwise until it stops. IMPORTANT: Do not discard the cap. It is part of your refrigerator. 3. With the cap in a horizontal position, insert the cap into the base grille until it stops. A. Cover B. O-rings 4. Remove the covers from the O-rings. Be sure the O-rings are still in place after the covers are removed. 4. Turn the cap counterclockwise until the cap slips into the attachment slot. Then, turn the cap clockwise until it is in a horizontal position. NOTE: The cap will not be even with the base grille. 9
-
 1
1 -
2
-
3
-
 4
4 -
 5
5 -
 6
6 -
 7
7 -
 8
8 -
 9
9 -
 10
10 -
 11
11 -
 12
12 -
 13
13 -
 14
14 -
15
-
16
-
17
-
18
-
19
-
20
-
21
-
22
-
23
-
24
-
25
-
26
-
27
-
28
-
29
-
30
-
31
-
32
-
33
-
34
-
35
-
36
-
37
-
38
-
39
-
40
-
41
-
42
-
43
-
44
-
45
-
46
-
47
-
48
-
49
-
50
-
51
-
52
-
53
-
54
 |
 |
