KitchenAid KBFS25EWMS Use & Care Guide - Page 8
Refrigerator Use
 |
UPC - 883049190938
View all KitchenAid KBFS25EWMS manuals
Add to My Manuals
Save this manual to your list of manuals |
Page 8 highlights
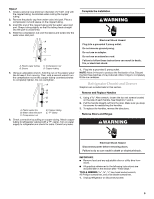
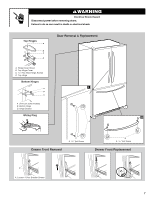
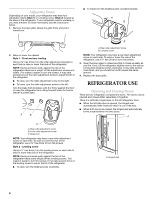
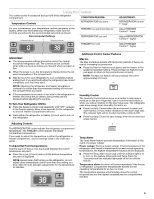
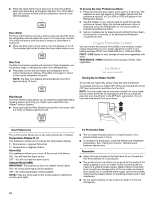
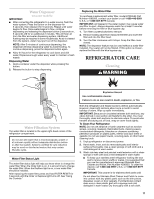
Adjust the Doors Depending on your model, your refrigerator may have four adjustable rollers (Style 1) or a leveling screw (Style 2) located at the base of the refrigerator. If your refrigerator seems unsteady or you want the door to close more easily, use the instructions below. 1. Remove the base grille. Grasp the grille firmly and pull it toward you. ■ To lower, turn the leveling screw counterclockwise. A B 2. Raise or lower the cabinet. Style 1 - Front and rear leveling Using a ³⁄₈" hex driver, turn the roller adjustment screw(s) on each side to raise or lower that side of the refrigerator. NOTE: Having someone push against the top of the refrigerator takes some weight off the adjustment screws and rollers. This makes it easier to turn the screws. It may take several turns of the roller adjustment screw to adjust the tilt of the refrigerator. ■ To raise, turn the roller adjustment screw to the right. ■ To lower, turn the roller adjustment screw to the left. Turn the brake foot clockwise until it is firmly against the floor to keep the refrigerator from rolling forward when the freezer drawer is pulled open. A B A. Rear roller adjustment screw B. Leveling screw NOTE: Your refrigerator may have a rear roller adjustment screw on each side. To raise or lower the rear of the refrigerator, use a ³⁄₈" hex driver to turn the screws. 3. Open the door again to make sure that it closes as easily as you like. If not, tilt the refrigerator slightly more to the rear by turning both leveling screws clockwise. It may take several more turns, and you should turn both screws the same amount. 4. Replace the base grille. REFRIGERATOR USE Opening and Closing Doors There are two refrigerator compartment doors. The doors can be opened and closed either separately or together. There is a vertically-hinged seal on the left refrigerator door. ■ When the left side door is opened, the hinged seal automatically folds inward so that it is out of the way. ■ When both doors are closed, the hinged seal automatically forms a seal between the two doors. A C A. Rear roller adjustment screw B. Front roller adjustment screw C. Brake foot NOTE: Your refrigerator may have a rear roller adjustment screw on each side. To raise or lower the rear of the refrigerator, use a ³⁄₈" hex driver to turn the screws. Style 2 - Leveling screw Using a ¹⁄₄" hex driver, turn the leveling screw on each side to raise or lower that side of the refrigerator. NOTE: Having someone push against the top of the refrigerator takes some weight off the leveling screws. This makes it easier to turn the screws. It may take several turns of the leveling screw to adjust the tilt of the refrigerator. ■ To raise, turn the leveling screw clockwise. A. Hinged seal 8
-
 1
1 -
2
-
 3
3 -
 4
4 -
 5
5 -
 6
6 -
 7
7 -
 8
8 -
 9
9 -
 10
10 -
 11
11 -
 12
12 -
 13
13 -
14
-
15
-
16
-
17
-
18
-
19
-
20
-
21
-
22
-
23
-
24
-
25
-
26
-
27
-
28
-
29
-
30
-
31
-
32
-
33
-
34
-
35
-
36
-
37
-
38
-
39
-
40
-
41
-
42
-
43
-
44
-
45
-
46
-
47
-
48
-
49
-
50
-
51
-
52
-
53
 |
 |
