KitchenAid KESS908SPB Installation Guide - Page 9
Electrical Connection - U.S.A. Only
 |
UPC - 883049027098
View all KitchenAid KESS908SPB manuals
Add to My Manuals
Save this manual to your list of manuals |
Page 9 highlights
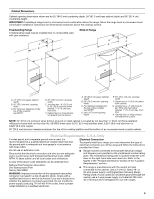
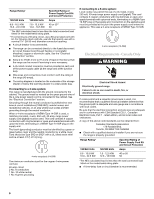
6. Align anti-tip bracket holes with holes in floor. Fasten anti-tip bracket with screws provided. 7. Move range close enough to opening to allow for electrical connections to be made. Remove cardboard or hardboard from under range. 8. Make electrical connections as described in the "Electrical Connection" section. 9. Move range into its final location, making sure rear leveling leg slides into anti-tip bracket. Depending on the thickness of your flooring, longer screws may be necessary to anchor the bracket to the subfloor. Longer screws are available from your local hardware store. 10. Continue installing your range using the following installation instructions. Power Supply Cord Electrical Connection - U.S.A. Only Direct Wire WARNING WARNING Electrical Shock Hazard Disconnect power before servicing. Use a new 40 amp power supply cord. Plug into a grounded outlet. Failure to follow these instructions can result in death, fire, or electrical shock. Electrical Shock Hazard Disconnect power before servicing. Use 8 gauge copper or 6 gauge aluminum wire. Electrically ground range. Failure to follow these instructions can result in death, fire, or electrical shock. 1. Disconnect power. 2. Remove the terminal block cover screws located on the back of the range. Pull cover down and toward you to remove cover. 3. Remove plastic tag holding three 10-32 hex nuts from the middle post of the terminal block. A B A. Hold-down screws B. Terminal block cover 4. Add strain relief. Style 1: Power supply cord strain relief ■ Remove the knockout at the bottom of the terminal box for the 40-amp supply cord. 9
-
 1
1 -
2
-
3
-
 4
4 -
 5
5 -
 6
6 -
 7
7 -
 8
8 -
 9
9 -
 10
10 -
 11
11 -
 12
12 -
 13
13 -
 14
14 -
15
-
16
-
17
-
18
-
19
-
20
-
21
-
22
-
23
-
24
 |
 |
