KitchenAid KFP1133CU Owners Manual - Page 12
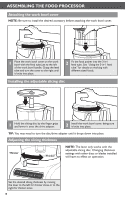
Installing the mini-bowl and mini-blade
 |
View all KitchenAid KFP1133CU manuals
Add to My Manuals
Save this manual to your list of manuals |
Page 12 highlights
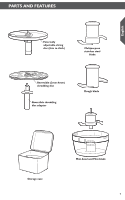
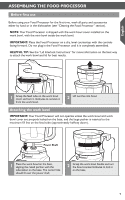
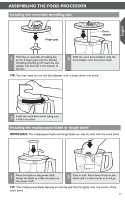
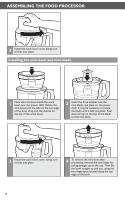
CAMSSDEM+BSLHINIFGT TCHLIECFKOTOODCPHRAONCGESESCOORPY 3 Install the work bowl cover, being sure it locks into place. Installing the mini-bowl and mini-blade 1 Place the mini-bowl inside the work bowl over the power shaft. Rotate the mini-bowl until the tabs on the top edge of the bowl drop into the indents on the top of the work bowl. 2 Insert the drive adapter into the mini-blade, and place on the power shaft. It may be necessary to rotate the blade until it falls into place. Push down firmly on the top of the blade to lock into place. 3 Install the work bowl cover, being sure it locks into place. 4 To remove the mini-bowl after processing, remove the mini-blade by pulling straight up on the cap. Then lift the bowl straight up and out, using the two finger grips located along the top edge of the bowl. 12
-
 1
1 -
2
-
3
-
4
-
5
-
6
-
 7
7 -
 8
8 -
 9
9 -
 10
10 -
 11
11 -
 12
12 -
 13
13 -
 14
14 -
 15
15 -
 16
16 -
 17
17 -
18
-
19
-
20
-
21
-
22
-
23
-
24
-
25
-
26
-
27
-
28
-
29
-
30
-
31
-
32
-
33
-
34
-
35
-
36
-
37
-
38
-
39
-
40
-
41
-
42
-
43
-
44
-
45
-
46
-
47
-
48
-
49
-
50
-
51
-
52
-
53
-
54
-
55
-
56
-
57
-
58
-
59
-
60
-
61
-
62
-
63
-
64
-
65
-
66
-
67
-
68
 |
 |
