KitchenAid KGRS205TBT User Instructions - Page 11
Dimensions for Routing Handle Side of Raised Door
 |
View all KitchenAid KGRS205TBT manuals
Add to My Manuals
Save this manual to your list of manuals |
Page 11 highlights
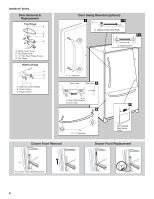
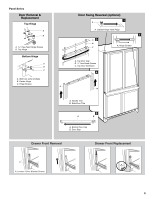
Remove the Door Panel IMPORTANT: ■ Door must be removed from refrigerator before removing handle. ■ Top trim must be removed from refrigerator before removing door panel. 1. Remove the refrigerator handle: ■ Using a Phillips screwdriver, remove the top door cap. ■ Tap the bottom edge of refrigerator door handle upward with a rubber mallet. ■ The handle will slide up approximately ³⁄₄" (19.05 mm) and release from door. 2. Remove the door panel: ■ Slide out decorator panel and filler board. ■ Store panel and filler board in such a manner as to avoid scratching. Replace the Door Panel 1. Replace the refrigerator door panel: ■ Slowly slide the ¹⁄₄" (6.35 mm), maximum thickness, decorator panel in grooves provided by bottom door cap and side trim. ■ Slide the filler board into place behind the decorator panel, if necessary. 2. Attach the handle and trim. 3. Reinstall the refrigerator door. Remove and Replace Freezer Drawer Panel NOTE: You do not need to remove the freezer drawer to remove or replace the decorator panel. 1. Pull the freezer drawer out to access the handle screws. 2. Using a Phillips screwdriver, remove the handle screws and lift off the handle. 3. Slide the decorator panel and filler board up through handle opening. 4. Replace the decorator panels by reversing directions. Care of Decorator Panels 1. Clean panels with stainless steel cleaner and polish or mild soap and water with a clean, soft, damp cloth. 2. Rinse panels thoroughly and blot dry using a dry, soft cloth or chamois. NOTE: Do not use paper towels or cleaners which contain solvents such as ammonia. They can damage the surface of the panels. Install Custom Wood Panels If you plan to install custom wood decorator panels, you will need to create the panels yourself or consult your cabinetmaker or carpenter. See dimensional drawings for wood panel inserts. Flat Panels: You can create a custom flat panel a maximum of ¹⁄₄" (6.35 mm) thick to replace your decorator panels. Flat wood panels less than ¹⁄₄" (6.35 mm) thick are not recommended. Raised Panels: A raised panel design can be created by screwing or gluing wood panels to ¹⁄₄" (6.35 mm) backing or by using ³⁄₄" (19.05 mm) stock with routed edges. Allow 2¹⁄₂" (6.35 cm) minimum clearance between raised edge of panel and handle. Weight requirements for raised panel inserts: ■ Refrigerator door panel should not exceed 30 lbs (14 kg). ■ Freezer drawer panels should not exceed 15 lbs (7 kg) combined weight. Dimensions for Custom Wood Panels 20 cu. ft. Refrigerator door 355/8" (90.5 cm) 42" (106.7 cm) 361/16" (91.6 cm) 231/4" (59.1 cm) Dimensions for Routing Handle Side of Raised Door Panels (End View) ¹⁄₄" (6 mm) max. 2¹⁄₂" (6.35 cm) A min. B A. Handle B. Door panel 11
-
 1
1 -
2
-
3
-
4
-
5
-
 6
6 -
 7
7 -
 8
8 -
 9
9 -
 10
10 -
 11
11 -
 12
12 -
 13
13 -
 14
14 -
 15
15 -
 16
16 -
17
-
18
-
19
-
20
-
21
-
22
-
23
-
24
-
25
-
26
-
27
-
28
-
29
-
30
-
31
-
32
-
33
-
34
-
35
-
36
-
37
-
38
-
39
-
40
-
41
-
42
-
43
-
44
-
45
-
46
-
47
-
48
 |
 |
