KitchenAid KGRS807SBL Use and Care Guide - Page 23
Oven Lights, Oven Door, Storage Drawer, Warming Drawer
 |
UPC - 883049027371
View all KitchenAid KGRS807SBL manuals
Add to My Manuals
Save this manual to your list of manuals |
Page 23 highlights
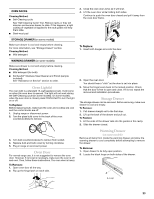
OVEN RACKS Cleaning Method: ■ Self-Cleaning cycle: See "Self-Cleaning Cycle" first. Remove racks or they will discolor and become harder to slide. If this happens, a light coating of vegetable oil applied to the rack guides will help them slide. ■ Steel-wool pad 3. Close the oven door as far as it will shut. 4. Lift the oven door while holding both sides. Continue to push the oven door closed and pull it away from the oven door frame. STORAGE DRAWER (on some models) Make sure drawer is cool and empty before cleaning. For more information, see "Storage Drawer" section. Cleaning Method: ■ Mild detergent To Replace: 1. Insert both hanger arms into the door. WARMING DRAWER (on some models) Make sure drawer is cool and empty before cleaning. Cleaning Method: ■ Mild detergent (for both) ■ KitchenAid® Stainless Steel Cleaner and Polish (sample included): See "Assistance or Service" section to order. Oven Light(s) The oven light is a standard 15-watt appliance bulb. It will come on when the oven door is opened. The light will not work during the Self-Cleaning cycle (on some models). On some models, when the oven door is closed, press OVEN LIGHT to turn the light on or off. To Replace: Before replacing bulb, make sure the oven and cooktop are cool and the control knobs are off. 1. Unplug range or disconnect power. 2. Turn the glass bulb cover in the back of the oven counterclockwise to remove. 2. Open the oven door. You should hear a "click" as the door is set into place. 3. Move the hinge levers back to the locked position. Check that the door is free to open and close. If it is not, repeat the removal and installation procedures. Storage Drawer The storage drawer can be removed. Before removing, make sure drawer is cool and empty. To Remove: 1. Pull drawer straight out to the first stop. 2. Lift up the back of the drawer and pull out. To Replace: 1. Fit the ends of the drawer rails into the guides in the cavity. 2. Slide the drawer closed. 3. Turn bulb counterclockwise to remove from socket. 4. Replace bulb and bulb cover by turning clockwise. 5. Plug in range or reconnect power. Oven Door For normal range use, it is not suggested to remove the oven door. However, if removal is necessary, make sure the oven is off and cool. Then, follow these instructions. The oven door is heavy. To Remove: 1. Open oven door all the way. 2. Flip up the hinge latch on each side. Warming Drawer (on some models) Remove all items from inside the warming drawer, and allow the warming drawer to cool completely before attempting to remove the drawer. To Remove: 1. Open drawer to its fully open position. 2. Locate the black loops on both sides of the drawer. A A. Loop 23
-
 1
1 -
2
-
3
-
4
-
5
-
6
-
7
-
8
-
9
-
10
-
11
-
12
-
13
-
14
-
15
-
16
-
17
-
 18
18 -
 19
19 -
 20
20 -
 21
21 -
 22
22 -
 23
23 -
 24
24 -
 25
25 -
 26
26 -
 27
27 -
 28
28 -
29
-
30
-
31
-
32
-
33
-
34
-
35
-
36
-
37
-
38
-
39
-
40
-
41
-
42
-
43
-
44
-
45
-
46
-
47
-
48
-
49
-
50
-
51
-
52
-
53
-
54
-
55
-
56
 |
 |
