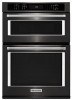
KitchenAid KOCE507EBS Instruction Sheet - Page 1
KitchenAid KOCE507EBS Manual
 |
View all KitchenAid KOCE507EBS manuals
Add to My Manuals
Save this manual to your list of manuals |
Page 1 highlights
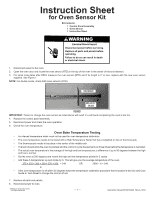
Instruction Sheet for Oven Sensor Kit Kit Contents: 1 Control Panel Assembly 1 Oven Sensor 1 Instruction Sheet WARNING Electrical Shock Hazard Disconnect power before servicing. Replace all parts and panels before operating. Failure to do so can result in death or electrical shock. 1. Disconnect power to the oven. 2. Open the oven door and locate the oven sensor (RTD) in the top of the oven in the center of the broil element. 3. For serial code dates after D549, measure the oven sensor (RTD) and if its length is 2" or less, replace with the new oven sensor supplied. See Figure 1. NOTE: For double ovens, check both oven sensors (RTD). oven sensor replace if 2" or less figure 1 IMPORTANT: Failure to change the oven sensor as noted above will result in a call back complaining the oven is too hot. 4. Replace the control panel assembly. 5. Reconnect power and check the oven operation. 6. Check the oven temperature. Oven Bake Temperature Testing • An inferred temperature tester must not be used for oven temperature calibration. • The oven temperature needs to be tested with a High Temperature Tester that has a weighted or clip-on thermocouple. • The thermocouple needs to be place in the center of the middle rack. • The tech should allow the oven to preheat and the control to cycle the elements on three times before the temperature is recorded. • The actual oven temperature is the average of the high and low temperatures; a difference of up to 50 degrees between the high and low is normal. • Set the oven at 350 degrees and record the high and low temperature points for 3 cycles. • Add these 6 temperatures up and divide by 6. This will give you the average temperature of the oven. 375 + 325 + 360 + 330 + 370 + 330 = 348 OR 2090 ÷ 6 = 348 6 • If the oven temperature is off within 35 degrees follow the temperature calibration procedure that is located in the Use and Care Guide or Tech Sheet to change the control off set. 7. Replace all parts and panels. 8. Reconnect power to oven. © Whirlpool Corporation 2016 (All Rights Reserved) - 1 - Instruction Sheet W10915233 Rev A 8/16
-
 1
1 -
 2
2
 |
 |
