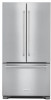
KitchenAid KRFC302ESS Owners Manual - Page 23
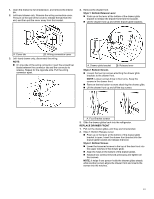
Style 1: Bottom Release Lever, Style 2: Bottom Screws, REPLACE DRAWER FRONT, A. Four Bracket screws
 |
View all KitchenAid KRFC302ESS manuals
Add to My Manuals
Save this manual to your list of manuals |
Page 23 highlights
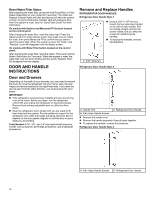
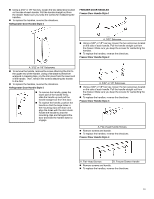
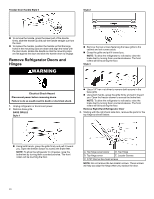
1. Open the drawer to its full extension, and remove the interior bin. 2. Left-hand drawer only: Remove the wiring connection cover. Press in on the side of the cover to release the tab from the slot, and then pull the cover away from the bracket. 4. Remove the drawer front. Style 1: Bottom Release Lever � Push up on the lever at the bottom of the drawer glide bracket to release the drawer front from the bracket. � Lift the drawer front up and off the drawer glide brackets. A. Cover tab B. Wiring connection cover 3. Left-hand drawer only, disconnect the wiring. NOTE: � On one side of the wiring connector, insert the screwdriver blade between the connector tab and the connector to release. Repeat for the opposite side. Pull the wiring connector apart. A. Drawer glide bracket B. Release lever Style 2: Bottom Screws � Loosen the two top screws attaching the drawer glide brackets to the drawer front. NOTE: Loosen screws three to four turns. Keep the screws in the drawer front. � Remove the two bottom screws attaching the drawer glide. � Lift the drawer front up and off the top screws. A. Four Bracket screws 5. Slide the drawer glides back into the refrigerator. REPLACE DRAWER FRONT 1. Pull out the drawer glides until they are full extended. 2. Style 1: Bottom Release Lever � Push up on the lever at the bottom of the drawer glide bracket to open. Insert the drawer front bracket into the drawer glide bracket and release the lever. Style 2: Bottom Screws � Lower the loosened screws in the top of the door front into the upper notches in the drawer glide. � Align the holes in the bottom of the drawer glides. � Replace two screws removed previously and tighten all four screws. NOTE: It helps if one person holds the drawer glides steady while another person aligns the drawer front and inserts the screws into the notches. 23
-
 1
1 -
2
-
3
-
4
-
5
-
6
-
7
-
8
-
9
-
10
-
11
-
12
-
13
-
14
-
15
-
16
-
17
-
 18
18 -
 19
19 -
 20
20 -
 21
21 -
 22
22 -
 23
23 -
 24
24 -
 25
25 -
 26
26 -
 27
27 -
 28
28 -
29
-
30
-
31
-
32
-
33
-
34
-
35
-
36
-
37
-
38
-
39
-
40
-
41
-
42
-
43
-
44
-
45
-
46
-
47
-
48
-
49
-
50
-
51
-
52
-
53
-
54
-
55
-
56
-
57
-
58
-
59
-
60
 |
 |
