KitchenAid KSM150PSPT Owners Manual - Page 8
the Stand Mixer.
 |
View all KitchenAid KSM150PSPT manuals
Add to My Manuals
Save this manual to your list of manuals |
Page 8 highlights
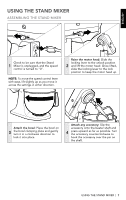
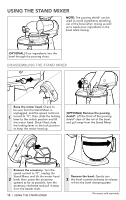
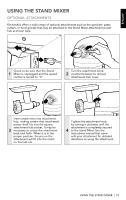
USING THE STAND MIXER ASSEMBLING THE STAND MIXER Lower the motor head: Slide the locking lever to the unlock position and guide the motor head down. 5 Make sure motor head is completely down, then slide the locking lever to the lock position. Before mixing, test lock by attempting to raise motor head. (OPTIONAL) To adjust beater to bowl clearance: Tilt the motor head back; then, using a flat-head screwdriver, turn the screw slightly counterclockwise (left) to raise the beater, or clockwise (right) to lower the beater. Adjust the beater so that it just clears the surface of the bowl. If you over adjust the screw, the bowl lock lever may not lock into place. (OPTIONAL) Place the pouring shield*: Slide the pouring shield* from the front of the Stand Mixer over the bowl until the pouring shield* is centered. The bottom rim of the pouring shield* fits inside of the bowl. The pouring chute will be just to the right of the attachment hub as you face the Stand Mixer. IMPORTANT: Your Stand Mixer is adjusted at the factory so that the flat beater just clears the bottom of the bowl. If, for any reason, the flat beater hits the bottom of the bowl or is too far away from the bowl, you can easily correct the clearance. NOTE: When properly adjusted, the flat beater will not strike on the bottom or sides of the bowl. If the flat beater or the wire whip is so close that it strikes the bottom of the bowl, coating may wear off the beater or wires on the whip may wear. 8 | USING THE STAND MIXER *Accessory sold separately
-
 1
1 -
2
-
 3
3 -
 4
4 -
 5
5 -
 6
6 -
 7
7 -
 8
8 -
 9
9 -
 10
10 -
 11
11 -
 12
12 -
 13
13 -
14
-
15
-
16
-
17
-
18
-
19
-
20
-
21
-
22
-
23
-
24
-
25
-
26
-
27
-
28
-
29
-
30
-
31
-
32
-
33
-
34
-
35
-
36
-
37
-
38
-
39
-
40
-
41
-
42
-
43
-
44
-
45
-
46
-
47
-
48
-
49
-
50
-
51
-
52
 |
 |
