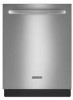
KitchenAid KUDE70FXPA Use & Care Guide - Page 6
Quick Steps, Dishwasher Use
 |
View all KitchenAid KUDE70FXPA manuals
Add to My Manuals
Save this manual to your list of manuals |
Page 6 highlights
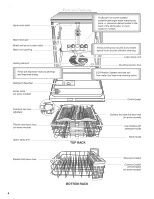
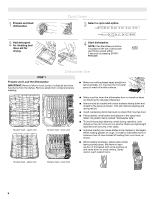
1 Prepare and load dishwasher. Quick Steps 3 Select a cycle and option. 2 Add detergent for cleaning and rinse aid for drying. 4 Start dishwasher. NOTE: If the Start/Resume button is located on the top of door, push door firmly closed within 3 seconds of pressing START/ RESUME. Dishwasher Use STEP 1 Prepare and Load the Dishwasher IMPORTANT: Remove leftover food, bones, toothpicks and other hard items from the dishes. Remove labels from containers before washing. ■ Make sure nothing keeps spray arm(s) from spinning freely. It is important for the water spray to reach all soiled surfaces. 10 place load - upper rack 10 place load - lower rack ■ Make sure that when the dishwasher door is closed no items are blocking the detergent dispenser. ■ Items should be loaded with soiled surfaces facing down and inward to the spray as shown. This will improve cleaning and drying results. ■ Avoid overlapping items like bowls or plates that may trap food. ■ Place plastics, small plates and glasses in the upper rack. Wash only plastic items marked "dishwasher safe." ■ To avoid thumping/clattering noises during operation, load dishes so they do not touch one another. Make sure lightweight load items are secured in the racks. ■ Improper loading can cause dishes to be chipped or damaged. When loading glasses or mugs, it is best to load these items in between rows of tines instead of loading them over tines, as shown. ■ When loading silverware, always place sharp items pointing down. Mix items in each section of the basket with some pointing up and some down to avoid nesting. Spray cannot reach nested items. 12 place load - upper rack 12 place load - lower rack 6
-
 1
1 -
 2
2 -
 3
3 -
 4
4 -
 5
5 -
 6
6 -
 7
7 -
 8
8 -
 9
9 -
 10
10 -
 11
11 -
 12
12 -
13
-
14
-
15
-
16
-
17
-
18
-
19
-
20
-
21
-
22
-
23
-
24
-
25
-
26
-
27
-
28
-
29
-
30
-
31
-
32
-
33
-
34
-
35
-
36
-
37
-
38
-
39
-
40
-
41
-
42
-
43
-
44
-
45
-
46
-
47
-
48
-
49
-
50
-
51
-
52
-
53
-
54
-
55
-
56
-
57
-
58
-
59
-
60
-
61
-
62
-
63
-
64
 |
 |
