KitchenAid KUIC18PNXS Use & Care Guide - Page 9
Interior Components - dishwasher
 |
UPC - 883049221731
View all KitchenAid KUIC18PNXS manuals
Add to My Manuals
Save this manual to your list of manuals |
Page 9 highlights
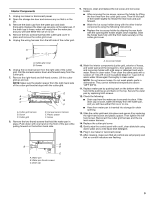
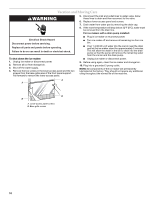
Interior Components 1. Unplug ice maker or disconnect power. 2. Open the storage bin door and remove any ice that is in the bin. 3. Remove the drain cap from the water pan and drain thoroughly. Replace the drain cap securely on the water pan. If the drain cap is loose, water will empty from the water pan, and you will have either thin ice or no ice. 4. Remove the two screws that hold the cutter grid cover in place and remove the cutter grid cover. 5. Unplug the wiring harness from the left side of the cutter grid. 9. Remove, clean and replace the ice scoop and ice scoop holder. ■ After removing the ice scoop, remove the holder by lifting the front free from the cutter grid cover. Then lift the back of the holder slightly to release the rear hook and pull forward. ■ Wash the ice scoop holder along with the other interior components using the following instructions. ■ Replace the ice scoop holder by aligning the rear hook with the opening (the holder angles down slightly). Slide the holder back fully until the front rests securely on the cutter grid cover. A A B A. Cutter grid cover B. Screws 6. Unplug the ice level sensor from the right side of the cutter grid. Pull the ice level sensor down and forward away from the cutter grid. 7. Remove the right-hand and left-hand screws. Lift the cutter grid up and out. NOTE: Make sure the plastic spacer from the right-hand side of the cutter grid bracket stays with the cutter grid. D A B E C F A. Cutter grid harness B. Screw C. Cutter grid D. Ice level sensor harness E. Plastic spacer F. Screw 8. Remove the two thumb screws that hold the water pan in place. Push down with one hand on the front of the pan while pulling forward on the bottom back side. A. Ice scoop holder 10. Wash the interior components (cutter grid, exterior of hoses, and water pan) and the storage bin, door gasket, ice scoop, and ice scoop holder with mild soap or detergent and warm water. Rinse in clean water. Then clean the same parts with a solution of 1 tbs (15 mL) of household bleach in 1 gal. (3.8 L) warm water. Rinse again thoroughly in clean water. NOTE: Do not remove hoses. Do not wash plastic parts in dishwasher. They cannot withstand temperatures above 145°F (63°C). 11. Replace water pan by pushing back on the bottom with one hand while pushing up and back on the top. Secure the water pan by replacing both screws. 12. Check the following: ■ Drain cap from the water pan is securely in place. If the drain cap is loose, water will empty from the water pan, and you will have either thin ice or no ice. ■ Hose from water pan is inserted into storage bin drain opening. 13. Slide the cutter grid back into place and secure it by replacing the right-hand screw and plastic spacer. Then tighten the lefthand screw. Reconnect the cutter grid harness and the ice level sensor harness. 14. Replace the cutter grid cover. 15. Gently wipe the control panel with a soft, clean dishcloth using warm water and a mild liquid dish detergent. 16. Plug in ice maker or reconnect power. 17. After cleaning, make sure that all controls are set properly and that no control indicators are flashing. A B B C A. Water pan B. Water pan thumb screws C. Drain cap 9
-
 1
1 -
2
-
3
-
 4
4 -
 5
5 -
 6
6 -
 7
7 -
 8
8 -
 9
9 -
 10
10 -
 11
11 -
 12
12 -
 13
13 -
 14
14 -
15
-
16
-
17
-
18
-
19
-
20
-
21
-
22
-
23
-
24
-
25
-
26
-
27
-
28
 |
 |
