KitchenAid KUID508HBL Owners Manual - Page 4
Caring For Your Ice Maker
 |
View all KitchenAid KUID508HBL manuals
Add to My Manuals
Save this manual to your list of manuals |
Page 4 highlights
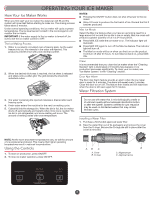
CARING FOR YOUR ICE MAKER Cleaning The ice making system and the air cooled condenser need to be cleaned regularly for the ice maker to operate at peak efficiency and to avoid premature failure of system components. See the "Ice Maker System" and the "Condenser" sections. Exterior Surfaces Wash the exterior enamel surfaces and gaskets with warm water and mild soap or detergent. Wipe and dry. Regular use of a good household appliance cleaner and wax will help maintain the finish. Do not use abrasive cleaners on enamel surfaces as they may scratch the finish. For products with a stainless steel exterior, use a clean sponge or soft cloth and a mild detergent in warm water. Do not use abrasive or harsh cleaners. Do not use chlorine bleach on the stainless steel surfaces. Ice Maker System Minerals that are removed from water during the freezing cycle will eventually form a hard scaly deposit in the water system. Cleaning the system regularly helps remove the mineral scale buildup. How often you need to clean the system depends upon how hard your water is. With hard water of 15 to 20 grains/gal. (4 to 5 grains/liter), you may need to clean the system as often as every 9 months. NOTE: Use one 16 oz (473 mL) bottle of approved ice maker cleaner. To order, see "Accessories." 1. Press the ON/OFF button. 2. Wait 5 to 10 minutes for the ice to fall into the storage bin. Remove all ice from the storage bin. 3. Unscrew the drain cap from the bottom of the water pan located inside the storage bin as shown. Allow the water to drain completely. 4. Replace the drain cap securely on the water pan. If the drain cap is loose, water will empty from the water pan and you will have either thin ice or no ice. 5. Read and follow all handling information on the cleaner bottle before completing the steps below. Use one 16 oz (473 mL) bottle of approved ice maker cleaner. 6. Pour one bottle of solution into the water pan. Fill the bottle twice with tap water and pour it into the water pan. NOTE: Severe scale buildup may require repeated cleaning with a fresh quantity of cleaning solution. 9. Press the ON/OFF button to resume ice production. Condenser A Dirty or Clogged Condenser ■■ Obstructs proper airflow. ■■ Reduces ice making capacity. ■■ Causes higher than recommended operating temperatures which may lead to component failure. WARNING Electrical Shock Hazard Disconnect power before cleaning. Replace all parts and panels before operating. Failure to do so can result in death or electrical shock. A B A. Water pan B. Drain cap 7. Press the CLEAN button. See "Using the Controls." The Clean button will blink, indicating that the cleaning cycle is in process. When the "Cleaning Complete" light is illuminated (approximately 70 minutes), the cleaning cycle is complete. During the cleaning cycle, the system will both clean and rinse itself. 8. After the cleaning cycle is complete, remove the drain cap from the water pan. Look for any cleaning solution left in the water pan. If cleaning solution drains from the water pan, you should run the clean cycle again. Be sure to refill the water pan with cleaner before starting the clean cycle again. Be sure to replace the drain cap securely on the water pan. If the drain cap is loose, water will empty from the water pan and you will have either thin ice or no ice. 4
-
 1
1 -
 2
2 -
 3
3 -
 4
4 -
 5
5 -
 6
6 -
 7
7 -
 8
8 -
 9
9 -
 10
10 -
11
-
12
-
13
-
14
-
15
-
16
-
17
-
18
-
19
-
20
-
21
-
22
-
23
-
24
-
25
-
26
 |
 |
