Kodak 8060006 User Manual - Page 43
Using exposure compensation with exposure bracketing
 |
View all Kodak 8060006 manuals
Add to My Manuals
Save this manual to your list of manuals |
Page 43 highlights
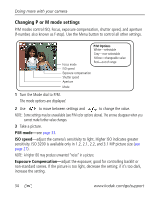
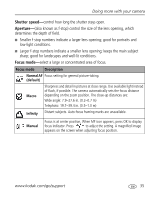
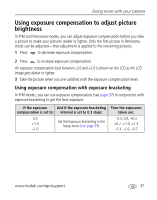
Doing more with your camera Using exposure compensation to adjust picture brightness In P/M and Panorama modes, you can adjust exposure compensation before you take a picture to make your pictures darker or lighter. Only the first picture in Panorama mode can be adjusted-that adjustment is applied to the remaining pictures. 1 Press to decrease exposure compensation. 2 Press to increase exposure compensation. An exposure compensation level between -2.0 and +2.0 is shown on the LCD as the LCD image gets darker or lighter. 3 Take the picture when you are satisfied with the exposure compensation level. Using exposure compensation with exposure bracketing In P/M modes, you can use exposure compensation (see page 37) in conjunction with exposure bracketing to get the best exposure. If the exposure And if the exposure bracketing compensation is set to: interval is set to 0.3 steps: 0.0 +1.0 Set the Exposure bracketing in the Setup menu (see page 29). -1.0 Then the exposures taken are: -0.3, 0.0, +0.3 +0.7, +1.0, +1.3 -1.3, -1.0, -0.7 www.kodak.com/go/support 37
-
 1
1 -
2
-
3
-
4
-
5
-
6
-
7
-
8
-
9
-
10
-
11
-
12
-
13
-
14
-
15
-
16
-
17
-
18
-
19
-
20
-
21
-
22
-
23
-
24
-
25
-
26
-
27
-
28
-
29
-
30
-
31
-
32
-
33
-
34
-
35
-
36
-
37
-
 38
38 -
 39
39 -
 40
40 -
 41
41 -
 42
42 -
 43
43 -
 44
44 -
 45
45 -
 46
46 -
 47
47 -
 48
48 -
49
-
50
-
51
-
52
-
53
-
54
-
55
-
56
-
57
-
58
-
59
-
60
-
61
-
62
-
63
-
64
-
65
-
66
-
67
-
68
-
69
-
70
-
71
-
72
-
73
-
74
-
75
-
76
-
77
-
78
-
79
 |
 |
