Kodak C913 User Manual
Kodak C913 - EASYSHARE Digital Camera Manual
 |
UPC - 041771509736
View all Kodak C913 manuals
Add to My Manuals
Save this manual to your list of manuals |
Kodak C913 manual content summary:
- Kodak C913 | User Manual - Page 1
any cables, install the software that was included with your camera. Follow the on-screen instructions. After installing the software, return to this User guide. ᕢ Loading the batteries • Kodak oxy-alkaline digital camera batteries AA • Kodak Ni-MH rechargeable digital camera batteries AA • Kodak - Kodak C913 | User Manual - Page 2
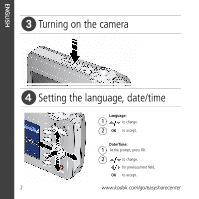
ENGLISH ᕣ Turning on the camera ᕤ Setting the language, date/time Language: 1 to change. 2 OK to accept. Date/Time: 1 At the prompt, press OK. 2 to change. for previous/next field. OK to accept. 2 www.kodak.com/go/easysharecenter - Kodak C913 | User Manual - Page 3
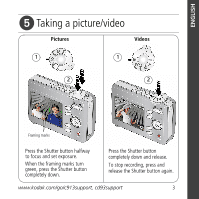
ENGLISH ᕥ Taking a picture/video Pictures Videos 1 1 2 2 Framing marks Press the Shutter button halfway to focus and set exposure. When the framing marks turn green, press the Shutter button completely down. Press the Shutter button completely down and release. To stop recording, press and - Kodak C913 | User Manual - Page 4
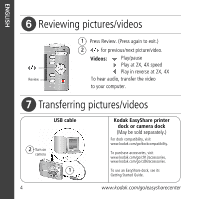
2X, 4X Review To hear audio, transfer the video to your computer. ᕧ Transferring pictures/videos USB cable 2 Turn on camera 1 4 Kodak EasyShare printer dock or camera dock (May be sold separately.) For dock compatibility, visit www.kodak.com/go/dockcompatibility. To purchase accessories, visit - Kodak C913 | User Manual - Page 5
option, use camera Help. (Highlight a menu choice, then press the button.) Visit www.kodak.com/go/c913support or www.kodak.com/go/cd93support for: • the extended user's guide • interactive troubleshooting and repairs • interactive tutorials • FAQs • downloads • accessories • printing information - Kodak C913 | User Manual - Page 6
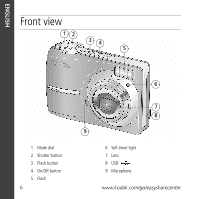
ENGLISH Front view 12 34 5 1 Mode dial 2 Shutter button 3 Flash button 4 On/Off button 5 Flash 6 6 7 8 9 6 Self-timer light 7 Lens 8 USB 9 Microphone www.kodak.com/go/easysharecenter - Kodak C913 | User Manual - Page 7
234 5 6 14 13 optional 1 LCD 2 Review button 3 Menu button 4 LCD/Info button 5 Delete button 6 Zoom button (Telephoto/Wide) 7 Strap post 7 8 9 10 12 11 8 9 OK button 10 Share button 11 Battery compartment 12 Slot for optional SD card 13 Dock connector 14 Tripod socket www.kodak.com/go/c913support - Kodak C913 | User Manual - Page 8
camera Storing pictures on an SD card Your camera has internal memory. You can purchase an SD card to store more pictures and videos (www.kodak.com/go/c913accessories, www.kodak.com/go/cd93accessories). We recommend Kodak SD cards. 1 Turn off the camera. 2 Insert or remove the optional card. 3 Turn - Kodak C913 | User Manual - Page 9
Doing more with your camera Using the zoom button Use optical zoom to get up to 3X closer to your subject. 1 Use the LCD to frame your subject. 2 Press Telephoto (T) to zoom in. Press Wide Angle (W) to zoom out. The zoom indicator shows zoom status. 3 Take the picture or video. NOTE: To get a - Kodak C913 | User Manual - Page 10
Doing more with your camera Using the flash button Use the flash when you take pictures at night, indoors, or outdoors in heavy shadows. Press the button repeatedly to scroll through flash modes (see Flash modes below). The current flash mode appears in the LCD screen. Flash Distance Wide angle: - Kodak C913 | User Manual - Page 11
mode For SCN Scene Point-and-shoot simplicity when taking pictures under special conditions. (See page 12.) Blur Reduction Minimizing the effects of camera shake and subject movement. Auto Landscape Close-up Video General picture taking-offers an excellent balance of image quality and ease - Kodak C913 | User Manual - Page 12
your camera Scene modes Choose a Scene mode-for great pictures in practically any situation! 1 Turn the Mode dial to Scene . 2 Press to display Scene mode descriptions. If the mode description turns off a wedding or lecture. Flash and sound are disabled. 12 www.kodak.com/go/easysharecenter - Kodak C913 | User Manual - Page 13
Place the camera on a flat, steady surface or use a tripod. High ISO People indoors, in low-light scenes. Minimizes red eye. Children Action pictures of children , until you change modes or turn off the camera. Some modes offer limited settings. www.kodak.com/go/c913support, cd93support 13 - Kodak C913 | User Manual - Page 14
button. Turn on/off Help Scroll up/down Understanding the picture-taking icons Flash Self-timer Date stamp 14 Picture size Pictures/time remaining Storage location Zoom: Wide Telephoto Digital Exposure metering White balance ISO speed Low battery Camera mode Exposure compensation www.kodak.com - Kodak C913 | User Manual - Page 15
Press the Review button, then picture/video. to find a 2 Press the OK button to select pictures/videos. Selected pictures A check mark appears on the picture. You can now print, transfer, delete, etc. the selected pictures. You can press OK a second time to remove a check mark. www.kodak.com/go - Kodak C913 | User Manual - Page 16
the protected picture/video. I Press the Menu button to exit the menu. appears CAUTION: Formatting internal memory or an SD or SDHC card deletes all (including protected) pictures/videos. (Formatting internal memory also deletes email addresses, tag names, and favorites.) 16 www.kodak.com/go - Kodak C913 | User Manual - Page 17
to highlight a tab: I Review to view pictures/videos I Edit Picture to edit pictures/videos I Setup for other camera settings 3 Press to highlight a setting, then press the OK button. 4 Highlight an option, then press the OK button. Using Kodak Perfect Touch technology Kodak Perfect Touch - Kodak C913 | User Manual - Page 18
the crop box. Press OK. 5 Follow the screen prompts. The picture is cropped and saved. The original is saved. I Press the Menu button to exit the menu. Rotating pictures You can change a picture to display in portrait or landscape orientation. 1 Press the Review button, then for previous/next - Kodak C913 | User Manual - Page 19
OK. Follow the screen prompts to replace the original picture or to save the rotated picture as a new one. I Press the Menu button to exit the menu. Making a picture from a video You can choose a single frame from a video, then make a picture suitable for printing. 1 Press the Review button, then - Kodak C913 | User Manual - Page 20
If you have many pictures on your camera or card, you can sort them so that only some are visible at a time. You can sort by the date a picture was taken or-if you've tagged pictures with a Favorites tag or a tag that you created-you can sort by tag. 1 Press the Review button, then the - Kodak C913 | User Manual - Page 21
Email tag Tag name Blur warning Kodak Perfect Touch tech. Picture number Image storage location Scroll arrows Videos Protected Favorite tag Email tag Review mode Video length Video number Image storage location Date/Time Review mode Scroll arrows www.kodak.com/go/c913support, cd93support 21 - Kodak C913 | User Manual - Page 22
: reviewing pictures/videos on the LCD; excessive use of the flash. I If you own an EasyShare camera dock series 3 or EasyShare printer dock series 3, use the Battery Refresh feature. Memory card full. I Insert a new card, transfer pictures to the computer, or delete pictures. 22 www.kodak.com - Kodak C913 | User Manual - Page 23
accessories, visit www.kodak/go/accessories. I Use only a USB-certified computer equipped with a current-limiting motherboard. Contact your computer manufacturer if you have questions. I If using this product in an airplane, observe all instructions of the airline. I When removing the battery - Kodak C913 | User Manual - Page 24
included on the Kodak EasyShare software CD and the camera firmware (the software that runs on the camera). See www.kodak.com/go/c913downloads, www.kodak.com/go/c913downloads. Limited warranty Kodak warrants Kodak consumer electronic products and accessories ("Products"), excluding batteries, to be - Kodak C913 | User Manual - Page 25
substitute equipment, facilities or services, or claims of your warranty gives you specific rights, and you may Kodak EasyShare C913/CD93 digital camera This equipment has been tested and found to comply with the limits for a Class B digital the instructions, determined by turning the equipment - Kodak C913 | User Manual - Page 26
cables have been provided with the product or specified additional components or accessories statement DOC Class B Compliance-This Class B digital apparatus complies with Canadian ICES-003. Observation des or appropriate local authorities; or visit www.kodak.com/go/recycle. (Product weight: 137g.) - Kodak C913 | User Manual - Page 27
China RoHS Appendix Eastman Kodak Company Rochester, New York 14650 © Eastman Kodak Company, 2008 Kodak, EasyShare, and Perfect Touch are trademarks of Eastman Kodak Company. 4H5151_en www.kodak.com/go/c913support, cd93support 27
-
 1
1 -
 2
2 -
 3
3 -
 4
4 -
 5
5 -
 6
6 -
 7
7 -
8
-
9
-
10
-
11
-
12
-
13
-
14
-
15
-
16
-
17
-
18
-
19
-
20
-
21
-
22
-
23
-
24
-
25
-
26
-
27
 |
 |

www.kodak.com/go/c913support, cd93support
1
ENGLISH
±
Installing the software
²
Loading the batteries
After installing the software, return to this
User guide.
Before connecting any cables, install the software that was
included with your camera. Follow the on-screen instructions.
• Kodak oxy-alkaline digital camera
batteries AA
• Kodak Ni-MH rechargeable digital
camera batteries AA
• Kodak Ni-MH rechargeable digital
camera battery KAA2HR
• alkaline batteries AA
• lithium batteries AA