Kodak I250 User Guide
Kodak I250 - Document Scanner Manual
 |
View all Kodak I250 manuals
Add to My Manuals
Save this manual to your list of manuals |
Kodak I250 manual content summary:
- Kodak I250 | User Guide - Page 1
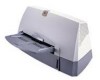
i200 Series Scanners User's Guide A-61167 Part No. 9E3968 CAT No. 850 7543 KODAK iNnovation Series Scanners - Kodak I250 | User Guide - Page 2
the scanner 11 Registering your scanner 11 Scanner components 11 Front 11 Rear 12 Side 12 Internal 12 Making connections 13 Installing the IEEE-1394 (FireWire) card in the host computer 13 Installing the Kodak Driver Software 13 Installing the IEEE-1394 (FireWire) cable 13 Power setup - Kodak I250 | User Guide - Page 3
module 24 Cleaning the feed module 25 Cleaning the drive rollers and transport area 26 Cleaning the imaging guides 27 Cleaning the paper path 28 Replacing parts 28 Calibrating the scanner 29 Troubleshooting 30 Indicator lights 30 Lamps 30 Clearing document jams 30 Adjusting the separator - Kodak I250 | User Guide - Page 4
A Specifications A-1 Appendix B Supplies and Accessories B-1 Appendix C Kodak i200 Series Imprinter C-1 Contents of the imprinter kit C-1 Installing the imprinter C-2 Removing the circuit board cover C-2 Attaching the imprinter board and cable C-3 Completing the imprinter installation - Kodak I250 | User Guide - Page 5
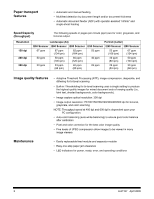
• ISIS and TWAIN device drivers are included on a CD that is packed with each scanner • International language support • Automatic overlap/multifeed detection • All scanner models support multiple electrical power requirements for use worldwide • May be user-calibrated at any time • Electronic red - Kodak I250 | User Guide - Page 6
calibration • Pixel and color correction for the best color image quality • Five levels of JPEG compression allow images to be viewed in many image viewers Maintenance • Easily replaceable feed module and separator module • Easy one-step paper jam clearance • LED indicators for power, ready, error - Kodak I250 | User Guide - Page 7
sleeve. Sleeves should be manually fed, one at a time, folded edge first, while lifting the gap release lever. NOTES: You also can use the optional Kodak i200 Series Dockable Flatbed to scan damaged documents. In addition, the automatic document feeder on the i280 Scanner can scan irregularly shaped - Kodak I250 | User Guide - Page 8
memory: 29.7 x 66.0 cm (11.7 x 26.0 in.) Dockable Flatbed: 29.7 x 43.2 cm (11.7 x 17 in.) Paper Inks Correction Fluids Document Batch Height for Automatic Feeding i280 Scanner With standard memory: 29.7 x 86.4 cm (11.7 x 34 in.) Dockable Flatbed: 29.7 x 43.2 cm (11.7 x 17 in.) NOTE: The - Kodak I250 | User Guide - Page 9
into the machine. • Take sufficient breaks to maintain mental alertness. Supervisors should review their practices and make the compliance with these precautions a part of the job description for the operator of the Kodak i200 Series Scanners and any other mechanical devices. A-61167 April 2005 5 - Kodak I250 | User Guide - Page 10
and regulatory agency approvals The Kodak i200 Series Scanners conform to all applicable national and international product safety and electronic emission regulatory requirements. This includes, but is not limited to, the following: Kodak i200 Series Scanners Regulatory Agency Approvals Country - Kodak I250 | User Guide - Page 11
Environmental information Acoustic emission Power system • The Kodak i200 Series Scanners are designed to meet worldwide environmental requirements. • The i200 Series Scanners' power supply cord jacket and the solder on the circuit boards contain lead. Disposal of lead may be regulated due to - Kodak I250 | User Guide - Page 12
limits for a Class A digital device pursuant to Part 15 of the FCC rules. These limits are and used in accordance with the instruction manual, may cause harmful interference to radio domestic environment, radio disturbance may arise. When such trouble occurs, the user may be required to take - Kodak I250 | User Guide - Page 13
of an office environment CAUTION: The scanner and power supply must only be used indoors in a dry location. • on a stable, level work surface capable of supporting the following weights: - i250 Scanner: 12.5 kg (27.5 lb.) - i260 Scanner: 13.9 kg (30.5 lb.) - i280 Scanner: 13.9 kg (30.5 lb.) - i250 - Kodak I250 | User Guide - Page 14
Windows 98SE, Windows Millennium Edition (Me), Windows 2000, or Windows XP • 200 MB of available hard disk space • 512 MB of RAM • Additional memory (SODIMM) installed in the scanner - i250 Scanner: up to 256 MB of memory is allowed - i260 Scanner: up to 256 MB of memory is allowed - i280 Scanner - Kodak I250 | User Guide - Page 15
: • Kodak i200 Series Scanner • Input tray • Output tray • Power supply • Power cord(s) • Installation CD • Kodak Capture Software Lite CD • Read Me Now sheet • User's Guide (printed English version; User's Guide .pdf files in nine other languages are included on the Installation CD) • Registration - Kodak I250 | User Guide - Page 16
4 Power input 5 Output tray 6 Output tray extender Side 1 Output tray extender 2 Output tray 3 Indicator lights (red, green) 4 Input tray 5 Input tray extenders Internal 1 Separator module 2 Drive rollers 3 Channels for ink blotter strips (for optional imprinter) 4 Rear roller cover 5 Front roller - Kodak I250 | User Guide - Page 17
2. Power up the host computer after the IEEE-1394 (FireWire) card installation is complete. 1. Insert the Kodak i200 Series Installation CD in the CD-ROM drive. The installation program starts automatically. 2. Follow the onscreen instructions to install the TWAIN and ISIS drivers and the Kodak Scan - Kodak I250 | User Guide - Page 18
: The i200 Series Scanner should be the only item plugged in to the IEEE-1394 (FireWire) card on the host computer. One or more power cords may be supplied with the scanner. Use only the cord required for your power type. Dispose of any unneeded power cords properly. Use only the power supply that - Kodak I250 | User Guide - Page 19
best calibration and scanning results, allow the scanner lamps to warm up for at least three minutes. • If you are installing the scanner on a computer that is running Windows 2000, the following screen may appear. Select Yes. Kodak has successfully tested the i200 Series Scanners with Windows 2000 - Kodak I250 | User Guide - Page 20
Select Next. The following screen appears. Select Continue Anyway. Kodak has successfully tested the i200 Series Scanners with Windows XP. The following screen appears. Select Finish. Your scanner is now installed. 16 A-61167 April 2005 - Kodak I250 | User Guide - Page 21
output trays also may be folded flat up against the scanner to save space when the scanner is not in use. Output tray Document stops Input tray the output tray until it snaps into place. Tray extenders and side guides • Both the input and output trays have extenders to accommodate long - Kodak I250 | User Guide - Page 22
it rests against the scanner back. Installing optional accessories If you have purchased a Kodak i200 Series Imprinter, Kodak i200 Series Dockable Flatbed, and/or additional memory (SODIMM), refer to the appropriate appendix in this guide for installation instructions. 18 A-61167 April 2005 - Kodak I250 | User Guide - Page 23
Scanner Starting and stopping scanning Automatic feeding Scanning is controlled by software developed for your application. To start and stop scanning, refer to the documentation provided with your software Continuous feeding 3. Adjust the document feeder guides. 4. Adjust the output tray position - Kodak I250 | User Guide - Page 24
Manual feeding Damaged documents Follow the guidelines for document size, type, weight the automatic document feeder if they are placed in a protective plastic sleeve. NOTE: The i280 Scanner has a feature (Special Document mode) that allows irregularly shaped documents or documents with holes - Kodak I250 | User Guide - Page 25
are for the i280 Scanner only: • Long Paper mode • Special Document mode • Perfect Page with iThresholding - for all i200 Series Scanners • Toggle ). The scanned document is delivered in multiple images. You can specify the length and width of the images in the fixed cropping option in your scanning - Kodak I250 | User Guide - Page 26
situations that previously required manual adjustments. Using the iThresholding feature, the scanner dynamically evaluates each document in reduces the need to pre-sort, rescan, and perform post-image processing. You get better image and text legibility, smoother lines, minimal to no artifacts, and - Kodak I250 | User Guide - Page 27
cleaning instructions in this section and clean the feed module tires, separator module tires, imaging guides, transport area, and paper path at least once per week. Clean the scanner and paper path daily if you are scanning carbonless paper or newsprint, or if you are using the imprinter. Use - Kodak I250 | User Guide - Page 28
area. 3. Lift up the scanner door release to unlatch the scanner door. 4. Pull up to open the scanner door. 5. Remove the separator module by pulling it down and lifting it off. Separator module 6. Manually rotate and wipe the separator module tires with a roller cleaning pad. 24 A-61167 April - Kodak I250 | User Guide - Page 29
clean the feed module. Cleaning the feed module 1. Push against the raised edge on the left side of the front roller cover to the side and pull the cover up and out to remove it. Front roller cover NOTE: You may need to lift the input tray slightly to remove the front - Kodak I250 | User Guide - Page 30
right to fit it into position. 7. Re-install the front roller cover. 8. Go to the next section to clean the drive rollers and transport area. Cleaning the drive rollers and transport area 1. Manually rotate and wipe the drive rollers with a roller cleaning pad. 2. Clean any dust or debris in the - Kodak I250 | User Guide - Page 31
Clean the exposed (top side) surfaces of the imaging guides. You do not need to remove the imaging guides for cleaning. 1. Wipe the upper and lower imaging guides with a Staticide Wipe. 2. Dry the imaging guides with a dry Staticide Wipe. 3. Lower the scanner door and press it down firmly until it - Kodak I250 | User Guide - Page 32
pre-separation pads, 120 tires) Kodak Imaging Guide Set (1 upper, 1 lower) CAT No. 124 1066 821 5808 120 0278 Use only these replacement parts in your scanner. The expected life of customer-replaceable parts is shown below. • Kodak Separator Module for i200 Series Scanners: 200,000 document pages - Kodak I250 | User Guide - Page 33
are for the TWAIN driver. Your screens may be different. 1. Allow the lamps to warm up for three minutes. 2. Click on Calibrate in the Imaging tab. The Image Chain Calibration dialog box appears. 3. Click Calibrate. A message appears. 4. Place the calibration target in the scanner ADF. Use the - Kodak I250 | User Guide - Page 34
jams Red indicator light Green indicator light Green on - scanner is ready to scan Green flashing - scanner is busy Red on - an error condition exists (refer to "Problem Solving" in this section for help with some common error conditions) Red and green on - scanner is powering up After you power up - Kodak I250 | User Guide - Page 35
. Heavy documents Normal documents (default position) Light documents 1. Power down the scanner. 2. Remove any documents from the feeder area. 3. Lift up the scanner door release to unlatch the scanner door. 4. Pull up to open the scanner door. 5. Remove the separator module by pulling - Kodak I250 | User Guide - Page 36
on the back of the scanner. 4. Power up the computer. 5. Power up the scanner. After you power up the scanner, the red and green indicator lights will illuminate. After approximately one minute, both lights go out. When the green indicator light comes back on, the scanner is ready to begin scanning - Kodak I250 | User Guide - Page 37
module and separator module for signs of wear, and replace these parts if necessary. • the imaging guides are securely in place and pushed all the way in. You can also power the scanner down and power up again or follow the instructions in "System is not responding" in this section. Make sure that - Kodak I250 | User Guide - Page 38
Problem Possible Solution Image quality is poor or has decreased Make sure that: • the scanner is clean. Refer to the Maintenance section. • the scanner is calibrated. Refer to the Maintenance section. The lamps shut off too soon The lamps in the i200 Series Scanners will turn off after 5 - Kodak I250 | User Guide - Page 39
the IEEE-1394 (FireWire) cable from the IEEE-1394 port on the back of the scanner. 5. Place the foam end caps on each end of the scanner. 6. Place the scanner in the box. 7. Place the power cord and power supply in the box. 8. Tape down the input and output trays to secure them. 9. Close the - Kodak I250 | User Guide - Page 40
in.) with standard memory 8.9 to 66.0 cm (3.5 to 26.0 in.) with extended memory Input Tray Capacity Recommended Daily Volume Light Source Electrical Requirements Scanner Power i280 Scanner: Width: 6.4 to 29.7 cm (2.5 to 11.7 in.) Length: 8.9 to 86.4 cm (3.5 to 34 in.) with standard memory up to - Kodak I250 | User Guide - Page 41
.10-1985, and ISO 7779 in a semi-anechoic chamber. Data reported was measured at Sound Pressure level. • Operating: 39.7 dB • Standby: 57 dB Specification values apply to all of the i200 Series Scanners except where noted. Specifications are subject to change without notice. A-2 A-61167 April 2005 - Kodak I250 | User Guide - Page 42
Ink Cartridges for i200/i800/3000/4000/7000/9000 Series Scanners (10) Kodak Imaging Guide Set Kodak Digital Science Transport Cleaning Sheets (50) Kodak Digital Science Roller Cleaning Pads (24) Staticide Wipes for Kodak Scanners (144) Kodak Calibration Kit for i200 Series Scanners CAT No. 130 - Kodak I250 | User Guide - Page 43
Appendix C Kodak i200 Series Imprinter Contents of the imprinter kit The Kodak i200 Series Imprinter adds imprinting capability to your Kodak i200 Series Scanner. The imprinter prints a date, time, fixed string, and/or sequential number on document backs. Purchase the imprinter separately (CAT No. - Kodak I250 | User Guide - Page 44
the imprinter Removing the circuit board cover 1. Make sure that the scanner is powered down and there are no documents in the feeder area. 2. Disconnect the power cord from the back of the scanner. 3. Disconnect the IEEE-1394 (FireWire) cable from the IEEE-1394 port on the back of the scanner - Kodak I250 | User Guide - Page 45
and cable 10. Go to the next section to attach the imprinter board and cable. The imprinter board is first attached to a mounting bracket which is connected to the main control board, then the imprinter cable is plugged in. IMPORTANT: Use proper precautions to avoid static when you install the - Kodak I250 | User Guide - Page 46
3. Loosely attach the imprinter board to the circuit board mounting bracket with the three thumbscrews. Thumbscrews Hook 4. Slide the hook near the bottom of the circuit board mounting bracket into the support slot on the main control board. Support slot 5. Press the imprinter board firmly into the - Kodak I250 | User Guide - Page 47
the three thumbscrews that connect the imprinter board and the circuit board mounting bracket. 9. Replace the circuit board cover. 10. Secure the circuit board cover with its two screws. 11. Locate the imprinter connector on the circuit board cover. The imprinter connector should be protruding from - Kodak I250 | User Guide - Page 48
-loop pad that is attached to the imprinter cable. 14. Align the imprinter cable along the channel in the circuit board cover and press the first self-stick hook-and-loop pad firmly to attach it to the circuit board cover. 15. Continue to align the imprinter cable along the channel in the circuit - Kodak I250 | User Guide - Page 49
cable. 17. Press the second self-stick hook-and-loop pad firmly to attach it to the circuit board cover. 18. Thread the imprinter cable through the opening and into the imprinter area. 19. Lower the scanner door and press it down firmly until it latches into place. 20. Go to the next section - Kodak I250 | User Guide - Page 50
the imprinter board and cable, you must seat the cable in its supports and install the ink cartridge and carrier. IMPORTANT: An ink cartridge must be in the ink cartridge carrier in order for the imprinter to be recognized. 1. Locate the imprinter access door on the back of the scanner. 2. Slide - Kodak I250 | User Guide - Page 51
locking bar around the ink cartridge. 9. Push the connector on the imprinter cable firmly into the ink cartridge carrier. 10. Slide the ink NOTE: Detailed information about setting the imprinter position may be found later in this chapter. 11. Replace the imprinter access door. 12. Re-attach the - Kodak I250 | User Guide - Page 52
transport area collect ink overflow. NOTE: Improperly aligned blotter strips may cause paper jams. 1. Lift up the scanner door release to unlatch the scanner door. 2. Pull up to open the scanner door. 3. Locate the two channels in the rear of the transport area. These channels are where the blotter - Kodak I250 | User Guide - Page 53
an ink cartridge To install the ink cartridge: 1. Locate the imprinter access door on the back of the scanner. 2. Slide your fingers under the imprinter access door handle and pull the door toward you. 3. Lift the imprinter access door off the scanner. 4. Slide the ink cartridge carrier out of its - Kodak I250 | User Guide - Page 54
access door handle and pull the door toward you. 3. Lift the imprinter access door off the scanner. 4. Locate the imprinter positioning slots. 5. Determine which position is suitable for your imprinting needs. 6. Lift the ink cartridge carrier out of its position. 7. Slide the ink cartridge - Kodak I250 | User Guide - Page 55
ink blotter strips, and ink cartridge carrier used in the imprinter will need replacing occasionally. If you are having problems imprinting on scanned documents: • Verify that the ink cartridge is not . Purchase ink cartridges from an office supply retailer near you. A-61167 April 2005 C-13 - Kodak I250 | User Guide - Page 56
should be replaced as necessary. To order additional ink blotter strips, refer to Appendix B, Supplies and Accessories. NOTE: Improperly aligned blotter strips may cause paper jams. 1. Power down the scanner. 2. Disconnect the power cord. 3. Remove any documents from the feeder area. 4. Lift up the - Kodak I250 | User Guide - Page 57
door and press it firmly until it snaps into place. To order ink cartridge carriers, refer to Appendix B, Supplies and Accessories. 1. Locate the imprinter access door on the back of the scanner. 2. Slide your fingers under the imprinter access door handle and pull the door toward you. 3. Lift the - Kodak I250 | User Guide - Page 58
document number). Software controls static fields; any information that the software allows you to enter can be sent to the imprinter. The imprinter can be manually placed in 14 horizontal positions. All imprinter controls and functions are accessible through ISIS and TWAIN drivers. Imprinting must - Kodak I250 | User Guide - Page 59
Imprinter specifications The resolution of the character fonts is 96 dpi across the width of the scanner. However, the font resolution varies with the direction that the paper is fed into the scanner automatic, sequential number advances, require a host command to restart the imprinter. You must - Kodak I250 | User Guide - Page 60
Flatbed • Installation instructions Flatbed specifications Dimensions Weight Height: 16.3 cm (6.4 in.) Width: 48.6 cm (19.1 in.) Length: 64.3 cm (25.3 in.) 7.3 kg (16.0 lb.) Installing the dockable flatbed The Dockable Flatbed is easy to attach to your i200 Series Scanner. 1. Power down the - Kodak I250 | User Guide - Page 61
the mounting posts on the back of the flatbed for storage. You will need to re-attach this panel to the scanner if you remove the flatbed from the scanner. 8. Power up the scanner. The flatbed is ready to use. NOTE: Lower the input tray when you are going to use the automatic document - Kodak I250 | User Guide - Page 62
document feeder (ADF). 1. Raise the input tray and rest it against the scanner, if necessary. 2. Lift the flatbed cover and hold it up. 3. Place allow scanning very thick books. 1. Raise the input tray and rest it against the scanner, if necessary. 2. Lift the flatbed cover and hold it up. 3. Place - Kodak I250 | User Guide - Page 63
are for the TWAIN driver. Your screens may be different. 1. Allow the lamps to warm up for three minutes. 2. Click on Calibrate in the Imaging tab. The Image Chain Calibration dialog box appears. 3. Click Calibrate. A message appears. 4. Place the calibration target in the scanner ADF. Use the - Kodak I250 | User Guide - Page 64
begins. A message appears when the flatbed calibration has finished. Cleaning the flatbed After a power failure 12. Click OK. The flatbed's glass platen can collect fingerprints and dust which may lessen the quality of your scans. Use Staticide Wipes for Kodak Scanners (CAT No. 896 5519) to clean - Kodak I250 | User Guide - Page 65
Removing the dockable flatbed The flatbed is easy to remove from your i200 Series Scanner. IMPORTANT: Do not attempt to undock the flatbed while it is in use. 1. Power down the scanner. 2. Raise the input tray and rest it against the scanner. 3. Squeeze the latches on the lower sides of the flatbed - Kodak I250 | User Guide - Page 66
sure that you do not bend or fold the flexible cable. 8. Align the scanner front panel pins with the slots on the scanner. Slots Pins 9. Press firmly against the right side of the door to latch it. IMPORTANT: The scanner will not operate if the front panel is not securely attached. 10. Lower - Kodak I250 | User Guide - Page 67
Data RAM" style modules do not fit in the i200 Series Scanners' CPU board socket. Use only PC-100 and PC-133 style modules. Use proper precautions to avoid static when you install memory. Installing memory in the scanner 1. Power down the scanner. 2. Remove any documents from the feeder area - Kodak I250 | User Guide - Page 68
that hold the circuit board cover in place. NOTE: If the optional imprinter has been installed, disconnect the imprinter cable from the imprinter board before you remove the circuit board cover. Refer to Appendix C, Kodak i200 Series Imprinter, for information about the imprinter cable. 10. Lift up - Kodak I250 | User Guide - Page 69
cover with its two screws. NOTE: If you removed the optional imprinter cable from the imprinter board, reinstall the cable now. Refer to Appendix C, Kodak i200 Series Imprinter, for information about the imprinter cable. 15. Lower the scanner door and press it down firmly until it latches into place - Kodak I250 | User Guide - Page 70
A-61167 4/2005 Cat. No. 850 7543 © Eastman Kodak Company, 2004 EASTMAN KODAK COMPANY Document Imaging Rochester, New York 14650 www.kodak.com/go/docimaging Kodak and Digital Science are trademarks of Eastman Kodak Company.
-
 1
1 -
 2
2 -
 3
3 -
 4
4 -
 5
5 -
 6
6 -
 7
7 -
8
-
9
-
10
-
11
-
12
-
13
-
14
-
15
-
16
-
17
-
18
-
19
-
20
-
21
-
22
-
23
-
24
-
25
-
26
-
27
-
28
-
29
-
30
-
31
-
32
-
33
-
34
-
35
-
36
-
37
-
38
-
39
-
40
-
41
-
42
-
43
-
44
-
45
-
46
-
47
-
48
-
49
-
50
-
51
-
52
-
53
-
54
-
55
-
56
-
57
-
58
-
59
-
60
-
61
-
62
-
63
-
64
-
65
-
66
-
67
-
68
-
69
-
70
 |
 |

i200 Series Scanners
User’s
Guide
A-61167
Part No. 9E3968
CAT No. 850 7543
KODAK iNnovation Series Scanners