Kodak Kodak 8 MP Setup Guide
Kodak Kodak 8 MP - 8MP 3x Optical/5x Digital Zoom HD Camera Manual
 |
UPC - 683728160029
View all Kodak Kodak 8 MP manuals
Add to My Manuals
Save this manual to your list of manuals |
Kodak Kodak 8 MP manual content summary:
- Kodak Kodak 8 MP | Setup Guide - Page 1
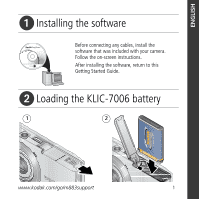
ENGLISH ᕡ Installing the software Before connecting any cables, install the software that was included with your camera. Follow the on-screen instructions. After installing the software, return to this Getting Started Guide. ᕢ Loading the KLIC-7006 battery 1 2 www.kodak.com/go/m883support 1 - Kodak Kodak 8 MP | Setup Guide - Page 2
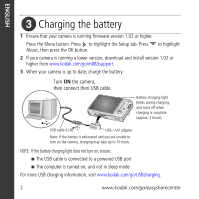
a lower version, download and install version 1.02 or higher from www.kodak.com/go/m883support. 3 When your camera is up to date, charge the battery: Turn ON the camera, then connect then USB cable. Battery charging light blinks during charging, and turns off when charging is complete (approx - Kodak Kodak 8 MP | Setup Guide - Page 3
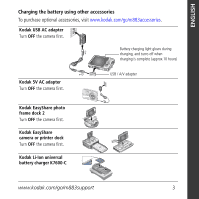
Kodak USB AC adapter Turn OFF the camera first. Battery charging light glows during charging, and turns off when charging is complete (approx.10 hours). Kodak 5V AC adapter Turn OFF the camera first. USB / A/V adapter Kodak EasyShare photo frame dock 2 Turn OFF the camera first. Kodak EasyShare - Kodak Kodak 8 MP | Setup Guide - Page 4
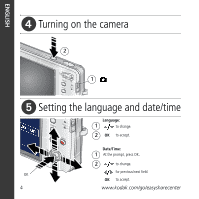
ENGLISH ᕤ Turning on the camera 2 1 ᕥ Setting the language and date/time Language: 1 to change. 2 OK to accept. Date/Time: 1 At the prompt, press OK. 2 to change. for previous/next field. OK OK to accept. 4 www.kodak.com/go/easysharecenter - Kodak Kodak 8 MP | Setup Guide - Page 5
picture/video Pictures 2 1 Videos 2 1 Framing marks 1 Slide the Mode switch to . 2 Press the Shutter button halfway to focus and set exposure. When the framing Display Display to turn on/off status icons, histogram, and framing grid. www.kodak.com/go/m883support 1 Slide the Mode switch to . 2 - Kodak Kodak 8 MP | Setup Guide - Page 6
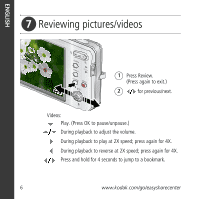
ENGLISH ᕧ Reviewing pictures/videos 1 Press Review. (Press again to exit.) 2 for previous/next. Videos: Play. (Press OK to pause/unpause.) During playback to reverse at 2X speed; press again for 4X. Press and hold for 4 seconds to jump to a bookmark. 6 www.kodak.com/go/easysharecenter - Kodak Kodak 8 MP | Setup Guide - Page 7
pictures/videos USB cable (U-8) (included) Kodak EasyShare photo frame dock 2, camera dock, or printer dock (may be sold separately) USB / A/V adapter USB cable (U-8) Turn camera on. For package contents, see your product package. To use a dock, see its Getting Started Guide. For - Kodak Kodak 8 MP | Setup Guide - Page 8
, so you can take and share your best pictures! To better understand each menu option, use camera Help. (Highlight a menu choice, then press the Zoom telephoto T button.) Visit www.kodak.com/go/m883support: • the user's guide • interactive troubleshooting and repairs • interactive tutorials • FAQs - Kodak Kodak 8 MP | Setup Guide - Page 9
ENGLISH Front View 1 23 4 7 6 1 Shutter button 2 On/Off button 3 Flash 4 Lens 5 DC-In (5V) 6 Microphone 7 Self-timer light www.kodak.com/go/m883support 5 9 - Kodak Kodak 8 MP | Setup Guide - Page 10
View 1234 5 6 13 7 12 8 11 10 9 optional 1 LCD 2 Battery charging/Video light 3 Delete, Menu, Review buttons 4 Wide angle button 5 Telephoto/Help button 10 Battery slot 11 Slot for optional SD or MMC card 12 USB/charging port, dock connector 13 Tripod socket www.kodak.com/go/easysharecenter - Kodak Kodak 8 MP | Setup Guide - Page 11
camera Using the 3X optical zoom 1 Use the LCD to frame your subject. 2 To zoom in, press Telephoto (T). To zoom out, press Wide Angle (W). The zoom indicator shows the zoom status. 3 Take the picture or video. D Digital zoom range T Optical zoom range (36-108 mm) W Using digital zoom Use digital - Kodak Kodak 8 MP | Setup Guide - Page 12
. 2x Press until the desired self-timer icon appears in the LCD status area. 1 Choose the desired self-timer mode, then compose the scene. 2 Press the Shutter button halfway, then completely down. The camera takes the picture/pictures after the delay. Use the same procedure to take a video, but - Kodak Kodak 8 MP | Setup Guide - Page 13
in the LCD status area. Flash modes Auto Flash fires When the lighting conditions require it. Fill Every time you take a picture, regardless of the lighting conditions. Use when the subject is in shadow or is "backlit" (when light is behind the subject). In low light, hold the camera steady or - Kodak Kodak 8 MP | Setup Guide - Page 14
-focus framing marks are not available in Landscape. Macro Close range. The camera automatically sets the focus distance depending on the zoom position. Use available light instead of flash, if possible. Press until the Macro or Landscape icon appears in the LCD status area. 14 www.kodak.com - Kodak Kodak 8 MP | Setup Guide - Page 15
Doing more with your camera Using Scene (SCN) modes Choose a Scene mode-for great pictures in practically any situation! 3 Press the OK button to choose a Scene mode. Using camera Help To better understand each menu option, use camera Help. Highlight a menu choice, then press the Zoom telephoto - Kodak Kodak 8 MP | Setup Guide - Page 16
timer Macro/Landscape Camera mode Album name Zoom: digital telephoto wide Histogram Flash Picture size Pictures/time remaining Image storage location Long time exposure AF mode Focus zone Exposure metering White Balance ISO Framing grid Battery level Exposure compensation 16 www.kodak.com/go - Kodak Kodak 8 MP | Setup Guide - Page 17
/video. 3 Press the Delete button. 4 Follow the screen prompts. Using the undo delete feature If you accidentally delete a picture, you may be able to use Undo Delete to retrieve it. This feature is only available immediately after you delete a single picture. www.kodak.com/go/m883support 17 - Kodak Kodak 8 MP | Setup Guide - Page 18
the OK button. Follow the screen prompts to replace the original picture or to save the enhanced picture as a new one. Enhanced pictures cannot be enhanced again on the camera. Kodak Perfect Touch technology can only be used with pictures, not video. ■ Press the Menu button to exit the menu. 18 - Kodak Kodak 8 MP | Setup Guide - Page 19
choose a single frame from a video, then make a picture suitable for a 4 x 6-inch (10 x 15 cm) print. 1 Press the Review button, then to find a video. 2 Press the Menu button, then to highlight the Edit tab. Highlight Make Picture, then press the OK button. Video Picture 3 Follow the screen - Kodak Kodak 8 MP | Setup Guide - Page 20
picture, suitable for a 4 x 6-inch frames, then 2, 7, or 14 equally spaced frames. Manual: You choose the first and last frames; the camera chooses 2, 7, or 14 equally spaced frames. Full Manual: You choose 4, 9, or 16 frames. Use Bookmarks: Bookmarked frames are used. A 4-, 9-, or 16-up picture - Kodak Kodak 8 MP | Setup Guide - Page 21
can press OK a second time to remove a check mark. Viewing as thumbnails (multi-up) 1 Press the Review button. 2 Press W to change from single-picture view to multi-up thumbnails. 3 Press T to return to single-picture view. ■ Press the Review button to exit Review. www.kodak.com/go/m883support 21 - Kodak Kodak 8 MP | Setup Guide - Page 22
function The battery does not charge using USB charging ■ See page 2 or visit www.kodak.com/go/USBcharging. Pictures remaining ■ Continue taking pictures. The camera is operating normally. number does not (The camera estimates the number of pictures remaining after each decrease after taking - Kodak Kodak 8 MP | Setup Guide - Page 23
may result in exposure to shock and/or electrical or mechanical hazards. If the LCD breaks, do not touch the glass or liquid. Contact Kodak customer support. ■ The use of an accessory that is not recommended by Kodak may cause fire, electric shock, or injury. For approved accessories, visit www - Kodak Kodak 8 MP | Setup Guide - Page 24
, accident, alteration, modification, unauthorized service, misuse, abuse, use with incompatible accessories or attachments (such as third party ink or ink tanks), failure to follow Kodak's operation, maintenance or repacking instructions, failure to use items supplied by Kodak (such as adapters and - Kodak Kodak 8 MP | Setup Guide - Page 25
Kodak EasyShare software CD and the camera firmware (the software that runs on the camera). Visit www.kodak.com/go/m883downloads. FCC compliance and advisory Kodak EasyShare M883 zoom digital camera installed or used in accordance with the instructions, may cause harmful interference to radio - Kodak Kodak 8 MP | Setup Guide - Page 26
DOC statement DOC Class B Compliance-This Class B digital apparatus complies with Canadian ICES-003. Observation des normes , contact your retailer, collection facility, or appropriate local authorities; or visit www.kodak.com/go/recycle. (Product weight: 105 g.) VCCI Class B ITE Australian C- - Kodak Kodak 8 MP | Setup Guide - Page 27
China RoHS Appendix Eastman Kodak Company Rochester, New York 14650 © Eastman Kodak Company, 2007 Kodak, EasyShare, and Perfect Touch are trademarks of Eastman Kodak Company. 4J6239_en www.kodak.com/go/m883support 27
-
 1
1 -
 2
2 -
 3
3 -
 4
4 -
 5
5 -
 6
6 -
 7
7 -
8
-
9
-
10
-
11
-
12
-
13
-
14
-
15
-
16
-
17
-
18
-
19
-
20
-
21
-
22
-
23
-
24
-
25
-
26
-
27
 |
 |
www.kodak.com/go/m883support
1
ENGLISH
±
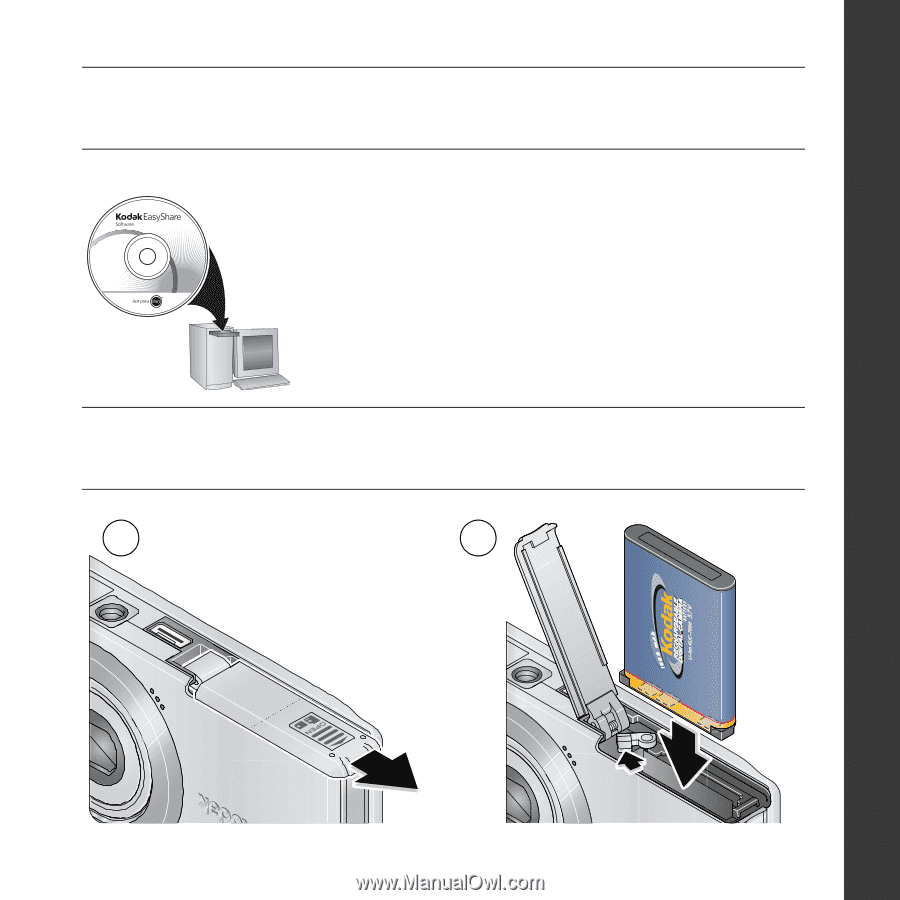
Installing the software
²
Loading the KLIC-7006 battery
Before connecting any cables, install the
software that was included with your camera.
Follow the on-screen instructions.
After installing the software, return to this
Getting Started Guide.
1
2