Kodak Z1085 Extended user guide - Page 44
Using exposure compensation to adjust brightness, Using exposure compensation with exposure bracketing
 |
UPC - 041771920296
View all Kodak Z1085 manuals
Add to My Manuals
Save this manual to your list of manuals |
Page 44 highlights
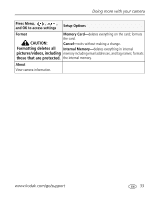
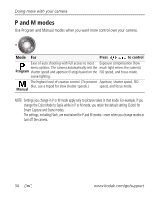
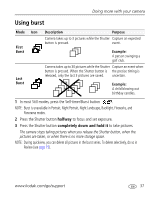
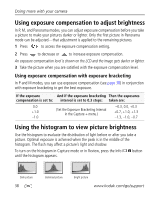
Doing more with your camera Using exposure compensation to adjust brightness In P, M, and Panorama modes, you can adjust exposure compensation before you take a picture to make your pictures darker or lighter. Only the first picture in Panorama mode can be adjusted-that adjustment is applied to the remaining pictures. 1 Press to access the exposure compensation setting. 2 Press to decrease or to increase exposure compensation. An exposure compensation level is shown on the LCD and the image gets darker or lighter. 3 Take the picture when you are satisfied with the exposure compensation level. Using exposure compensation with exposure bracketing In P and M modes, you can use exposure compensation (see page 38) in conjunction with exposure bracketing to get the best exposure. If the exposure And if the exposure bracketing Then the exposures compensation is set to: interval is set to 0.3 steps: taken are: 0.0 -0.3, 0.0, +0.3 +1.0 (Set the Exposure Bracketing Interval in the Capture + menu.) +0.7, +1.0, +1.3 -1.0 -1.3, -1.0, -0.7 Using the histogram to view picture brightness Use the histogram to evaluate the distribution of light before or after you take a picture. Optimal exposure is achieved when the peak is in the middle of the histogram. The flash may affect a picture's light and shadow. To turn on the histogram in Capture mode or in Review, press the Info until the histogram appears. button Dark picture 38 Balanced picture Bright picture www.kodak.com/go/support
-
 1
1 -
2
-
3
-
4
-
5
-
6
-
7
-
8
-
9
-
10
-
11
-
12
-
13
-
14
-
15
-
16
-
17
-
18
-
19
-
20
-
21
-
22
-
23
-
24
-
25
-
26
-
27
-
28
-
29
-
30
-
31
-
32
-
33
-
34
-
35
-
36
-
37
-
38
-
 39
39 -
 40
40 -
 41
41 -
 42
42 -
 43
43 -
 44
44 -
 45
45 -
 46
46 -
 47
47 -
 48
48 -
 49
49 -
50
-
51
-
52
-
53
-
54
-
55
-
56
-
57
-
58
-
59
-
60
-
61
-
62
-
63
-
64
-
65
-
66
-
67
-
68
-
69
-
70
-
71
-
72
-
73
-
74
-
75
-
76
-
77
 |
 |
