Kodak Z710 User Manual
Kodak Z710 - EASYSHARE Digital Camera Manual
 |
UPC - 041778197776
View all Kodak Z710 manuals
Add to My Manuals
Save this manual to your list of manuals |
Kodak Z710 manual content summary:
- Kodak Z710 | User Manual - Page 1
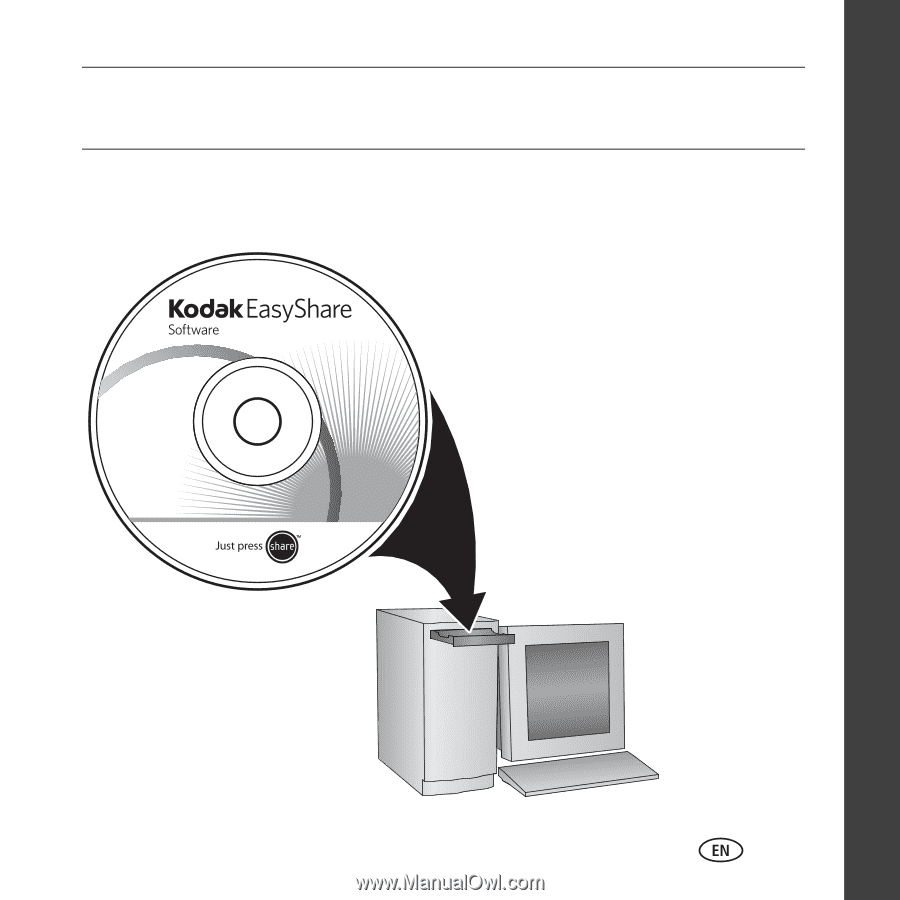
ENGLISH ᕡ Installing the software IMPORTANT: Before connecting any cables, install the software that was included with your camera. Follow the on-screen instructions. After installing the software, return to this Getting Started Guide. www.kodak.com/go/z710support 1 - Kodak Z710 | User Manual - Page 2
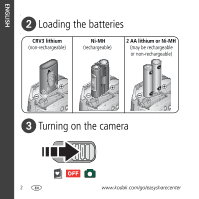
ENGLISH ᕢ Loading the batteries CRV3 lithium (non-rechargeable) Ni-MH (rechargeable) 2 AA lithium or Ni-MH (may be rechargeable or non-rechargeable) ᕣ Turning on the camera 2 www.kodak.com/go/easysharecenter - Kodak Z710 | User Manual - Page 3
ENGLISH ᕤ Setting the language, date/time Language: 1 to change. 2 OK to accept. Date/Time: 1 At the prompt, press OK. 2 to change. for previous/next field. OK to accept. OK www.kodak.com/go/z710support 3 - Kodak Z710 | User Manual - Page 4
on. EVF LCD 3 Press the Shutter button halfway to focus and set exposure. When the AF/AE indicator turns green, press the Shutter button completely down. 3 Press the Shutter button completely down and release. To stop recording, press the Shutter button again. 4 www.kodak.com/go/easysharecenter - Kodak Z710 | User Manual - Page 5
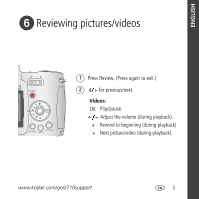
ENGLISH ᕦ Reviewing pictures/videos 1 Press Review. (Press again to exit.) 2 for previous/next. Videos: OK Play/pause. Adjust the volume (during playback). Rewind to beginning (during playback) Next picture/video (during playback). www.kodak.com/go/z710support 5 - Kodak Z710 | User Manual - Page 6
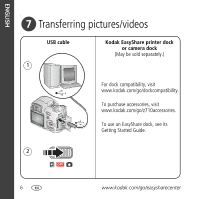
videos USB cable 1 Kodak EasyShare printer dock or camera dock (May be sold separately.) For dock compatibility, visit www.kodak.com/go/dockcompatibility. To purchase accessories, visit www.kodak.com/go/z710accessories. To use an EasyShare dock, see its Getting Started Guide. 2 6 www.kodak.com - Kodak Z710 | User Manual - Page 7
best pictures! Visit www.kodak.com/go/z710support and www.kodak.com/go/easysharecenter for: • the extended user's guide • interactive troubleshooting and repairs • interactive tutorials • FAQs • downloads • accessories • printing information • product registration www.kodak.com/go/z710support 7 - Kodak Z710 | User Manual - Page 8
ENGLISH Front view 45678 9 3 2 1 10 11 12 13 14 1 Grip 8 Speaker 2 Low-light assist, Self-timer light 9 Flash 3 Shutter button 10 Open Flash switch 4 Flash button 11 Neck strap post 5 Close-up/Landscape button 12 Microphone 6 Self-timer/Burst button 13 Lens 7 Power/Favorites switch 14 - Kodak Z710 | User Manual - Page 9
3 Delete button 4 Tripod socket 5 Dock connector 6 LCD 7 Info button 8 EVF (Electronic viewfinder) 9 EVF/LCD button 10 Zoom (Wide Angle/Telephoto) 11 Share button 12 Joystick/OK button 13 Mode dial 14 USB, A/V Out 15 Optional SD or MMC card 16 Battery compartment www.kodak.com/go/z710support 9 - Kodak Z710 | User Manual - Page 10
recording. 1 Use the viewfinder or LCD to frame your subject. 2 Press Telephoto (T) to zoom in. Press Wide Angle (W) to zoom out. The zoom indicator shows zoom status. 3 Take the picture or video. Zoom indicator Optical zoom range Digital zoom range W T D Use digital zoom in any Still mode to - Kodak Z710 | User Manual - Page 11
camera Using the flip-up flash Use the flash when you take pictures at night, indoors, or outdoors in heavy shadows. 1 2 Press the flash button repeatedly to scroll through flash modes. The current flash mode is depicted in the LCD ). In low light, hold the camera steady or use a tripod. The - Kodak Z710 | User Manual - Page 12
Doing more with your camera Using the self-timer 1 Place camera on a tripod or flat surface. 2 In any Still mode, is taken, press the Self-timer button. (The Self-timer setting remains active.) Use the same procedure to take a video, but: ■ Turn the Mode dial to Video . ■ Press the Shutter button - Kodak Z710 | User Manual - Page 13
quality and ease of use. Subjects that are in motion. Shutter speed is fast. The camera pre-settings are Multi-Pattern Exposure Metering, Multi-Zone Focus. Full-frame portraits of people. Allows the subject sound. P PASM More creative control. (See page 15.) ASM www.kodak.com/go/z710support 13 - Kodak Z710 | User Manual - Page 14
repeatedly until the or icon appears in the status bar. 3 Take a picture. NOTE: After you take the picture, the camera stays in the Close-up or Landscape setting. To exit, press the Close-up/Landscape button until the icon turns off (or turn off the camera). 14 www.kodak.com/go/easysharecenter - Kodak Z710 | User Manual - Page 15
and detail in pictures at close range. Use available light instead of flash if possible. The camera automatically sets the focus distance depending on the zoom position: Zoom position Wide angle Telephoto Close-up focus distance 4.7-27.6 in. (12-70 cm) 3.9-6.9 ft (1.2-2.1 m) Landscape pictures - Kodak Z710 | User Manual - Page 16
, you retain the default setting of Color for Auto and Scene modes. The settings, including Flash, are maintained for P, A, S, and M modes-even when you change modes or turn off the camera. Use Reset to Default to reset P, A, S, or M mode to its default setting. 16 www.kodak.com/go/easysharecenter - Kodak Z710 | User Manual - Page 17
Turn the Mode dial to PASM. The mode options are displayed. 2 Press to choose P, A, S, or M. 3 Press to move between settings, open a setting, or change a setting , decrease the setting; if it's too dark, increase the setting. Shutter speed-control how long the shutter stays open. A shaking - Kodak Z710 | User Manual - Page 18
more with your camera Aperture-(also known as f-stop) control the size of the lens opening, which determines the depth of field. ■ Smaller f-stop numbers indicate a larger lens opening; good for portraits and low-light conditions. ■ Larger f-stop numbers indicate a smaller lens opening; keeps the - Kodak Z710 | User Manual - Page 19
1 Press Review. (Press again to exit.) 2 for previous/next. Videos: OK Play/pause. Adjust the volume. Rewind to beginning (during playback). Next picture/video (during playback). Magnifying a picture 1 W/T 2 3 OK Magnify 1X - 8X. View other parts of the picture. Return to 1X. www.kodak.com/go - Kodak Z710 | User Manual - Page 20
Working with pictures/videos Viewing multi-up (thumbnails) 1 View multi-up thumbnails. 2 View previous/next row or thumbnail. 3 OK View single picture. Deleting pictures and videos 1 Press Review. 2 View previous/next. 3 Press Delete. 4 Follow the screen prompts. 20 www.kodak.com/go/ - Kodak Z710 | User Manual - Page 21
Use the Slide Show to display your pictures and videos on the camera. To save battery power, use an optional Kodak 3-volt AC adapter. (Visit www.kodak.com/go/z710accessories.) Starting the slide show 1 Press the Review button, then press the Menu button. 2 Press to highlight Slide Show, then - Kodak Z710 | User Manual - Page 22
Telephoto (T) to zoom in, or 5 Press OK, then follow the screen prompts. to move the crop box. The picture is copied, then cropped. The original picture is saved. A cropped picture cannot be cropped again on the camera. Press the Menu button to exit the menu. 22 www.kodak.com/go/easysharecenter - Kodak Z710 | User Manual - Page 23
view To turn on the histogram in any picture-taking mode or in Review, press the Info button until the histogram appears. NOTE: If a scene is dark or light, you can adjust the exposure compensation before taking the picture. The flash may affect a picture's light and shadow. www.kodak - Kodak Z710 | User Manual - Page 24
product support, visit www.kodak.com/go/z710support and select Interactive Troubleshooting & Repairs. Problem Camera does not turn on, or it turns on and shuts off Solution 1 Turn off the camera. 2 Remove the batteries; confirm that they are the correct batteries for your camera. 3 Insert a set of - Kodak Z710 | User Manual - Page 25
Important safety instructions CAUTION: Do not disassemble this product; there are no user-serviceable parts inside. Refer servicing to qualified service personnel. Do not expose this product to liquid, moisture, or extreme temperatures. Kodak AC adapters and battery chargers are intended for - Kodak Z710 | User Manual - Page 26
does not apply to the battery(s) used in digital cameras or accessories. This warranty does not cover circumstances beyond Kodak's control, nor problems caused by failure to follow the operating instructions in the Kodak EasyShare digital cameras and accessories User's Guides. This warranty does not - Kodak Z710 | User Manual - Page 27
option of replacement is Kodak's only obligation. Kodak will not of substitute equipment, facilities or services, or claims of your customers Kodak EasyShare Z710 zoom digital camera This equipment has been tested and found to comply with the limits for a Class B digital device, pursuant to Part - Kodak Z710 | User Manual - Page 28
can be determined by turning the equipment off and on, the user is encouraged to try user's authority to operate the equipment. Where shielded interface cables have been provided with the product or specified additional components or accessories www.kodak.com/go/recycle for recycling program information. VCCI - Kodak Z710 | User Manual - Page 29
by a consumer engaging in personal and non-commercial activities. Eastman Kodak Company Rochester, New York 14650 © Eastman Kodak Company, 2006 Kodak, EasyShare, and Perfect Touch are trademarks of Eastman Kodak Company. Schneider-Kreuznach and C-Variogon are trademarks of Jos. Schneider Optische
-
 1
1 -
 2
2 -
 3
3 -
 4
4 -
 5
5 -
 6
6 -
 7
7 -
8
-
9
-
10
-
11
-
12
-
13
-
14
-
15
-
16
-
17
-
18
-
19
-
20
-
21
-
22
-
23
-
24
-
25
-
26
-
27
-
28
-
29
 |
 |
www.kodak.com/go/z710support
1
ENGLISH
±
Installing the software
IMPORTANT:
Before connecting any cables, install the software that was included with
your camera. Follow the on-screen instructions.
After installing the software, return
to this Getting Started Guide.