Konica Minolta Fujitsu fi-6400 Getting Started Guide - Page 5
Test-Scanning Documents
 |
View all Konica Minolta Fujitsu fi-6400 manuals
Add to My Manuals
Save this manual to your list of manuals |
Page 5 highlights
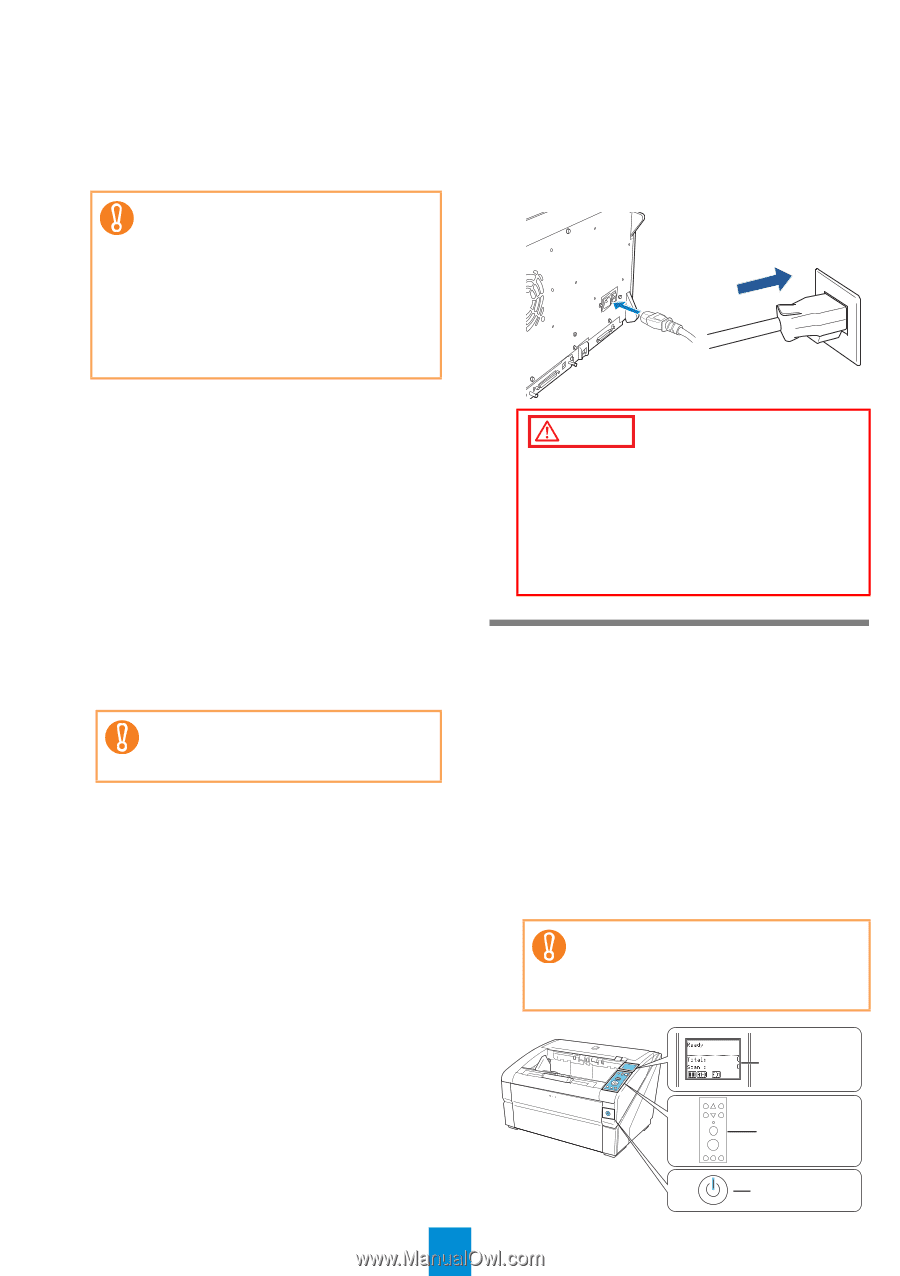
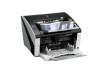
1. Make sure that the computer is turned OFF. 2. Connect the scanner to your computer either with a USB or SCSI cable. (fi-6800) Only fi-6800 is supported by SCSI. You cannot make both USB and SCSI cable connections at the same time. (fi-6800) You cannot connect multiple computers to the scanner at the same time. Turn off the scanner and your computer whenever you switch the interface cable. The following describes the requirements for connecting with the respective cables. USB cable -Be sure to use the USB cable which comes as an accessory with this scanner. -When connecting to an USB hub, use the first stage USB hub that is closest to the computer. If you use the second or later hub stages, the scanner may not operate correctly. -If you connect the scanner with USB 2.0, it is required that the USB port and the hub be compliant with USB 2.0. The scanning speed slows down when you connect the scanner with USB 1.1. SCSI cable (fi-6800) Be careful not to damage any pins of the SCSI connector when connecting the scanner to your computer. -When using the scanner with a SCSI interface, the following types of SCSI cable and SCSI card must be purchased. SCSI cable: Use a SCSI cable whose connector on the computer side mates to the connector on the SCSI card installed on your computer. On the scanner side, use a 50-pin highdensity type SCSI cable. SCSI Connector 1: 50-pin high-density type SCSI Connector 2: 68-pin high-density type SCSI card: Find the recommended SCSI card information on the Fujitsu website (FAQ): http://www.fujitsu.com/global/support/computing/peripheral/scanners/scsi/ -In a SCSI daisy chain formation, connect the scanner so that it is the terminated device. -The SCSI ID initially set at the factory is [5]. If the SCSI ID of another SCSI device is set to the same ID, change the scanner's SCSI ID to [0] through [6]. 3. Connect the power cable to the power connector of your scanner and to the power outlet. WARNING Be sure to use the supplied power cable. The following cases may cause electrical shock or malfunction. Using a power cable other than that supplied Using the supplied power cable for other devices Test-Scanning Documents Using PaperStream Capture, you can test-scan documents to check if they are scanned correctly. The following describes how to test-scan a document: 1. Turn on the scanner. 1. Press the "I" side of the main power switch on the rear side of the scanner. 2. Press the power button on the front of the scanner. The scanner is turned ON, the power button lights in blue, and the liquid crystal display (LCD) shows [Ready]. If you see an error indication other than the above on the LCD, refer to "Chapter 7 Troubleshooting" in the Operator's Guide. LCD Menu Function /Enter Send to /Pause Check Clear /Back Stop Scan Counter iMFF Reset Eject Overlay Power Button 5
-
 1
1 -
 2
2 -
 3
3 -
 4
4 -
 5
5 -
 6
6
 |
 |