Konica Minolta Kodak Ngenuity 9125 User Guide - Page 87
Digits, Font Height, Font Width, Large, Normal, Text Orientation, Insert Dynamic Content
 |
View all Konica Minolta Kodak Ngenuity 9125 manuals
Add to My Manuals
Save this manual to your list of manuals |
Page 87 highlights
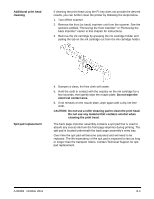
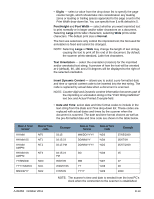
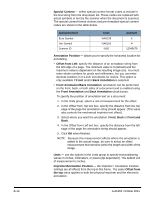
• Digits - select a value from the drop-down list to specify the page counter length, which should take into consideration any leading zeros or leading or trailing spaces appended to the page count in the Print Width drop-down list. You can specify from 1 to 9; default is 5. Font Height and Font Width - select whether you want imprinted text to print normally or in larger and/or wider characters on a document. Selecting Large prints taller characters; selecting Wide prints wider characters. The default print size is Normal. The font size selections only control the imprinted text; the font used for annotation is fixed and cannot be changed. NOTE: Selecting Large or Wide may change the length of text strings, causing the text to print off the end of the document. By default, the scanner prints standard, Latin font characters. Text Orientation - select the orientation (rotation) for the imprinted and/or annotated text string. A preview of how the text will be oriented at 0 (default), 90, 180 and 270 degrees will be displayed to the right of the selected orientation. Insert Dynamic Content - allows you to select a pre-formatted date and time or special content code to be inserted into the text string. The code is replaced by actual data when a document is scanned. NOTE: Counter digit and Dynamic content information becomes part of the imprinting or annotation string in the "Print String Definition" text box and Actual Printed Example field. • Date and Time: select date and time format codes to include in the text string from the Date and Time drop-down list. These codes are replaced with actual dates and times by the scanner when the document is scanned. The date and time format choices as well as the pre-formatted date and time code are shown in the table below. Date & Time format HH:MM HH:MM:SS HH:MM AM/PM HH:MM:SS AM/PM YY/MM/DD YYYY/MM/DD MM/DD/YY Date & Time code Example %T0 03:15 %T1 %T2 03:15:23 03:15 PM Date & Time format MM/DD/YYYY DD/MM/YY DD/MM/YYYY Date & Time code Example %D3 07/05/2009 %D4 %D5 05/07/09 05/07/2009 %T3 %D0 %D1 %D2 03:15:23 PM 09/07/05 2009/07/05 07/05/09 DD MM YY YYYY %D6 %D7 %D8 %D9 05 07 09 2009 NOTE: The scanner's time and date is seeded from the host PC's clock when the connection to the scanner is established. A-61662 October 2011 B-13
-
 1
1 -
2
-
3
-
4
-
5
-
6
-
7
-
8
-
9
-
10
-
11
-
12
-
13
-
14
-
15
-
16
-
17
-
18
-
19
-
20
-
21
-
22
-
23
-
24
-
25
-
26
-
27
-
28
-
29
-
30
-
31
-
32
-
33
-
34
-
35
-
36
-
37
-
38
-
39
-
40
-
41
-
42
-
43
-
44
-
45
-
46
-
47
-
48
-
49
-
50
-
51
-
52
-
53
-
54
-
55
-
56
-
57
-
58
-
59
-
60
-
61
-
62
-
63
-
64
-
65
-
66
-
67
-
68
-
69
-
70
-
71
-
72
-
73
-
74
-
75
-
76
-
77
-
78
-
79
-
80
-
81
-
 82
82 -
 83
83 -
 84
84 -
 85
85 -
 86
86 -
 87
87 -
 88
88 -
 89
89 -
 90
90 -
 91
91 -
 92
92 -
93
-
94
-
95
-
96
-
97
-
98
 |
 |