Konica Minolta Kodak Ngenuity 9150 User Guide
Konica Minolta Kodak Ngenuity 9150 Manual
 |
View all Konica Minolta Kodak Ngenuity 9150 manuals
Add to My Manuals
Save this manual to your list of manuals |
Konica Minolta Kodak Ngenuity 9150 manual content summary:
- Konica Minolta Kodak Ngenuity 9150 | User Guide - Page 1
- Konica Minolta Kodak Ngenuity 9150 | User Guide - Page 2
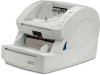
Place the scanner on a sturdy, level work surface capable of supporting 50.8 kg (112 lbs) and leave adequate clearance on all cord from the power outlet. Contact Kodak Service. • Do not disassemble, service or modify the scanner except as explained in the User's Guide. • Do not move the scanner - Konica Minolta Kodak Ngenuity 9150 | User Guide - Page 3
service; follow local regulations or contact Kodak locally for more information. • The product packaging is recyclable. • Kodak used in accordance with the instruction manual, may cause harmful interference to , radio disturbance may arise. When such trouble occurs, the user may be required to - Konica Minolta Kodak Ngenuity 9150 | User Guide - Page 4
Peoples Republic of China WARNING: This is a Class A product. In a domestic environment this product may cause radio interference in which case the user may be required to take adequate measures. Korea Please note that this equipment has obtained EMC registration for commercial use. In the event - Konica Minolta Kodak Ngenuity 9150 | User Guide - Page 5
OVERVIEW 1-1 INSTALLATION 2-1 GETTING STARTED 3-1 CONTROL PANEL AND NGENUITY OPERATOR UTILITY 4-1 ADVANCED FEATURES 5-1 MAINTENANCE 6-1 TROUBLESHOOTING 7-1 APPENDICES A-E - Konica Minolta Kodak Ngenuity 9150 | User Guide - Page 6
the Kodak Ngenuity 9000 Series Scanners. The information in this guide is for use with all models unless otherwise noted. The following documentation is available in support of the Kodak Ngenuity 9000 Series Scanners: • User's Guide • Installation Guide • Maintenance Reference Guide A-61662 - Konica Minolta Kodak Ngenuity 9150 | User Guide - Page 7
page (postscan) imprinting prints user-specified 802 9654 What's in the box • Kodak Ngenuity 9090DC, 9090DB, 9125DC or 9150DC Scanner • Power cord bundle Manual and Release notes - Ngenuity Operator Utility (NOU) - ISIS/TWAIN Drivers - User's Guide - Installation Guide - Maintenance Reference Guide - Konica Minolta Kodak Ngenuity 9150 | User Guide - Page 8
the control panel. 3 Feeder table extender - provides a support for longer documents that extend beyond the standard length. The ) to the feeder table. 4 Side guides - used to guide document(s) into the scanner's transport. They manual feeding or a down position for automatic document feeding. - Konica Minolta Kodak Ngenuity 9150 | User Guide - Page 9
cover. 8 Scanner cover - opens in an upward position and will stay open in a full-up position with the support of two gas springs. 9 Document output guides - used to guide the scanned document(s) into a neat stack on the exit tray. They can be widthadjusted independently for left-, right- or - Konica Minolta Kodak Ngenuity 9150 | User Guide - Page 10
of the scanner cover. This is useful when scanning small documents. NOTES: • If you have the optional imprinter, there is a door underneath the exit tray that allows access to the front page imprinter. • If you are using the optional straight pass-through adapter, you can remove the exit tray from - Konica Minolta Kodak Ngenuity 9150 | User Guide - Page 11
use of the exit tray extender. NOTE: Positioning the document stop guide too close to the back of the exit tray (towards the extender - pull the extender out when scanning longer documents. A second document stop guide is located on the end of the exit tray extender when scanning extra long documents - Konica Minolta Kodak Ngenuity 9150 | User Guide - Page 12
Rear view 1 2 3 45 67 8 9 1 Imprinter door - provides access to the optional imprinter for installation and maintenance. 2 Straight pass-through door - allows you to use the optional straight pass-through adapter. When the door is open and the - Konica Minolta Kodak Ngenuity 9150 | User Guide - Page 13
the exit deflector 2-1 Installation: with a USB connection 2-2 Installation: with an optional SCSI connection 2-3 This section provides detailed information supporting the Installation Guide that is provided with your scanner. Follow these steps in the order they are provided to install your - Konica Minolta Kodak Ngenuity 9150 | User Guide - Page 14
, refer to the next section for installation instructions. 1. Without the scanner attached, turn on the host PC. 2. Load the Installation CD into the CD-ROM drive and install the software in the following order: Ngenuity VRS software first, then the Ngenuity Operator Utility (NOU). You do not need - Konica Minolta Kodak Ngenuity 9150 | User Guide - Page 15
Installation: with an optional SCSI connection The Kodak Ngenuity Scanner is equipped to accommodate a SCSI , go to www.Kodak.com/go/scanners. 3. Power down the host PC and remove the power cord. 4. Install the SCSI card (Adaptec 29160) in the host PC. See the instructions that are included with - Konica Minolta Kodak Ngenuity 9150 | User Guide - Page 16
Utility Home Screen (default) will update when the scanner self tests have passed and communication with the scanner has been established. NOTE: If the Ngenuity Operator Utility failed to connect with the scanner, refer to Chapter 7, Troubleshooting for more information. 2-4 A-61662 October 2011 - Konica Minolta Kodak Ngenuity 9150 | User Guide - Page 17
Manually feeding , the Ngenuity Operator Control guides on the feeder table can be moved in and out to accommodate the size of the documents you are scanning. • If you are scanning documents longer than 11 inches (279.4 mm), pull the feeder table extender out. The feeder table extender will support - Konica Minolta Kodak Ngenuity 9150 | User Guide - Page 18
fluids on the paper must be dry before scanning is started. • Sheets that are exceptionally thick or thin should be placed in the feeder table manually, one sheet at a time, or you can use the optional straight pass-through adapter. The following types of documents may cause jams or may cause - Konica Minolta Kodak Ngenuity 9150 | User Guide - Page 19
skimmer to the up position. 7. Remove any paper from the feeder. 8. Start a scan, either single or batch. The feeder table will move up, and the Manual Feed LED will light. The scanner motor will start and beep indicating it is ready for scanning. 9. Carefully insert the page, keeping your hands and - Konica Minolta Kodak Ngenuity 9150 | User Guide - Page 20
Accelerated scanning (VRS only) If you want to improve the scanning throughput at 300 dpi (or greater), you can change your acceleration scanning setting. To do this: 1. If using Windows 7, from the Taskbar, click the Up arrow to access the Admin Utility. 2. Right-click the VirtualReScan icon. 3. - Konica Minolta Kodak Ngenuity 9150 | User Guide - Page 21
Utility Contents Control panel 4-2 Status 4-3 Feeder table 4-5 Custom functions 4-5 Scan monitor 4-5 Batch control 4-7 Ngenuity Batch Counter 4-8 Ngenuity Operator Utility 4-8 Ngenuity Operator Utility main screen 4-9 Menu bar 4-10 Home screen 4-13 Settings button 4-15 Maintenance - Konica Minolta Kodak Ngenuity 9150 | User Guide - Page 22
Control panel The control panel is located on the front of the scanner. The LEDs and audible tones notify you of the current state of the scanner (e.g., power state, maintenance needed, active features, errors, etc.). The control panel has five sections: • Status • Feeder table • Custom functions • - Konica Minolta Kodak Ngenuity 9150 | User Guide - Page 23
Status The status area of the control panel consists of: Power Mode, Back Door, Maintenance and Manual Feed. Power Mode - this green LED indicates the power status or transition between power modes. Power State/Transition Power Mode LED Off Off Sleep>Powered - Konica Minolta Kodak Ngenuity 9150 | User Guide - Page 24
imprinter cleaning, etc.). Scanner self-test fault detected; scanner service may be required. Use the NOU for more information on the self test failure. Manual Feeder), to Manual feed mode. When the LED is illuminated, the scanner is in Manual feed mode. Feed modes: the Ngenuity Scanner has four - Konica Minolta Kodak Ngenuity 9150 | User Guide - Page 25
no function. Two custom functions (F1 and F2) can be assigned via the Ngenuity Operator Utility. Available functions are: Feed Test Batch, Page Eject and Clean and F2 is assigned to Page Eject. See the section entitled, "Ngenuity Operator Utility" later in the chapter for more information. The Scan - Konica Minolta Kodak Ngenuity 9150 | User Guide - Page 26
Multifeed - when illuminated, indicates multiple or overlapped documents have been detected entering the scanner. This indicator will either momentarily light or remain lit depending on the multifeed condition. For example: • If the multifeed mode is set to Stop, the indicator remains lit and the - Konica Minolta Kodak Ngenuity 9150 | User Guide - Page 27
feeder - the skimmer is lowered - the feeder table has risen (or is rising) to where the skimmer is resting on the documents in the feeder. • Manual Feed mode: the scanner is ready to scan. The LED will remain a steady green while the scanner is scanning. Clear/Restart - allows you to clear - Konica Minolta Kodak Ngenuity 9150 | User Guide - Page 28
application can be started from Start>Programs>Kodak>Ngenuity 9000 Scanner>Ngenuity Batch Counter. This application provides two counters, click the C button next to the bottom counter. Ngenuity Operator Utility The Ngenuity Operator Utility (NOU) is the application that communicates with the - Konica Minolta Kodak Ngenuity 9150 | User Guide - Page 29
Operator Utility main screen The Ngenuity Operator Utility main screen provides a menu bar and options for configuring basic scanner settings and tasks. The sections that follow provide descriptions of the components - Konica Minolta Kodak Ngenuity 9150 | User Guide - Page 30
as instructed by Kodak Technical Support. Update Firmware - allows you to select and download scanner firmware updates. Firmware updates should only be performed when instructed by Kodak Technical Support. See www.kodak.com/go/ scanners for any possible updates. Exit - closes the Ngenuity Operator - Konica Minolta Kodak Ngenuity 9150 | User Guide - Page 31
Access>Configure. The Configure Access Wizard dialog box will be displayed. 2. Enter the password, Ngenuity, in the Password field and click Next. NOTE: It is recommended that you change the Kodak-supplied password using the Change password option after you login the first time. A-61662 October - Konica Minolta Kodak Ngenuity 9150 | User Guide - Page 32
OK, when finished. Displays help topics for the following: View Operator Manual, Product Support, and About Ngenuity Scanner Utility. View Operator Manual - launches a PDF file for the Kodak Ngenuity 9000 Series Scanners User's Guide. NOTE: You must have Adobe Reader installed on your PC to view - Konica Minolta Kodak Ngenuity 9150 | User Guide - Page 33
main Ngenuity Operator Utility screen, the following information is displayed. Scanner Model - displays the scanner connection status. If the scanner is properly connected, the icon indicates a successful connection. The scanner model and connectivity type (USB or SCSI) is also displayed. Imprinter - Konica Minolta Kodak Ngenuity 9150 | User Guide - Page 34
the Scanner Self Test monitor again. If the problem persists, refer to Chapter 7, Troubleshooting. Maintenance monitor - this section of the guides, camera glass covers, sensors) • Replace feed rollers • Calibration of the front/back camera • Replace imprinter ink cartridge (if optional imprinter - Konica Minolta Kodak Ngenuity 9150 | User Guide - Page 35
6, Maintenance. When you click the Settings button on the Ngenuity Operator Utility main screen, the Configure Scanner Settings screen will ; the maximum time is 4 hours. NOTE: Sleep mode can also be entered manually by pressing the Pause/Stop button on the control panel. See the section entitled, - Konica Minolta Kodak Ngenuity 9150 | User Guide - Page 36
or clear the transport after a stop. This is the default setting for the F2 key. • Clean Print Head: if you have the optional imprinter installed, will activate the imprinter to clean the print head. Audio - allows you to configure audio features. • Volume: can be set to Mute, Low, Medium or High - Konica Minolta Kodak Ngenuity 9150 | User Guide - Page 37
Advanced settings • Select the Advanced button on the Configure Scanner Settings screen to access additional scanner settings. Border Adjust tab: allows you to adjust the image boundaries or borders of a scanned image which is determined by autocrop. Each side of a scanned image can be - Konica Minolta Kodak Ngenuity 9150 | User Guide - Page 38
Configuration tab: allows you to configure advanced scanner features. 4-18 Front Panel MF Ignore Button Mode - allows you to select how the MF Ignore button on the control panel will operate. • Ignore MF Alarm on the Next Page Only: when you select this option, it allows you to momentarily turn - Konica Minolta Kodak Ngenuity 9150 | User Guide - Page 39
Maintenance button on the Ngenuity Operator Utility main screen guides, sensors) Replace Feed Rollers (pick, drive and separation rollers) Range 1K - 50K 5K - 100K 5K - 150K 100K - 900K Default 10K 50K 50K 600K Maintenance Operations - provides access to additional maintenance and troubleshooting - Konica Minolta Kodak Ngenuity 9150 | User Guide - Page 40
screen 5-10 Multifeed screen 5-11 About screen 5-13 This chapter provides information about advanced features that can be used with Kodak Ngenuity 9000 Series Scanners. The controls for operating the Advanced Features are accessible within the VirtualReScan® (VRS) Interactive Viewer. NOTE: When - Konica Minolta Kodak Ngenuity 9150 | User Guide - Page 41
the VRS Interactive Viewer, Ngenuity VRS Professional software must be loaded on the host PC that the scanner is connected to. VRS Professional will be active when the scanning application being used is launched and a VRS scan source is selected. NOTE: This User's Guide only documents the VRS-based - Konica Minolta Kodak Ngenuity 9150 | User Guide - Page 42
Application and Profiles, see the Kofax VRS 4.5 (or newer) User's Guide. NOTE: Any settings made in the Advanced Properties dialog box must be Imprinter, see Appendix B for installation procedures, maintenance and instructions for using the front page (pre-scan) and back page (post-scan) imprinter - Konica Minolta Kodak Ngenuity 9150 | User Guide - Page 43
Color screen The Color screen allows you to dropout a form's background so that only the entered data is included in the electronic image (i.e., remove the form's lines and boxes). Front Side Dropout Color - select the desired dropout color you want to eliminate from the front side. Selections are - Konica Minolta Kodak Ngenuity 9150 | User Guide - Page 44
Picking Rectangle screen The Picking Rectangle screen provides the following options: Front Side/Back Side - allows you to define the area to be imaged by selecting a value in the Width and Height drop-down boxes and its offset from the upper left corner of the image (defined by the Top and Left - Konica Minolta Kodak Ngenuity 9150 | User Guide - Page 45
Rotation screen The Rotation screen provides the following options. Front Side/Back Side - allows you to rotate the scanned image 0, 90, 180 or 270 degrees. 0 is the default. 5-6 A-61662 October 2011 - Konica Minolta Kodak Ngenuity 9150 | User Guide - Page 46
signal that a patch has been recognized. If grayed out, this feature is not currently supported by the scanner firmware. These patch codes are recognized when toggle color mode is enabled: 300 dpi. Refer to the Kofax VRS Users Guide or VRS online help for more information regarding this feature. 5-7 - Konica Minolta Kodak Ngenuity 9150 | User Guide - Page 47
you to make any required feeding adjustments. The document can then be restarted using the Clear/Restart button. • The Very Long Document option does not support the simultaneous use of some other options offered through VRS ImageControls and Direct Drivers. 5-8 A-61662 October 2011 - Konica Minolta Kodak Ngenuity 9150 | User Guide - Page 48
you to reverse black with white when scanning in black and white or to invert grayscale levels when scanning in grayscale. This control is not supported when scanning in color. Dark Background Crop - in addition to auto-crop and deskew, this option could be considered as an alternative for dark - Konica Minolta Kodak Ngenuity 9150 | User Guide - Page 49
Advanced Color screen The Advanced Color screen provides the following options. 5-10 If the color on your images is not as expected, you can use the Advanced Color screen to make color adjustments to meet your scanning needs. Camera Modes • sRGB: uses specific camera gamma to achieve the best - Konica Minolta Kodak Ngenuity 9150 | User Guide - Page 50
Multifeed screen Gamma (default) - allows you to specify a specific camera gamma (1.0 - 2.5). The camera gamma value can be entered or selected by moving the slider to the desired value. Select a lower gamma value to enhance color saturation for bright colors and a higher gamma value to enhance - Konica Minolta Kodak Ngenuity 9150 | User Guide - Page 51
• Stop: when a multifeed is detected, the scanner sounds an audible alarm, the Multifeed LED lights steady and the scanner's transport stops. You can delete or keep the multifeed image. The VirtualRescan Auto Resolve Manager will display the front of the image of the document that triggered the - Konica Minolta Kodak Ngenuity 9150 | User Guide - Page 52
About screen The About screen displays the scanner version and copyright information. A-61662 October 2011 5-13 - Konica Minolta Kodak Ngenuity 9150 | User Guide - Page 53
6-12 Replacing the pre-separation pad 6-13 Replacing the imaging guides 6-13 Lamps (LEDs 6-13 Camera calibration 6-14 Supplies and life of your scanner. The Maintenance monitor on the Home screen of the Ngenuity Operator Utility (NOU) provides reminders as to when scanner maintenance is required. - Konica Minolta Kodak Ngenuity 9150 | User Guide - Page 54
10,000 pages Clean transport rollers 50,000 pages Clean Optics: imaging guides, camera glass covers, sensors. The lamps are not part of the 1200 hours 600,000 pages Ink cartridge(s) - only relevant if optional imprinter is installed Approximately 34,000 pages (can vary depending on number of - Konica Minolta Kodak Ngenuity 9150 | User Guide - Page 55
Cleaning procedures Cleaning your scanner and performing preventative maintenance on a regular basis is required to ensure the best possible image quality. Some document types generate more paper dust and debris and may require more frequent cleaning. Before cleaning your scanner or replacing - Konica Minolta Kodak Ngenuity 9150 | User Guide - Page 56
. Cleaning the pick and drive rollers When the feed rollers become dirty, they may begin to slip on paper or cause multifeeds. To prevent feeding problems and avoid rubber tire replacements, it is recommended that you clean the tires on the rollers every 10,000 pages or as needed. Different document - Konica Minolta Kodak Ngenuity 9150 | User Guide - Page 57
5. Re-install the pick roller. 6. Remove the drive roller by pushing the roller to the right. Hold the drive roller shaft in place and slide it off the shaft. Gently release the drive roller shaft back into position. 7. Using a roller cleaning pad, scrub the roller tires using a side-to-side motion - Konica Minolta Kodak Ngenuity 9150 | User Guide - Page 58
12. Close the scanner cover and reset the maintenance reminder by clicking on the Clean Feed Rollers link on the Maintenance monitor. 13. Click Yes on the dialog box to confirm the feed rollers have been cleaned. The reminder will be reset for the next required maintenance session. 6-6 A-61662 - Konica Minolta Kodak Ngenuity 9150 | User Guide - Page 59
The lamps (LEDs) should not be cleaned with wipes or solvents. Cleaning the imaging guides and camera glass covers To prevent streaks in images, reduced OCR/ICR/Barcode recognition rates, blurred . The MSDS is available on the Kodak web site at www.kodak.com/go/MSDS. A-61662 October 2011 6-7 - Konica Minolta Kodak Ngenuity 9150 | User Guide - Page 60
scanner. 6. When the camera cover is clean, re-insert the cleaned imaging guide into the scanner by holding the frame of the imaging guide so that the fastening clips are on the back side of the imaging guide. Slide the guides under the transport tray towards the feeder table and ease the back side - Konica Minolta Kodak Ngenuity 9150 | User Guide - Page 61
Cleaning the sensors There are 7 sensors that require regular cleaning. Use only the supplied blower brush to clean these sensors. Do not use any type of cotton swab or cloth as these items may leave lint in the sensors. 9. Feeder sensor: Place the brush end of the blower brush into the feeder - Konica Minolta Kodak Ngenuity 9150 | User Guide - Page 62
11. Exit sensor: The exit sensor is located on the transport toward the back of the scanner. Clean the exit sensor by placing the brush end of the blower brush into the exit sensor area and squeeze the blower brush several times. Exit sensor 12. When all sensors are clean, close the scanner cover - Konica Minolta Kodak Ngenuity 9150 | User Guide - Page 63
50,000 pages or as needed. NOTE: It is recommended that you clean the imaging guides again after cleaning the transport with a transport cleaning sheet. 1. Establish communication between the scanner and the Ngenuity Operator Utility. 2. Verify that one of the Custom Functions (F1 or F2) is set to - Konica Minolta Kodak Ngenuity 9150 | User Guide - Page 64
Replacement procedures Replacing tires This section provides procedures for replacing the following parts: the feed rollers, the pre-separation pad and the imaging guides. When replacing parts, turn the scanner off by pressing the power switch located in the back of the scanner and unplug the power - Konica Minolta Kodak Ngenuity 9150 | User Guide - Page 65
lifting the pad up and out of position. Replacing the imaging guides Lamps (LEDs) NOTE: The pre-separation pad fits snuggly in Ngenuity Scanners should last the life of the scanner with normal use. If something happens that requires the replacement of the LEDs, contact Kodak Technical Support - Konica Minolta Kodak Ngenuity 9150 | User Guide - Page 66
• Shut down any other scanning application connected to the scanner. 1. Open the Ngenuity Operator Utility and establish communication with the scanner. 2. Click on one of the message, Lift skimmer, then manually feed the calibration sheet into scanner will be displayed. 6-14 A-61662 October 2011 - Konica Minolta Kodak Ngenuity 9150 | User Guide - Page 67
tray is empty. The scanner will automatically go into Manual Feed Mode, the feeder table will rise and recheck the scanner's optics. After cleaning, inspect the imaging guides for contamination, excessive scratches or gouges, or dirt that has Kodak Technical Support. A-61662 October 2011 6-15 - Konica Minolta Kodak Ngenuity 9150 | User Guide - Page 68
Science Roller Cleaning Pads 853 5981 Staticide Wipes for Kodak Scanners 896 5519 Blower Brush 179 7158 Imaging Guide Assembly 162 0640 Calibration Kit (contains Calibration Sheet 5K0449) 199 8103 The following roller kits are for Ngenuity Scanners with the original feeder that does not - Konica Minolta Kodak Ngenuity 9150 | User Guide - Page 69
7 Troubleshooting Contents Clearing a document jam 7-1 Problem solving 7-2 Contacting Service 7-4 Clearing a document jam IMPORTANT: Only remove jammed documents from the transport when the scanner cover is OPEN. 1. Pull the scanner cover release lever forward to - Konica Minolta Kodak Ngenuity 9150 | User Guide - Page 70
guide to check possible solutions to help you resolve the situation before calling Technical Support. If a problem persists after reviewing the problems . Cycle power to the scanner. If the problem persists, contact Technical Support. An imprinter was detected and enabled, but is no longer - Konica Minolta Kodak Ngenuity 9150 | User Guide - Page 71
errors Entry/exit sensor errors Possible Cause ... ... Possible Remedy Cycle power to the scanner. If the problem persists, contact Technical Support. Contact Technical Support. • Imaging guide(s) and/or camera cover(s) need to be cleaned. • Camera(s) need to be calibrated. • Clean the imaging - Konica Minolta Kodak Ngenuity 9150 | User Guide - Page 72
Contacting Service 1. Visit www.Kodak.com/go/dicontacts to obtain the most current phone number for your country. 2. When calling, please have the following information ready: • A description of your problem. • The scanner model and serial number. • Computer configuration. • Software application - Konica Minolta Kodak Ngenuity 9150 | User Guide - Page 73
only 9150: Portrait 120 ppm / 240 ipm 9125: Portrait 120 ppm/ 240 ipm 9090DC: Portrait Ngenuity VRS 4.5 (or greater) Professional Interface USB 2.0 (cable included); SCSI III, D68-SCSI-3 Support , Ignore by Size Imprinting Optional user-installable pre- and post-scan imprinter, time and date - Konica Minolta Kodak Ngenuity 9150 | User Guide - Page 74
installable pre- and post-scan imprinter, Roller Kit, Cleaning Kit System requirements Following is the minimum recommended system configuration to run Kodak Ngenuity 9000 Series Scanners: Recommended: 7 (32-bit and 64-bit) NOTE: VRS does not support Windows XP, 64-bit A-2 A-61662 October 2011 - Konica Minolta Kodak Ngenuity 9150 | User Guide - Page 75
B-11 Patch code options B-16 This appendix provides installation procedures, maintenance and instructions for using the front page (pre-scan) and back page (postscan) imprinter. Front page (pre-scan) imprinting prints the user-specified alphanumeric string on the front side of documents before - Konica Minolta Kodak Ngenuity 9150 | User Guide - Page 76
the scanner. Be sure the ink cartridge is properly seated. Connector Printing position scale Thumbscrew Carriage Ink cartridge holder Ink cartridge Locating pin 1. Remove the imprinter and ink cartridge from the box. 2. Remove the protective tape from the ink cartridge. B-2 A-61662 October 2011 - Konica Minolta Kodak Ngenuity 9150 | User Guide - Page 77
it into place. Center position 5. Turn off the scanner and power down the PC. 6. Remove the scanner exit tray. 7. Open the front page imprinter door. 8. Insert the imprinter's spring-loaded locating pin into the correspond- ing hole found in the scanner's front page assembly (left side) with the ink - Konica Minolta Kodak Ngenuity 9150 | User Guide - Page 78
tray. 13. Turn on the scanner and the PC. 14. Launch the Ngenuity Operator Utility and confirm the imprinter is recognized. NOTE: Do not leave the ink cartridge in the imprinter when not in use. Removing the front imprinter 1. Turn off the scanner. 2. Remove the exit tray. 3. Open the front page - Konica Minolta Kodak Ngenuity 9150 | User Guide - Page 79
and snap it into place. Center position 5. Turn off the scanner and power down the PC. 6. Open the back page imprinter door located in the back of the scanner. 7. Install the imprinter with the ink cartridge holder facing the bottom of the scanner, inserting the spring-loaded locating pin into the - Konica Minolta Kodak Ngenuity 9150 | User Guide - Page 80
the PC. 12. Launch the Ngenuity Operator Utility and confirm the imprinter is recognized. NOTE: Do not leave the ink cartridge in the imprinter when not in use. Removing the back imprinter 1. Turn off the scanner. 2. Open the back page imprinter door. 3. Unplug the imprinter cable. 4. Unscrew the - Konica Minolta Kodak Ngenuity 9150 | User Guide - Page 81
back) imprinter from the scanner. See the sections entitled, "Removing the front imprinter" or "Removing the back imprinter" earlier in this appendix for instructions. 3. imprinter into the scanner. 8. Turn on the scanner and the PC. 9. Launch the Ngenuity Operator Utility and confirm the imprinter - Konica Minolta Kodak Ngenuity 9150 | User Guide - Page 82
function to one of the Custom Function buttons (F1 or F2) using the Ngenuity Operator Utility to be able to clean the print head using the scanner. See black stripe then the print head should be removed from the imprinter and cleaned manually. See the next section, "Additional print head cleaning" - Konica Minolta Kodak Ngenuity 9150 | User Guide - Page 83
(or back) imprinter unit from the scanner. See the sections entitled, "Removing the front imprinter" or "Removing the back imprinter" earlier in this chapter for instructions. 3. Remove the than the transport rollers. Contact Technical Support for spit pad replacement. A-61662 October 2011 B-9 - Konica Minolta Kodak Ngenuity 9150 | User Guide - Page 84
align the carriage tab with one of the marks that appears on the scale on the imprinter. For the print string to appear on the right side of the page, move the carriage to the right side of the scale. For the imprint to appear on the left side of the page, move the carriage to the - Konica Minolta Kodak Ngenuity 9150 | User Guide - Page 85
is selected. NOTE: For instructions on how to select the scan source (scanner), see Chapter 4, Control Panel and Ngenuity Operator Utility. 1. Right-click Properties screen, click on the Imprinter menu item to display the Imprinter controls. 5. Enable the imprinter you want to use: Front Page - Konica Minolta Kodak Ngenuity 9150 | User Guide - Page 86
dialog box: NOTE: Patch Code functionality is only available with the Kodak Ngenuity 9150 Scanner. B-12 Page Counter Enable - click this checkbox to a value from the drop-down list to determine how the automatic imprinter/annotation counter is incremented on each page. The counter should be set - Konica Minolta Kodak Ngenuity 9150 | User Guide - Page 87
print off the end of the document. By default, the scanner prints standard, Latin font characters. Text Orientation - select the orientation (rotation) for the imprinted and/or annotated text string. A preview of how the text will be oriented at 0 (default), 90, 180 and 270 degrees will be displayed - Konica Minolta Kodak Ngenuity 9150 | User Guide - Page 88
Top text box, specify the distance from the top edge of the page the annotation string should appear. (This value also controls the mechanical imprinter text offset.) 3. Select where you want the annotation: Front, Back or Front and Back. 4. In the Offset from Left text box, specify the distance - Konica Minolta Kodak Ngenuity 9150 | User Guide - Page 89
numbers for pixels and millimeters, but you can enter decimal numbers in 0.1-inch increments for inches. NOTE: The horizontal location for imprinting must be manually set inside the scanner. Print String Definition, Maximum String Length and Remaining Count - use the Print String Definition text box - Konica Minolta Kodak Ngenuity 9150 | User Guide - Page 90
Kodak Ngenuity 9150 Scanner. Set these options if you want to use patch sheets within a batch to control printer index values. A set of patch codes can be found on the Installation CD or on the website at www.kodak.com/go/scanners; under Support>User Manuals of whether Imprint Patch Code Sheets - Konica Minolta Kodak Ngenuity 9150 | User Guide - Page 91
Appendix C Installing and Using the Optional Straight PassThrough Adapter Contents Installing the straight pass-through adapter C-1 Using the straight pass-through adapter C-2 The straight pass-through adapter allows you to output fragile or thick documents through the straight pass-through - Konica Minolta Kodak Ngenuity 9150 | User Guide - Page 92
on the exit tray with the slots on the straight pass-through adapter and be sure that it is securely in place. 3. Adjust the side guides and the end stop on the exit tray as desired to meet your scanning needs. NOTES: • When you are not using the straight pass-through - Konica Minolta Kodak Ngenuity 9150 | User Guide - Page 93
at one time. Optics - refers to the following scanner components: imaging guides, camera glass covers and sensors. This term does not include LEDs. Paper scanner selected for use through the scanning application on the host PC. Ngenuity Operator Utility (NOU) - the software that resides on the host - Konica Minolta Kodak Ngenuity 9150 | User Guide - Page 94
lead edge of the document. All Kodak Ngenuity Scanners support patch reading for color toggle patch processing. Only the Kodak Ngenuity 9150 Scanner supports Printer Counter Increment and Resetting through Patch. The Kodak Ngenuity 9150 Scanner does not support full image addressing or batching. The - Konica Minolta Kodak Ngenuity 9150 | User Guide - Page 95
bar dimensions and optical properties should conform to the Kodak specifications outlined in Kodak Publication, A-61599. • Patch codes must be printed in. - center line of the scanner document feeder with the side guides centered. - allowable vertical region for the printed patch code. The entire - Konica Minolta Kodak Ngenuity 9150 | User Guide - Page 96
Comment Kodak Patch Code #1 Kodak Patch Code #2 Kodak Patch Code #3 Kodak Patch Code #4 (Kodak Toggle Patch) Kodak Patch Code #5 (Kodak Transfer Patch) Kodak Patch Code #6 Kodak Ngenuity 9150 only - Code #7 - Scan in Bitonal Kodak Ngenuity 9150 only - Code #8 - Scan in Color Kodak Ngenuity 9150 - Konica Minolta Kodak Ngenuity 9150 | User Guide - Page 97
Patch codes Patch 7 Patch 9 Patch 11 Patch 13 Patch 8 Patch 10 Patch 12 Patch 14 E4 A-61662 October 2011 - Konica Minolta Kodak Ngenuity 9150 | User Guide - Page 98
-
 1
1 -
 2
2 -
 3
3 -
 4
4 -
 5
5 -
 6
6 -
 7
7 -
8
-
9
-
10
-
11
-
12
-
13
-
14
-
15
-
16
-
17
-
18
-
19
-
20
-
21
-
22
-
23
-
24
-
25
-
26
-
27
-
28
-
29
-
30
-
31
-
32
-
33
-
34
-
35
-
36
-
37
-
38
-
39
-
40
-
41
-
42
-
43
-
44
-
45
-
46
-
47
-
48
-
49
-
50
-
51
-
52
-
53
-
54
-
55
-
56
-
57
-
58
-
59
-
60
-
61
-
62
-
63
-
64
-
65
-
66
-
67
-
68
-
69
-
70
-
71
-
72
-
73
-
74
-
75
-
76
-
77
-
78
-
79
-
80
-
81
-
82
-
83
-
84
-
85
-
86
-
87
-
88
-
89
-
90
-
91
-
92
-
93
-
94
-
95
-
96
-
97
-
98
 |
 |
