Konica Minolta Kodak Ngenuity 9150 User Guide - Page 14
Installation: with a USB connection, Launch the Ngenuity Operator Utility NOU by double-clicking
 |
View all Konica Minolta Kodak Ngenuity 9150 manuals
Add to My Manuals
Save this manual to your list of manuals |
Page 14 highlights
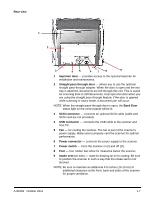
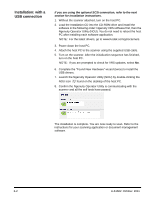
Installation: with a USB connection If you are using the optional SCSI connection, refer to the next section for installation instructions. 1. Without the scanner attached, turn on the host PC. 2. Load the Installation CD into the CD-ROM drive and install the software in the following order: Ngenuity VRS software first, then the Ngenuity Operator Utility (NOU). You do not need to reboot the host PC after installing each software application. NOTE: For the latest drivers, go to www.Kodak.com/go/scanners. 3. Power down the host PC. 4. Attach the host PC to the scanner using the supplied USB cable. 5. Turn on the scanner. After the initialization sequence has finished, turn on the host PC. NOTE: If you are prompted to check for VRS updates, select No. 6. Complete the "Found New Hardware" wizard (twice) to install the USB drivers. 7. Launch the Ngenuity Operator Utility (NOU) by double-clicking the NOU icon found on the desktop of the host PC. 8. Confirm the Ngenuity Operator Utility is communicating with the scanner and all the self tests have passed. The installation is complete. You are now ready to scan. Refer to the instructions for your scanning application or document management software. 2-2 A-61662 October 2011
-
 1
1 -
2
-
3
-
4
-
5
-
6
-
7
-
8
-
 9
9 -
 10
10 -
 11
11 -
 12
12 -
 13
13 -
 14
14 -
 15
15 -
 16
16 -
 17
17 -
 18
18 -
 19
19 -
20
-
21
-
22
-
23
-
24
-
25
-
26
-
27
-
28
-
29
-
30
-
31
-
32
-
33
-
34
-
35
-
36
-
37
-
38
-
39
-
40
-
41
-
42
-
43
-
44
-
45
-
46
-
47
-
48
-
49
-
50
-
51
-
52
-
53
-
54
-
55
-
56
-
57
-
58
-
59
-
60
-
61
-
62
-
63
-
64
-
65
-
66
-
67
-
68
-
69
-
70
-
71
-
72
-
73
-
74
-
75
-
76
-
77
-
78
-
79
-
80
-
81
-
82
-
83
-
84
-
85
-
86
-
87
-
88
-
89
-
90
-
91
-
92
-
93
-
94
-
95
-
96
-
97
-
98
 |
 |