Konica Minolta MGI JETvarnish 3D One MGI JETvarnish 3D One User Manual
Konica Minolta MGI JETvarnish 3D One Manual
 |
View all Konica Minolta MGI JETvarnish 3D One manuals
Add to My Manuals
Save this manual to your list of manuals |
Konica Minolta MGI JETvarnish 3D One manual content summary:
- Konica Minolta MGI JETvarnish 3D One | MGI JETvarnish 3D One User Manual - Page 1
User Manual EN JETVARNISH 3D One Original instructions F Version 2.7 Available for the JETVARNISH 3D One: • Gen.1 • Gen.2 • Gen.3 22/05/2023 - Konica Minolta MGI JETvarnish 3D One | MGI JETvarnish 3D One User Manual - Page 2
JETVARNISH 3D One Created by MGI Digital Technology 4, rue de la Méridienne 94260 Fresnes FRANCE If you have any comments or suggestions about this manual, feel free to report them to your local SSD organization (Technical Support), which will forward them to MGI. Thank you! Copyright © 2006-2023 - Konica Minolta MGI JETvarnish 3D One | MGI JETvarnish 3D One User Manual - Page 3
3.8 Safety & warning label locations - Top view 17 3.9 Beacon ...18 3.10 JETVARNISH 3D One Safety Instructions 20 3.11 LED Flashlights used nearby the UV Printheads 22 4 JETVARNISH 3D One Specifications and Configurations 23 4.1 Machine specifications ...23 4.2 Production speeds...25 4.3 Machine - Konica Minolta MGI JETvarnish 3D One | MGI JETvarnish 3D One User Manual - Page 4
JETVARNISH 3D One 6.3 The Paper Exit Tray Type 1 ...83 6.4 The Paper Exit Tray Type 2 & 2.1 ...90 7 MGI software & graphical user interfaces 102 7.1 Advices about your Cyber Security 102 7.2 MGI ...177 12.9 Cost Calculator ...182 12.10 The MGI Spot Varnish Editor ...185 12.11 Remote access...190 - Konica Minolta MGI JETvarnish 3D One | MGI JETvarnish 3D One User Manual - Page 5
.6 Power failure procedure ...232 19.7 File troubleshooting ...233 19.8 Varnish image troubleshooting...234 19.9 Too dark or too light image - metallized substrate 239 20 Glossary ...240 21 Appendix ...243 21.1 EC Declaration of Conformity - JETVARNISH 3D One 243 21.2 EC Declaration of Conformity - Konica Minolta MGI JETvarnish 3D One | MGI JETvarnish 3D One User Manual - Page 6
JETVARNISH 3D One 1 REVISION HISTORY The following changes have been made from the original release. Version Version 1.6 Version 1.7 Version 1.8 Version 1.9 Version 2.0 Date 12/05/2020 17/11/2020 09/02/2021 09/04/2021 04/05/2021 Comments Major review about this manual. Many improvements and typo - Konica Minolta MGI JETvarnish 3D One | MGI JETvarnish 3D One User Manual - Page 7
generations of the JETvarnish 3D One were produced: Generation Gen. 1 Gen. 2 Gen. 3 SN range From SN 050 up to 140 From SN 141 up to 185 From SN 186 IMPORTANT REMARK Several generations of this equipment are now existing. By default, in this "User Manual", all instructions are valid regardless - Konica Minolta MGI JETvarnish 3D One | MGI JETvarnish 3D One User Manual - Page 8
JETVARNISH 3D One 2 CONVENTIONS AND REMARKS ABOUT THIS DOCUMENT 2.1 Conventions This document uses the following conventions: • Operator Side = [O.S] or OS • Maintenance Side = [M.S] or The same concept of Portrait and Landscape applies for all other ISO paper sizes (such as A3). User Manual - 8 - - Konica Minolta MGI JETvarnish 3D One | MGI JETvarnish 3D One User Manual - Page 9
JETVARNISH 3D One 2.2 Symbols used in this manual In this manual, each of three expressions « DANGER », « WARNING », and « CAUTION » is defined as follows together with a symbol mark to be used in a limited meaning. When using or servicing this product, the relevant works (cleaning, disassembling, - Konica Minolta MGI JETvarnish 3D One | MGI JETvarnish 3D One User Manual - Page 10
of the product properly. Keep this manual also for future service. It is imperative to observe the following safety instructions! 1. Read these instructions before starting the machine! 2. Only trained and authorized persons may work on the JETVARNISH 3D One 3. The generally applicable accident - Konica Minolta MGI JETvarnish 3D One | MGI JETvarnish 3D One User Manual - Page 11
JETVARNISH 3D One 3.4 Security signs affixed on the equipment 3.4.1 or serious injury. Handling of the product is allowed only for the qualified service engineer. Make sure to open the covers only after disconnecting the corresponding electric proof UV goggles or face shield. User Manual - 11 - - Konica Minolta MGI JETvarnish 3D One | MGI JETvarnish 3D One User Manual - Page 12
JETVARNISH 3D One Ear Protection For continuous and all-day use at close proximity of the Caution to be taken against electrical shock. Disconnect all power supply plugs before servicing. Earth connection Caution to be taken against electrical shock. Earth connection essential before connecting supply - Konica Minolta MGI JETvarnish 3D One | MGI JETvarnish 3D One User Manual - Page 13
JETVARNISH 3D One Do not replace battery Do not replace the battery if it has failed. Contact MGI support. JETVARNISH 3D One has 2 Emergency Stop buttons. Each one is located at each end of the equipment. Maintenance Side [M.S] [F.D] Operator Side [O.S] JETVARNISH 3D One - Top view User Manual - Konica Minolta MGI JETvarnish 3D One | MGI JETvarnish 3D One User Manual - Page 14
JETVARNISH 3D One • To activate an emergency stop button, just push it DOWN • To release an emergency stop button, turn it counter clockwise to lift grey or blue cover, first Visible from outside The area locations using a dotted line indicates a location inside the equipment User Manual - 14 - - Konica Minolta MGI JETvarnish 3D One | MGI JETvarnish 3D One User Manual - Page 15
JETVARNISH 3D One ② ① ⑥ ⑤ ③ ④ JETVARNISH 3D One - Operator Side [O.S] User Manual - 15 - - Konica Minolta MGI JETvarnish 3D One | MGI JETvarnish 3D One User Manual - Page 16
JETVARNISH 3D One 3.7 Safety & warning label locations - Maintenance Side [M.S] Warning labels Location areas ① Remarks first The area locations using a dotted line indicates a location inside the equipment ④ ⑧ ⑤ ⑥ User Manual ③ ① ⑨ ② ⑩ ⑪ ⑦ JETVARNISH 3D One -Maintenance Side [M.S] - 16 - - Konica Minolta MGI JETvarnish 3D One | MGI JETvarnish 3D One User Manual - Page 17
labels Location areas ① ② ③ ④ Remarks Visible from outside Inside the equipment open the blue door, first Visible from outside Visible from outside Maintenance Side [M.S] ② [F.D] ① ④ Operator Side [O.S] ③ JETVARNISH 3D One - Top view [F.D] User Manual - 17 - - Konica Minolta MGI JETvarnish 3D One | MGI JETvarnish 3D One User Manual - Page 18
JETVARNISH 3D One 3.9 Beacon The JETVARNISH 3D One has a 3-color beacon on the roof on the equipment (top view) The beacon can be lighted in 3 colors: • GREEEN • ORANGE • RED Operator Side [O.S] [F.D] The beacon - Konica Minolta MGI JETvarnish 3D One | MGI JETvarnish 3D One User Manual - Page 19
JETVARNISH 3D One Red message through the Pilot Beacon & JVTi/Pilot message color coding Color meaning There is an error and the equipment cannot RED keeps working or the equipment is in progress GREEN This is information. Operator has nothing to do, the equipment is OK User Manual - 19 - - Konica Minolta MGI JETvarnish 3D One | MGI JETvarnish 3D One User Manual - Page 20
JETVARNISH 3D One 3.10 JETVARNISH 3D One Safety Instructions General operating rules Rules related to presence of UV system UV radiation For safety reasons, always Sheet (MSDS) relating to products or groups of products; the latter contains information in condensed form. User Manual - 20 - - Konica Minolta MGI JETvarnish 3D One | MGI JETvarnish 3D One User Manual - Page 21
to have an air renewal system. As a matter of fact, the JETVARNISH 3D ONE operates together with UV LED which release heat, and the ambient temperature light. - See MSDS datasheet. Store in a cool and dry place. MGI varnish has a shelf life of 14 months Please refer to the date printed Manual - 21 - - Konica Minolta MGI JETvarnish 3D One | MGI JETvarnish 3D One User Manual - Page 22
JETVARNISH 3D One 3.11 LED Flashlights used nearby the UV Printheads When the Operator needs to perform some maintenance operations inside the UV Print Engine, it might be convenient to use a Flashlight to better see inside this cabinet. The MGI LED flashlight is the only authorized light source to - Konica Minolta MGI JETvarnish 3D One | MGI JETvarnish 3D One User Manual - Page 23
JETVARNISH 3D One 4 JETVARNISH 3D ONE SPECIFICATIONS AND CONFIGURATIONS 4.1 Machine specifications For the machines produced from September 2020 - S/N ≥ 141 MGI's exclusive inkjet engine technology Drop Automatic tray full sensor All paper formats from A4 up to 36.4 x 75 cm User Manual - 23 - - Konica Minolta MGI JETvarnish 3D One | MGI JETvarnish 3D One User Manual - Page 24
JETVARNISH 3D One In-line LED UV dryer Front end system Built-in application software Maintenance & remote technical support Pilot panel Options to production in less than 10 minutes Remote troubleshooting & support via included video/web camera (high speed (1 shift work) User Manual - 24 - - Konica Minolta MGI JETvarnish 3D One | MGI JETvarnish 3D One User Manual - Page 25
JETVARNISH 3D One 4.2 Production speeds The expected JETVARNISH 3D One production speeds are the following: • JETVARNISH 3D One with 1 print bar (no possible (s) and/or print heads. This leads to print quality problems. An Automatic Printhead Protection System (APPS) is activated to Manual - 25 - - Konica Minolta MGI JETvarnish 3D One | MGI JETvarnish 3D One User Manual - Page 26
second. With the JETVARNISH 3D ONE, it is not possible to print in less than 3 drops, equivalent to 21 µm of varnish thickness. Only the dithering mode can enable this by using a halftoning technique. It allows spraying less varnish, but the substrate and the CYMK ink should support this low varnish - Konica Minolta MGI JETvarnish 3D One | MGI JETvarnish 3D One User Manual - Page 27
JETVARNISH 3D One 4.3 Machine configurations User Manual JETVARNISH 3D One • Standard features -Paper Feeder (Type 1 or 2) -Main body with the IJ Print Engine -Single print bar (not upgradable) -AIS SmartScanner (Type 1 or 2) -Performance Workstation Computer - Konica Minolta MGI JETvarnish 3D One | MGI JETvarnish 3D One User Manual - Page 28
JETVARNISH 3D One User Manual • OPTION 3 VDP barcode camera The barcode camera allows to read the preprinted barcode on each sheet and then, selects the corresponding .TIFF file already stored - Konica Minolta MGI JETvarnish 3D One | MGI JETvarnish 3D One User Manual - Page 29
JETVARNISH 3D One Type 1 Type 2 Option of the option 5: External Ozone Filter The CTS Corona module can also receive an optional Ozone to your purchase date (Type 1 or cabinet version or Type 2 or fully external). Refer to the "CTS S Corona User Manual" to discover more about the CTS module. User - Konica Minolta MGI JETvarnish 3D One | MGI JETvarnish 3D One User Manual - Page 30
installation instructions. 4.4.2 Electrical Tension Standard: 2x220-240V 32A 50/60 Hz -Please refer to the product site survey to learn more about the electrical requirements It is mandatory to be sure that the tension will not drop when all the machines are switched on. The JETVARNISH 3D ONE must - Konica Minolta MGI JETvarnish 3D One | MGI JETvarnish 3D One User Manual - Page 31
to have the use of a table, a trash can and paper towels. MGI also provides a cleaning solution (MGI PN: 8484S). After drying, the varnish can be handled with no issue. 4.4.8 Precautions against the UV rays The JETVARNISH 3D ONE emits UV rays during production. Those rays are contained within the - Konica Minolta MGI JETvarnish 3D One | MGI JETvarnish 3D One User Manual - Page 32
JETVARNISH 3D One our MGI equipment varnish in MGI equipment on which JETVARNISH 3D ONE . A full cleaning and control of machine is required to verify whether the electronic circuits and other components were not damaged. 4.4.11 Fire protection We hereby inform you that the JETvarnish JETVARNISH - Konica Minolta MGI JETvarnish 3D One | MGI JETvarnish 3D One User Manual - Page 33
JETVARNISH 3D One 4.4.13 JETVARNISH 3D ONE varnish CAUTION It is strictly forbidden to use any other varnish than the one provided by MGI Digital Technology. Any damage incurred to the equipment due to the use power supply, the installation of over floor trunking is recommended. User Manual - 33 - - Konica Minolta MGI JETvarnish 3D One | MGI JETvarnish 3D One User Manual - Page 34
JETVARNISH 3D One 5 Overall Descriptions The JETVARNISH 3D One comes with two distinct modules: 1) The Paper feeder module (Type 1 or 2) 2) The Inkjet print engine module or the elements which are described below. When a device is available only as an option, it is colored BLUE. User Manual - 34 - - Konica Minolta MGI JETvarnish 3D One | MGI JETvarnish 3D One User Manual - Page 35
JETVARNISH 3D One 5.1 The 3D One from S/N 185 and above The differences are outlined in the Paper Feeder chapter. 5.1.2 Monitor The Graphical User Interface named "JVTi" is running on a 22" LCD monitor. Associated to this monitor, a handy shelf hosts the built-in keyboard and a mouse. User Manual - Konica Minolta MGI JETvarnish 3D One | MGI JETvarnish 3D One User Manual - Page 36
JETVARNISH 3D One 5.1.3 The Pilot Installed on the [MS] of Appearance of error messages on the printing system - Precise location of the reason for any machine problem - Number of files sent by the JVTi, number of remaining files to be printed, and the corresponding varnish file. User Manual - 36 - - Konica Minolta MGI JETvarnish 3D One | MGI JETvarnish 3D One User Manual - Page 37
JETVARNISH 3D One to dry and cure the freshly printed varnish. 5.2.3 AIS SmartScanner The JETVARNISH 3D One is equipped with the state-of-the-art system for a perfect - delivered with the 3D One from S/N 050 to S/N 140 included - AIS SmartScanner Type 2 - delivered with the 3D One from S/N 141 and - Konica Minolta MGI JETvarnish 3D One | MGI JETvarnish 3D One User Manual - Page 38
on the equipment at any time. 5.2.5 Paper Exit tray The JETVARNISH 3D One comes with a paper exit tray which can stack up to 15 centimeters of paper and all supported formats from A4 (21x29.7) up to 36x75 cm included. This . This option can be added on the equipment at any time. User Manual - 38 - - Konica Minolta MGI JETvarnish 3D One | MGI JETvarnish 3D One User Manual - Page 39
JETVARNISH 3D One b) VDP processing - with additional hardware When the optional VDP barcode camera is associated to this Automatic PDF converter then, varnish files. Each page can receive a unique varnish mask and this is a completely automated process during varnish production. User Manual - 39 - - Konica Minolta MGI JETvarnish 3D One | MGI JETvarnish 3D One User Manual - Page 40
thousands. The iFOIL One associated with the JETVARNISH 3D One can create foiled static printouts as well as variable data foiled jobs. The machine shown below, is a AccurioShine 3600 - The only difference is about the color covers iFOIL One module User Manual iFOIL One - internal view with - Konica Minolta MGI JETvarnish 3D One | MGI JETvarnish 3D One User Manual - Page 41
5.5 Corona Treatment - CTS S module (option) As an option, the JETVARNISH 3D One, can be fitted with the CTS S module to offer in-line corona treatment capabilities. It or to improve the adhesion of the UV varnish over the substrate. It can be one or the two combined effects. User Manual - 41 - - Konica Minolta MGI JETvarnish 3D One | MGI JETvarnish 3D One User Manual - Page 42
Functional descriptions 6.1 The Paper Feeder Type 1 According to the Serial Number of the JETVARNISH 3D One, 3 variants of the Paper Feeder exist: Paper Feeder Type 1 Paper Feeder Type 2.& Paper Feeder Type 2 (S/N ≥ 141), you can skip to the next chapter - Paper Feeder Type 2. User Manual - 42 - - Konica Minolta MGI JETvarnish 3D One | MGI JETvarnish 3D One User Manual - Page 43
Feeder Type 1 was introduced at the start of the JETVARNISH 3D One production (S/N 050) until the S/N 0140. This feeder has nothing in common with existing JETvarnish feeders. This feeder is based on the following principle: and do not represent the actual colour of the parts. User Manual - 43 - - Konica Minolta MGI JETvarnish 3D One | MGI JETvarnish 3D One User Manual - Page 44
JETVARNISH 3D One 6.1.1 Specifications The JETVARNISH 3D One Paper Feeder has the following specifications Minimum supported paper width Maximum supported paper width Minimum supported paper length Maximum supported paper height The Paper feeder can receive a pile up to 28 cm User Manual - 44 - - Konica Minolta MGI JETvarnish 3D One | MGI JETvarnish 3D One User Manual - Page 45
JETVARNISH 3D One 6.1.2 Description of main components 6.1.2.1 Global views Paper Feeder front view [OS] REMINDER: The coloured parts on this drawing are for indication only and do not represent the actual colors of the parts Paper Feeder rear view [MS] User Manual - 45 - - Konica Minolta MGI JETvarnish 3D One | MGI JETvarnish 3D One User Manual - Page 46
JETVARNISH 3D One 6.1.2.2 Paper Feeder main components Monitor Articulated Arm 22" LCD monitor Double feed sensor [OS] User Manual Feeding Direction Operator's Panel Buttons [MS] Keyboard Mouse Top view - 46 - - Konica Minolta MGI JETvarnish 3D One | MGI JETvarnish 3D One User Manual - Page 47
JETVARNISH 3D One Front blowing holes (x7) 1st row of side blowing holes [OS] Feeding Direction 2nd row of side blowing holes Top view (Upper air suction system removed) [MS] User Manual - 47 - - Konica Minolta MGI JETvarnish 3D One | MGI JETvarnish 3D One User Manual - Page 48
JETVARNISH 3D One Upper limit of Paper Pile Side guide plate (right) User Manual Side guide plate (left) Side guide plate lock knob (x1) Operator Side [OS] views - 48 - - Konica Minolta MGI JETvarnish 3D One | MGI JETvarnish 3D One User Manual - Page 49
JETVARNISH 3D One Rear guide plate Bottom plate Height adjustment knurl Paper sensor Rear guide lock release lever User Manual Operator Side [OS] - 49 - - Konica Minolta MGI JETvarnish 3D One | MGI JETvarnish 3D One User Manual - Page 50
JETVARNISH 3D One 24V ON/OFF OFF ON Emergency Stop Power Init. Stop job Run job Top view - Operator Panel devices & buttons JVTi error from the Performance PC Workstation, please use the USB port available near the Paper Feeder Control Panel buttons [OS]. USB port User Manual - 50 - - Konica Minolta MGI JETvarnish 3D One | MGI JETvarnish 3D One User Manual - Page 51
JETVARNISH 3D One Paper Feeder Control panel B1 B3 B2 B4 Paper Feeder Control Panel buttons Each button has the following names and possible lights: B1 = white light is OFF and when pressing continuously, it moves the plate down until the lowest possible level is reached. User Manual - 51 - - Konica Minolta MGI JETvarnish 3D One | MGI JETvarnish 3D One User Manual - Page 52
JETVARNISH 3D One B3 Feeding one sheet When pressing continuously this button for more than 1 second, a sheet will be fed toward the AIS SmartScanner. It stops if you uses a Paper sensor to detect the optimum distance between the top of the paper pile and the Paper Feeder belts. User Manual - 52 - - Konica Minolta MGI JETvarnish 3D One | MGI JETvarnish 3D One User Manual - Page 53
JETVARNISH 3D One 6.1.3 Operating instructions 6.1.3.1 Loading a new paper pile When loading a new paper format ( the paper pile width Adjust the Rear guide plate to be aligned to the rear edge of the loaded paper pile To do so unlock and then lock the Rear guide lock release lever - push left to - Konica Minolta MGI JETvarnish 3D One | MGI JETvarnish 3D One User Manual - Page 54
JETVARNISH 3D One Put the paper pile on the Bottom plate and in the newly created space between the 3 guides, while you are standing on the Operator Side [OS]. When the paper pile is neat and well ordered, adjust the Side guide plates to gently touch the paper pile edge. Do not tighten too much, it - Konica Minolta MGI JETvarnish 3D One | MGI JETvarnish 3D One User Manual - Page 55
JETVARNISH 3D One Adjust so that the top of the pile is approximately level with the edge of the feed plate. (Pile Upper Limit) Upper Limit When everything into Auto mode. B1 & B2 become lit (in white) Press B1 until it lights up white (Auto Mode will be displayed on the JVTi) User Manual - 55 - - Konica Minolta MGI JETvarnish 3D One | MGI JETvarnish 3D One User Manual - Page 56
JETVARNISH 3D One 6.1.4 Paper Feeder settings through the JVTi interface 6.1.4.1 Feeder tab ① ⑧ ② ③ ④ ⑤ ⑥ ⑦ Screen capture from the JVTI version ≥ 3.3.6 MGI recommendations Do not try reducing the meter) is considered as the minimal value. Default value is = 0 seconds User Manual - 56 - - Konica Minolta MGI JETvarnish 3D One | MGI JETvarnish 3D One User Manual - Page 57
JETVARNISH 3D One Side fans. This setting turns ON or OFF the blowing devices located on each Side guide plate. OFF: Row 1: Row 2: Rows 1 & 2: not blowing at all do not change this value, it will cause varnish registration problems. [8] Double sheet. This sets if the double sheet Manual - 57 - - Konica Minolta MGI JETvarnish 3D One | MGI JETvarnish 3D One User Manual - Page 58
JETVARNISH 3D One 6.2 The Paper Feeder Type 2 ONLY VALID FOR GEN.2 This Paper Feeder was introduced with the equipment produced from September 2020. It is reusing motor. Same applies to any body part. Never leave your foot underneath the Bottom plate as it can be moved down. User Manual - 58 - - Konica Minolta MGI JETvarnish 3D One | MGI JETvarnish 3D One User Manual - Page 59
JETVARNISH 3D One 6.2.1 Description of main components 6.2.1.1 Global views Paper Feeder Type 2 - Operator Side [OS] REMINDER: The colored parts on this drawing are for indication only and do not represent the actual colors of the parts. User Manual Paper Feeder Type 2 - Maintenance Side [MS] - - Konica Minolta MGI JETvarnish 3D One | MGI JETvarnish 3D One User Manual - Page 60
JETVARNISH 3D One Operator Side view Front view Side right view User Manual Top view - 60 - - Konica Minolta MGI JETvarnish 3D One | MGI JETvarnish 3D One User Manual - Page 61
JETVARNISH 3D One 6.2.1.2 Paper Feeder main components CAD-CAM drawing Double sheet sensor 22" LCD monitor Monitor articulated arm Paper feeding head [MS] Feeding Direction (FD) [OS] Operator Panel buttons Keyboard Mouse Paper pile area Paper Feeder Top View User Manual - 61 - - Konica Minolta MGI JETvarnish 3D One | MGI JETvarnish 3D One User Manual - Page 62
JETVARNISH 3D One [OS] [MS] FD Paper Feeder Top view The airflow system - working principle The Paper Feeder is using 2 types of controlled airflows: - the side position is low (as shown on the picture). Push the blue lever to move it from low to high position. User Manual - 62 - - Konica Minolta MGI JETvarnish 3D One | MGI JETvarnish 3D One User Manual - Page 63
JETVARNISH 3D One When the top of pile sensor is in high position, the paper sheet on the top of the paper pile is closer from the air . 5) While the top flying sheet is captured by the air suction, it is moved by the 4 top belts which are running forward (white arrows). User Manual - 63 - - Konica Minolta MGI JETvarnish 3D One | MGI JETvarnish 3D One User Manual - Page 64
JETVARNISH 3D One 6.2.2 Paper Feeder specifications The JETVARNISH 3D One Paper Feeder Type 2 has the following specifications. (identical to the Type 1) Minimum supported paper width Min. = 21 cm* Maximum supported paper direction). In this case, the leading edge is 21 cm. User Manual - 64 - - Konica Minolta MGI JETvarnish 3D One | MGI JETvarnish 3D One User Manual - Page 65
JETVARNISH 3D One 6.2.3 Paper adjustment components Paper Feeder - front view Side guide plate (left) (moving left to right) Bottom plate (moving up & down) Side guide plate (right) (moving left to right) Paper width adjustment To unlock the Side guide the underneath Side guide plate lever. Lock - Konica Minolta MGI JETvarnish 3D One | MGI JETvarnish 3D One User Manual - Page 66
JETVARNISH 3D One Paper Feeder - front view Rear guide plate (moving back & forth) Paper length adjustment To unlock the Rear guide plate, turn anti-clockwise the Rear guide plate black knob. Lock it back after setting the right paper length. Unlock Lock User Manual - 66 - - Konica Minolta MGI JETvarnish 3D One | MGI JETvarnish 3D One User Manual - Page 67
JETVARNISH 3D One 6.2.4 Mouse, keyboard and operator panel buttons To operate the JVTI, the mouse and the keyboard are necessary. While for the overall JETvarnish day-today operations, the 6 buttons/switch have specific roles. This will be described later on in this manual. 24V ON/OFF Emergency - Konica Minolta MGI JETvarnish 3D One | MGI JETvarnish 3D One User Manual - Page 68
JETVARNISH 3D One 6.2.5 Paper Feeder Control panel B1 B3 B2 B4 Paper Feeder Control Panel buttons The Paper feeder operator panel comes with 4 buttons, lowest possible level is reached. Watch out if any object is remaining underneath the Bottom plate before being squeezed. User Manual - 68 - - Konica Minolta MGI JETvarnish 3D One | MGI JETvarnish 3D One User Manual - Page 69
JETVARNISH 3D One B3 Feeding one sheet When pressing continuously this button for more than 1 second, a sheet will be fed toward the AIS SmartScanner. It stops as printing, the drying and the storage on the paper tray. The belt stops when all the remaining sheets are cleared. User Manual - 69 - - Konica Minolta MGI JETvarnish 3D One | MGI JETvarnish 3D One User Manual - Page 70
JETVARNISH 3D One b) The "Double feed" B4 yellow button lights ON. How to clear the double-sheet error 1. Press the yellow button continuously to automatically feed the top of the paper pile and the Paper Feeder belts. When the Auto mode is selected, the B1 button is lighted. User Manual - 70 - - Konica Minolta MGI JETvarnish 3D One | MGI JETvarnish 3D One User Manual - Page 71
JETVARNISH 3D One 6.2.6 The USB port When there is a need to import or export a file from the Performance PC Workstation, please use the USB port available on the Paper Feeder Control Panel [OS]. USB port 6.2.7 Operating instructions How to load a new paper pile: Prepare the paper pile accordingly - Konica Minolta MGI JETvarnish 3D One | MGI JETvarnish 3D One User Manual - Page 72
JETVARNISH 3D One 2) on the Rear guide plate (hole + message) Only valid when the bottom plate is in the lowest position. In this case the sign can be taken or larger), move down the Bottom plate by pressing the B2 button. B2 Remove all remaining sheets out of the Paper feeder. User Manual - 72 - - Konica Minolta MGI JETvarnish 3D One | MGI JETvarnish 3D One User Manual - Page 73
JETVARNISH 3D One Open the Side guide plates (right and left) by unlocking the Side guide plate lock knob. There is only one. Push left to release the lock. The Side guide guides, while you are standing on the Operator Side [OS]. When the paper pile is neat and well ordered, adjust the Side guide - Konica Minolta MGI JETvarnish 3D One | MGI JETvarnish 3D One User Manual - Page 74
JETVARNISH 3D One Do not tight too much the paper pile with the 3 guides. Leave some free space (1-2 millimeters) between the paper pile and the guides. A too tightened paper pile could lead to paper misfeeds. Lock the guides, when until B1 lit (in white) B1 lights up in white User Manual - 74 - - Konica Minolta MGI JETvarnish 3D One | MGI JETvarnish 3D One User Manual - Page 75
JETVARNISH 3D One Auto Mode message is displayed on the JVTi status User Manual - 75 - - Konica Minolta MGI JETvarnish 3D One | MGI JETvarnish 3D One User Manual - Page 76
JETVARNISH 3D One 6.2.8 Paper Feeder settings through the JVTi interface 6.2.8.1 considered as the minimal value. Default value is = 0 seconds MGI recommendations Do not try reducing the average gap of 10 centimeters between "Separation" is one of the efficient parameters to increase/decrease the gap between - Konica Minolta MGI JETvarnish 3D One | MGI JETvarnish 3D One User Manual - Page 77
JETVARNISH 3D One [2] Feeding belt vacuum. This setting fans. This setting turns ON or OFF the airflow blown through the Air Nozzles located on each Side guide plate. Side fan Air Nozzles 0 I ⑦ Side Air opening retaining [OS] [5] Side fan power with the "factory" defaults. User Manual - 77 - - Konica Minolta MGI JETvarnish 3D One | MGI JETvarnish 3D One User Manual - Page 78
JETVARNISH 3D One 6.2.8.2 Usual and most common settings The Paper Feeder type 2 is designed to minimize the setting changes when switching from one paper reference to another one. The paper reference used is the Novatech® Gloss (coated paper) in various thicknesses. These most common settings apply - Konica Minolta MGI JETvarnish 3D One | MGI JETvarnish 3D One User Manual - Page 79
JETVARNISH 3D One • Medium papers Regardless the paper sizes Medium papers Recommended JVTI settings Central fan power 40 to 80% Start first at 60% Side fan to put it back in low position when the thick paper production is over. Low position Top of the pile sensor lever User Manual - 79 - - Konica Minolta MGI JETvarnish 3D One | MGI JETvarnish 3D One User Manual - Page 80
JETVARNISH 3D One 6.2.8.3 Paper Jam If you have a paper jam, the Pilot guides you through all the steps, to clear the problem. The existing jams scenarios are the following: • Feeder jam • CTS corona jam (when green dot is indicating the presence of a sheet under a sensor User Manual - 80 - - Konica Minolta MGI JETvarnish 3D One | MGI JETvarnish 3D One User Manual - Page 81
JETVARNISH 3D One 4. Then, a new message asks you to go to the stacker area 5. Wait for the green button to blink. When blinking, keep pushing the green button - Konica Minolta MGI JETvarnish 3D One | MGI JETvarnish 3D One User Manual - Page 82
JETVARNISH 3D One Stacker area control buttons 6. When all the sheets are cleared from the printing belt, go back and check the Pilot screen if there done, press on the validation button (green check box). 8. Now, you can start printing again END OF THE SECTION VALID FOR GEN.2 User Manual - 82 - - Konica Minolta MGI JETvarnish 3D One | MGI JETvarnish 3D One User Manual - Page 83
JETVARNISH 3D One, three variants of the Paper Exit Tray exist: Paper Exit tray Type 1, Paper Exit Type 2 and Paper Exit Type 2.1 JETVARNISH 3D One of the Print module It is a basic but robust exit tray which supports all paper sizes; from the smallest (21x29.7 cm) to the largest Manual - 83 - - Konica Minolta MGI JETvarnish 3D One | MGI JETvarnish 3D One User Manual - Page 84
JETVARNISH 3D One Paper Exit Tray and its sensor detecting the paper level [M.S] 6.3.1 Paper Exit Tray main components The main components are the following: The two Guides and the Paper stopper. It can be adjusted individually (from narrower to wider) - see the white arrows. The Bottom plate - Konica Minolta MGI JETvarnish 3D One | MGI JETvarnish 3D One User Manual - Page 85
JETVARNISH 3D One Side guide (left) Sensor Side guide (right) Bottom plate Paper stopper Adjusting knob Paper Exit tray - front view When the Side guides or the Paper stopper need to be adjusted, an adjusting knob is available for each (no tooling required). Please note for the right Side - Konica Minolta MGI JETvarnish 3D One | MGI JETvarnish 3D One User Manual - Page 86
JETVARNISH 3D One When looking at the equipment with a lower point of view, 3 fans are visible and responsible for blowing air to facilitate the paper to modify: • The height of the Paper Exit Tray (blue arrow) • The tilt angle of the Paper Exit Tray (yellow arrow) ① ② User Manual - 86 - - Konica Minolta MGI JETvarnish 3D One | MGI JETvarnish 3D One User Manual - Page 87
JETVARNISH 3D One By finding the right combination of the height setting + tilt angle setting, it is possible to vary the overall Paper Exit Tray tilt angle from positive to neutral and then, to negative User Manual - 87 - - Konica Minolta MGI JETvarnish 3D One | MGI JETvarnish 3D One User Manual - Page 88
JETVARNISH 3D One The default height and the tilt angle set at the installation, fit the majority of the regular applications. However, the operator is free to change - Konica Minolta MGI JETvarnish 3D One | MGI JETvarnish 3D One User Manual - Page 89
JETVARNISH 3D One 6.3.2 Paper Exit Tray/Stacker settings through the JVTi interface The blowing power of the 3 fans are controlled in the JVTi, through the " up to 100%). 0% = stacker fans are OFF 100% = stacker fans are blowing at FULL power END OF THE SECTION VALID FOR GEN.1 User Manual - 89 - - Konica Minolta MGI JETvarnish 3D One | MGI JETvarnish 3D One User Manual - Page 90
JETVARNISH 3D One 6.4 The Paper Exit Tray Type 2 & 2.1 ONLY VALID FOR GEN.2 ARNISH 3D One - Gen.21 The Paper Exit Tray or paper stacker, is installed at the extreme end of the Printer module. [MS] [OS] Paper Exit Tray - front view It is a basic but robust exit tray which supports all paper sizes; - Konica Minolta MGI JETvarnish 3D One | MGI JETvarnish 3D One User Manual - Page 91
JETVARNISH 3D One 6.4.1 Paper Exit Tray main components The main components are the following: The two Side Guides and the Paper stopper left Side guide) detects when the paper pile reaches its highest level (± 15cm). Side guide (left) and its integrated "stacker full" sensor Side guide (right) - Konica Minolta MGI JETvarnish 3D One | MGI JETvarnish 3D One User Manual - Page 92
JETVARNISH 3D One When the Side guides or the Paper stopper need to be adjusted, an Adjusting knob is available for each (no tooling required). Please note for the right Side guide, the knob is accessible underneath the Tray plate. The right Side guide and then, to negative ① ② User Manual - 92 - - Konica Minolta MGI JETvarnish 3D One | MGI JETvarnish 3D One User Manual - Page 93
JETVARNISH 3D One The default height and the tilt angle set at the installation, fit the majority of the regular applications. However, the operator is free to change - Konica Minolta MGI JETvarnish 3D One | MGI JETvarnish 3D One User Manual - Page 94
JETVARNISH 3D One 6.4.2 Paper Exit Tray/Stacker settings through the JVTi interface There is no more Paper Exit tray settings in the JVTi. There is nothing to change or to adjust through this interface. Screen capture from the JVTI version ≥ 3.4.7 END OF THE SECTION VALID FOR GEN.2 User Manual - - Konica Minolta MGI JETvarnish 3D One | MGI JETvarnish 3D One User Manual - Page 95
JETVARNISH 3D One ONLY VALID FOR GEN.3 Paper Exit Tray = PET The Paper Exit Tray is installed at the extreme end of the Printer module. [MS] [OS] Paper Exit Tray - front view It is a basic but robust exit tray which supports by removing the paper pile out of the Paper Exit tray. User Manual - 95 - - Konica Minolta MGI JETvarnish 3D One | MGI JETvarnish 3D One User Manual - Page 96
JETVARNISH 3D One The Paper Exit tray and the sensor integrated in the left Side Guide [M.S] The sensor (integrated in the left Side Guide) detects when the paper pile reaches its highest level (± 15cm). The Tray Full Sensor has two colored LEDs. No obstacle facing the sensor LED = GREEN - Konica Minolta MGI JETvarnish 3D One | MGI JETvarnish 3D One User Manual - Page 97
JETVARNISH 3D One 6.4.3 Paper Exit Tray main components The main components are the following: The two Side Guides and the Paper stopper. They are magnetic and can be dragged individually to match all supported paper sizes. The Tray plate receives the paper sheets as they come out of the Printer - Konica Minolta MGI JETvarnish 3D One | MGI JETvarnish 3D One User Manual - Page 98
JETVARNISH 3D One When the Side guides (right & left) need to be adjusted, you can slide them thanks to their magnetism (no tooling required). Thanks to the Centering + tilt angle setting, it is possible to vary the overall Paper Exit Tray tilt angle from positive to neutral. ① ② User Manual - 98 - - Konica Minolta MGI JETvarnish 3D One | MGI JETvarnish 3D One User Manual - Page 99
JETVARNISH 3D One A E ❻ ❶ • The Paper Exit Tray height adjustment (blue arrow) - 5 slots, noted A to E • The Paper Exit Tray tilt angle adjustment (yellow arrow) - 6 slots, noted 1 to 6 User Manual - 99 - - Konica Minolta MGI JETvarnish 3D One | MGI JETvarnish 3D One User Manual - Page 100
JETVARNISH 3D One Matrix of the possible combinations Paper Exit Tray tilt angle variation Operator Side [OS] A B C D E 123456 Not recommended Default Optional Not used User Manual - 100 - - Konica Minolta MGI JETvarnish 3D One | MGI JETvarnish 3D One User Manual - Page 101
JETVARNISH 3D One Setting advices • Do not use the slots in red - it provides an angle which is not suitable for a reliable stacking • The position (4,B) is the 200 to 300 GSM in SRA3 Not used Thin Paper (< 200 GSM) or shorter than SRA3 END OF THE SECTION VALID FOR GEN.3 User Manual - 101 - - Konica Minolta MGI JETvarnish 3D One | MGI JETvarnish 3D One User Manual - Page 102
JETVARNISH 3D One 7 MGI software & graphical user interfaces 7.1 Advices about your Cyber Security Your entire JETvarnish equipment is driven by a single PC, the PC Workstation. This PC numbers). • Caldera Security patches & OS updates Contact Caldera to get the latest updates. User Manual - 102 - - Konica Minolta MGI JETvarnish 3D One | MGI JETvarnish 3D One User Manual - Page 103
: JVTi is used to print, monitor production and set up the JETVARNISH 3D One. (Refer to section "How to use the JVTi"). MGI Kernel ("Noyau" in French) communicates with all physical components of the JETVARNISH 3D One. This application is automatically run upon starting of the JVTi and configuration - Konica Minolta MGI JETvarnish 3D One | MGI JETvarnish 3D One User Manual - Page 104
JETVARNISH 3D One 7.3 JVTI - Graphical User Interface 7.3.1 STARTING UP THE JVTi The JETvarnish Tactile Interface named here, JVTi, is the main application suite to drive the equipment, its jobs and its various maintenance procedures. To run the JVTI, - Konica Minolta MGI JETvarnish 3D One | MGI JETvarnish 3D One User Manual - Page 105
/ Restricted Info MGI MGI / Restricted info JETVARNISH 3DS/3D One OK OK OK OK Basically, the different logon levels are the following (from the lowest rights to the highest ones functions plus these specific ones: - Possibility to create - Konica Minolta MGI JETvarnish 3D One | MGI JETvarnish 3D One User Manual - Page 106
the machine production phases. This interface is accessible once the whole machine is started. On the JETVARNISH 3D One, the screen is not tactile, therefore you need the virtual keyboard or the physical keyboard and it properly, the JVTi will post this form at each launch. User Manual - 106 - - Konica Minolta MGI JETvarnish 3D One | MGI JETvarnish 3D One User Manual - Page 107
JETVARNISH 3D One Once the form is properly filled, the main screen shows the following with main areas outlined ② ) [7] Administration icons: For Varnish registration, User management and MGI access (remote support with MGI hotline) [8] Cleaning tab: This tab displays the hot purge - Konica Minolta MGI JETvarnish 3D One | MGI JETvarnish 3D One User Manual - Page 108
JETVARNISH 3D One 7.4 The Pilot - Graphical touch screen interface 7.4.1 How to access it The Pilot screen is physically installed on the [MS] of the Paper Feeder module. It is an LCD color touchscreen. Pilot Touch Screen User Manual - 108 - - Konica Minolta MGI JETvarnish 3D One | MGI JETvarnish 3D One User Manual - Page 109
JETVARNISH 3D One The Pilot screen can be also remotely displayed on the main 22" LCD monitor, using a handy utility software (provided with the equipment). User Manual - 109 - - Konica Minolta MGI JETvarnish 3D One | MGI JETvarnish 3D One User Manual - Page 110
JETVARNISH 3D One 7.4.2 Pilot Main screen or Home screen [1] [2] [3] [10] [4] [5] [9] [6] [7] [8] [1] [6] Buzzer - button Enable/disable the buzzer [7] Technical menu/MGI mode service - button Reserved for technicians, a password is necessary to access of the substrate User Manual - 110 - - Konica Minolta MGI JETvarnish 3D One | MGI JETvarnish 3D One User Manual - Page 111
JETVARNISH 3D One 7.4.2.2 Symbolic varnish circuit diagram This diagram represents the key elements which are necessary to monitor for good varnish Intermediate tank + manifold EV Pump Varnish canister (10 liters) EV = electro valve EV Pump Main Tank Float switches (x2) User Manual - 111 - - Konica Minolta MGI JETvarnish 3D One | MGI JETvarnish 3D One User Manual - Page 112
JETVARNISH 3D One 7.4.2.3 System Information screen This screen gives you system related information about this equipment. [1] SYSTEM INFORMATION Date & Time Machine the technician or for hotline when they are requesting this information Buttons [ ] 1. Go back to Home screen User Manual - 112 - - Konica Minolta MGI JETvarnish 3D One | MGI JETvarnish 3D One User Manual - Page 113
JETVARNISH 3D One 7.4.2.4 Machine parameter screen MACHINE PARAMETERS Double feed detection Printing belt rotation Current head plate position: Buttons [ ] 1. Go Turns ON/OFF Double feed detection Turns ON/OFF Print belt rotation Indicates current heads position (Print/Purge) User Manual - 113 - - Konica Minolta MGI JETvarnish 3D One | MGI JETvarnish 3D One User Manual - Page 114
JETVARNISH 3D One 7.4.2.5 Printheads maintenance screen [1] [2] PRINTHEADS MAINTENANCE 3 sec. 5 sec. 8 sec. PURGE TIME Cold purge lasting 3 seconds Cold purge lasting 5 seconds should use JVTi for this function) Buttons [ ] 1. Disable/Enable beeper 2. Go back to Home screen User Manual - 114 - - Konica Minolta MGI JETvarnish 3D One | MGI JETvarnish 3D One User Manual - Page 115
JETVARNISH 3D One 7.4.2.6 Disable/Enable buzzer Toggle function - press once buzzer is disable, press again, buzzer is enable 7.4.2.7 Technical menu This menu is reserved for certified trained MGI technicians. [2] [1] TECHNICAL MODE Service mode MGI Menu Explanations Mode used by Trained Service - Konica Minolta MGI JETvarnish 3D One | MGI JETvarnish 3D One User Manual - Page 116
JETVARNISH 3D One 7.4.2.8 Consumables life life time is reached. These parts are not included in the Service Contract signed between the User and the Distributor, if any. Operator is reached. These parts are normally included in the Service Contract signed between the User and the Distributor, if - Konica Minolta MGI JETvarnish 3D One | MGI JETvarnish 3D One User Manual - Page 117
JETVARNISH 3D One The "Consumables life" screen displays a series of lines. Each spare part -2nd element = Part Number for reordering this spare part (using MGI reference) [2] Number of days after initial installation/initialization of this spare part option User Manual(s). User Manual - 117 - - Konica Minolta MGI JETvarnish 3D One | MGI JETvarnish 3D One User Manual - Page 118
JETVARNISH 3D One EXPLANATIONS OF THE SPARE PARTS USED IN THE 3D ONE/ACCURIOSHINE 3600 CONSUMABLES LIFE SCREENS ORU SECTION - (operator) PART NAME USED IN THE PILOT Curing LED2 with your distributor/trained technician to order/change this spare part BEFORE the machine stops. User Manual - 118 - - Konica Minolta MGI JETvarnish 3D One | MGI JETvarnish 3D One User Manual - Page 119
JETVARNISH 3D One • With a PLC Pilot firmware ≥ V1. life time is reached. These parts are not included in the Service Contract signed between the User and the Distributor, if any. is reached. These parts are normally included in the Service Contract signed between the User and the Distributor, if - Konica Minolta MGI JETvarnish 3D One | MGI JETvarnish 3D One User Manual - Page 120
JETVARNISH 3D One The "Consumables life" screen displays a series of lines. Each spare part -2nd element = Part Number for reordering this spare part (using MGI reference) [2] Number of days after initial installation/initialization of this spare part option User Manual(s). User Manual - 120 - - Konica Minolta MGI JETvarnish 3D One | MGI JETvarnish 3D One User Manual - Page 121
JETVARNISH 3D One EXPLANATIONS OF THE SPARE PARTS USED IN THE 3D ONE/ACCURIOSHINE 3600 CONSUMABLES LIFE SCREENS ORU SECTION - (operator) PART NAME USED IN THE PILOT Curing LED2 with your distributor/trained technician to order/change this spare part BEFORE the machine stops. User Manual - 121 - - Konica Minolta MGI JETvarnish 3D One | MGI JETvarnish 3D One User Manual - Page 122
JETVARNISH 3D One 8 INSTALLING THE CONSUMABLES 8.1 Installation of the containers The varnish, the cleaning agent and the waste containers the machine. Open the back door [MS]. [1] [2] [3] [1] Varnish container [2] Waste container [3] Cleaning agent container (flush) User Manual - 122 - - Konica Minolta MGI JETvarnish 3D One | MGI JETvarnish 3D One User Manual - Page 123
JETVARNISH 3D One 1.1.1 Cleaning agent container Open the cleaning agent container by unscrewing Opener". Insert the pipe with the pierced cap on the container. WARNING Please Note: The JETVARNISH 3D One requires a specific Cleaning Agent reference: PN: 8484S Do not use any third-party cleaning - Konica Minolta MGI JETvarnish 3D One | MGI JETvarnish 3D One User Manual - Page 124
JETVARNISH 3D One Put the container in its location and connect the pipe connector. To remove the cleaning agent container, do the previous steps in reverse order. 8.1.2 Waste - Konica Minolta MGI JETvarnish 3D One | MGI JETvarnish 3D One User Manual - Page 125
marprene tubing). 8.1.3 Varnish container WARNING Please note the JETVARNISH 3D One requires a specific varnish reference - PN: 10109S Do not use another MGI varnish reference on this equipment. The system will refuse to use it and any damage will be chargeable (parts & labor) User Manual - 125 - - Konica Minolta MGI JETvarnish 3D One | MGI JETvarnish 3D One User Manual - Page 126
JETVARNISH 3D One The cleaning agent/flush container (blue) is at the extreme right of the picture [1] 1. Varnish container 2. Waste container 3. Cleaning agent container (flush) [2] [3] User Manual - 126 - - Konica Minolta MGI JETvarnish 3D One | MGI JETvarnish 3D One User Manual - Page 127
JETVARNISH 3D One To change a varnish container. remove the intake pipe inside the empty one and clean it. You can place the pipe on the holder next to the container with a tissue underneath the metallic pipe inside the container and push it firmly down to seal the rubber cap. User Manual - 127 - - Konica Minolta MGI JETvarnish 3D One | MGI JETvarnish 3D One User Manual - Page 128
This information refers to the JETVARNISH 3D ONE with its 10-litre container, but it is also VALID for the 18-litre container on other JETVARNISH MODELS. Introduction 18-liter • Container installed correctly in its tray support (bottom of container in contact with sensor) User Manual - 128 - - Konica Minolta MGI JETvarnish 3D One | MGI JETvarnish 3D One User Manual - Page 129
JETVARNISH 3D One 9.1 Intake pipe settings 9.1.1 Angle setting Top view of the intake pipe Cross-sectional view of the container NOT OK Sensor NOT OK Actual top view of varnish intake pipe User Manual - 129 - - Konica Minolta MGI JETvarnish 3D One | MGI JETvarnish 3D One User Manual - Page 130
JETVARNISH 3D One OK OK OK When the intake pipe is properly inserted, its horizontal handle should perfectly match the container handle (see the white is empty, or is falsely indicating that the container is empty, please call your distributor and request an engineer. User Manual - 130 - - Konica Minolta MGI JETvarnish 3D One | MGI JETvarnish 3D One User Manual - Page 131
JETVARNISH 3D One 10 VARNISH REGISTRATION PROCEDURE 10.1 Purpose of validity date of each varnish in the machine to be checked in order to prevent problems at the inkjet print heads. This registration is mandatory each time a container is installed the sequence to be followed: User Manual - 131 - - Konica Minolta MGI JETvarnish 3D One | MGI JETvarnish 3D One User Manual - Page 132
JETVARNISH 3D One Located on the bottom right of the screen, this button is used to access the consumable register the site. The center of the screen displays the list of varnishes which were registered on the JETVARNISH 3D ONE. The button below hides the empty pockets: User Manual - 132 - - Konica Minolta MGI JETvarnish 3D One | MGI JETvarnish 3D One User Manual - Page 133
the moment when the pocket was registered on the JETVARNISH 3D ONE. The "Expiration date" is the varnish expiration date (14 months after being produced by MGI). When the expiration date is reached, this varnish (French or English). 3. Select the language and then click "Enter". User Manual - 133 - - Konica Minolta MGI JETvarnish 3D One | MGI JETvarnish 3D One User Manual - Page 134
JETVARNISH 3D One 4. For identification purposes. you must enter the "JET Code" and "Control Code" identify the person responsible for the machine. 5. The following window asks you to scan or manually enter the two items of information specific to the varnish container placed in the machine (Serial - Konica Minolta MGI JETvarnish 3D One | MGI JETvarnish 3D One User Manual - Page 135
JETVARNISH 3D One 8. The window below should open. The following fields must then be completed: - Serial Number. - Key. - Activation key. Identify whether the 10% of the pocket is available. Registration will have to be validated through a license to unblock the remaining 90%. User Manual - 135 - - Konica Minolta MGI JETvarnish 3D One | MGI JETvarnish 3D One User Manual - Page 136
JETVARNISH 3D One 11 Starting up & shutting down procedures 11.1 Procedure details By touching the Pilot Touch Screen, the starting procedure appears. It is procedure not done yet. - Step in progress. - Step to validate (to be able to go to the next step). - Step done. User Manual - 136 - - Konica Minolta MGI JETvarnish 3D One | MGI JETvarnish 3D One User Manual - Page 137
JETVARNISH 3D One 11.2 Starting up 1 2 3 4 5 6 [1] The first step is to disable all emergency buttons ① (which are activated when the machine is shutdown) and the ON/OFF 24V switch ② to power the electronic boards ① ② This step needs to be acknowledged User Manual - 137 - - Konica Minolta MGI JETvarnish 3D One | MGI JETvarnish 3D One User Manual - Page 138
JETVARNISH 3D One [2] Then, press the blue button ③ next to the ON/OFF 24V switch ③ [3] Start the computer by opening the lower front door needs to be acknowledged . [4] During this step the machine makes its initialization (the printing plate and purging tray are initialized). User Manual - 138 - - Konica Minolta MGI JETvarnish 3D One | MGI JETvarnish 3D One User Manual - Page 139
JETVARNISH 3D One [5] Start up the JVTI software The next step is to start the JVTi on the computer. The software makes the communication with all the Password associated to the User profile is: USER As soon as you are logged. the pilot goes automatically to the next step. User Manual - 139 - - Konica Minolta MGI JETvarnish 3D One | MGI JETvarnish 3D One User Manual - Page 140
JETVARNISH 3D One [6] Follow the JVTI start-up procedure pro On the JVTi the following message appears when you are starting the machine: A wiping of . 11.3 Shutting down 11.3.1 Closing the JVTi Close the JVTi and select to "Shutdown the printer". Then, confirm your choice. User Manual - 140 - - Konica Minolta MGI JETvarnish 3D One | MGI JETvarnish 3D One User Manual - Page 141
JETVARNISH 3D One The Pilot Touch Screen will show up the extinction procedure. It is mandatory to follow step-by-step this procedure every time you on the blue icon to start the automatic cleaning of the print heads (Refer to "Automatic cleaning of the print heads" section) User Manual - 141 - - Konica Minolta MGI JETvarnish 3D One | MGI JETvarnish 3D One User Manual - Page 142
JETVARNISH 3D One [2] Switch off the ON/OFF 24V ② and press on the emergency button ① ① ② This step needs to be acknowledged. [3] Shutdown the computer once you have finished, to close everything on it This step needs to be acknowledged . User Manual - 142 - - Konica Minolta MGI JETvarnish 3D One | MGI JETvarnish 3D One User Manual - Page 143
JETVARNISH 3D One [4] Wait for the machine extinction When all the steps are finished a timer starts to end the shutdown procedure. Once it is finished the pilot screen turns to the screen saver. User Manual - 143 - - Konica Minolta MGI JETvarnish 3D One | MGI JETvarnish 3D One User Manual - Page 144
JETVARNISH 3D One 12 HOW TO RUN A PRODUCTION 12.1 Printable areas and Q-Zone Using the same rational as the printing environment, it creating a quality issue (called "spray issue"). 2.0 cm Paper sheet Best varnished area or Q-zone 1.5 cm 1.5 cm Feeding Direction User Manual 2.0 cm - 144 - - Konica Minolta MGI JETvarnish 3D One | MGI JETvarnish 3D One User Manual - Page 145
JVTi The Graphical User Interface (GUI) on the JETVARNISH 3D One is named the "JVTi" which is the common interface for all JETvarnish equipment. For the JETVARNISH 3D One, the JVTi version is ≥ 3.3.x This quick /icon has restricted credentials, it displays a lock or a padlock. User Manual - 145 - - Konica Minolta MGI JETvarnish 3D One | MGI JETvarnish 3D One User Manual - Page 146
JETVARNISH 3D One [1] Folder selection [2] Job management [3] Printing progress User Manual Listing of the folders found Play/Pause** button The pause mode - important rules to remind (Only valid with the JETVARNISH 3D One S1 Pilot version ≥ 1.28) At any time during the printing production, a job - Konica Minolta MGI JETvarnish 3D One | MGI JETvarnish 3D One User Manual - Page 147
JETVARNISH 3D One User icon access: Printing icon, management icon and technician icon Administrator icon access: [4] Menu selection Standard printing ( for Error codes) Substrate format [6] Printing status Printing speed in s/h (sheets per hour)* Remaining time of printing User Manual - 147 - - Konica Minolta MGI JETvarnish 3D One | MGI JETvarnish 3D One User Manual - Page 148
JETVARNISH 3D One [7] logins (Refer to Chapter Login Management) MGI access: TeamViewer with MGI connection for remote access (Internet assistance and print speed uses a fixed gap of 10 cm between 2 sheets. From one job to another, your real print speed will vary related to feeder settings, - Konica Minolta MGI JETvarnish 3D One | MGI JETvarnish 3D One User Manual - Page 149
JETVARNISH 3D One 12.3 Standard conditions [1] [2] [1] File listing [2] File selection [3] File management User Manual [4] [5] [3] Click on the file to select it. Files turn green and Cost calculator) Script application on the selected file Open MGI Spot Varnish Editor (Refer to the Chapter: The - Konica Minolta MGI JETvarnish 3D One | MGI JETvarnish 3D One User Manual - Page 150
JETVARNISH 3D One [4] Job ticket management [5] Print menu button: Copy the job ticket of the selected file Save the job ticket of the selected file Listing of saved - Konica Minolta MGI JETvarnish 3D One | MGI JETvarnish 3D One User Manual - Page 151
JETVARNISH 3D One 12.4 Print menu [1] [2] [3] [1] Machine setting [2] File name [3] Print menu tabs [4] Print menu management User Manual [5] [6] [4] Click to open a tab displaying feeder, printer and curing settings Display the name of the file you are printing Click to open the settings for - Konica Minolta MGI JETvarnish 3D One | MGI JETvarnish 3D One User Manual - Page 152
JETVARNISH 3D One [5] Print starting button [6] Quantity You have to set all the previous parameters to be able to print. Once it is done the button become green: Click on the quantity to change the number of printing you want. User Manual - 152 - - Konica Minolta MGI JETvarnish 3D One | MGI JETvarnish 3D One User Manual - Page 153
JETVARNISH 3D One 12.4.1 Position tab [1] [1] Paper format [2] Margin and position User Manual [3] [2] You can select the format mm to 0.450 mm). Change this value each time you are changing from one paper thickness to another one. This value is really important for: - Print Cradle (all Types, all - Konica Minolta MGI JETvarnish 3D One | MGI JETvarnish 3D One User Manual - Page 154
JETVARNISH 3D One [3] Manual adjustment: - AIS SmartScanner (Type 2 only) If you have a SmartScanner Type 2 (S/N ≥ 0141) then, the Paper Thickness value is also influencing the AIS SmartScanner move to the right or to the bottom. Remove value to move to the left or to the top. User Manual - 154 - - Konica Minolta MGI JETvarnish 3D One | MGI JETvarnish 3D One User Manual - Page 155
JETVARNISH 3D One 12.4.2 Quality Tab Remark about the maximum varnish thickness Experience shows that there is a possible relation between the paper thickness and the maximum varnish thickness. It is commonly admitted that the varnish thickness should not exceed 1/3 (one ) µm User Manual - 155 - - Konica Minolta MGI JETvarnish 3D One | MGI JETvarnish 3D One User Manual - Page 156
JETVARNISH 3D One [1] THICKNESS panel User Manual You can adjust the thickness of varnish you want by using this slider. The slider varies from 21* to 116 µm *21 µm is the minimum allowed, - Konica Minolta MGI JETvarnish 3D One | MGI JETvarnish 3D One User Manual - Page 157
JETVARNISH 3D One [2] HEAD 1 CONFIGURATION 2 1. Please always select "Factory Mode" 2. Adjust the overlap of the heads in individual nozzle values. (Please see part 19.6.2 in the troubleshooting a banding effect Shading using IJ technology - varnish dots for instance User Manual - 157 - - Konica Minolta MGI JETvarnish 3D One | MGI JETvarnish 3D One User Manual - Page 158
JETVARNISH 3D One Shading without dithering & with dithering (JETvarnish) • Without dithering (possible banding) 100% 0% • With dithering (smooth transitions) 100% 0% Without the dithering activation, the thinnest varnish value is controled only by the JVTI - depending on the JETvarnish model - Konica Minolta MGI JETvarnish 3D One | MGI JETvarnish 3D One User Manual - Page 159
JETVARNISH 3D One Advantages: • You can go lower in thickness than the JVTI minimal thickness value. Thus, you can save varnish (if substrate permits). If not permit to spray a so little varnish thickness. • You have unwanted dots/noise in the image and wanted to remove them. User Manual - 159 - - Konica Minolta MGI JETvarnish 3D One | MGI JETvarnish 3D One User Manual - Page 160
JETVARNISH 3D One Image rendering without and with dithering (simplified) User Manual - 160 - - Konica Minolta MGI JETvarnish 3D One | MGI JETvarnish 3D One User Manual - Page 161
JETVARNISH 3D One 12.4.4 How to activate the Dithering function? By default, the Dithering function is disabled. Generic JVTI menu - not always related to this User Manual model If you select it, the Dithering will be activated and will change the rendering of the printed varnish. A positive effect - Konica Minolta MGI JETvarnish 3D One | MGI JETvarnish 3D One User Manual - Page 162
JETVARNISH 3D One 12.4.5 Machine settings 12.4.5.1 Summary of settings Machine settings Validate the machine settings and go back to the print menu (Refer to tab (Refer to Chapter 12.4.5.4 Printer tab) Display the varnish thickness adjusted in the print menu in the Quality tab User Manual - 162 - - Konica Minolta MGI JETvarnish 3D One | MGI JETvarnish 3D One User Manual - Page 163
JETVARNISH 3D One 12.4.5.2 Overview tab [1] [2] [3] [1] Curing tab [2] Printer tab [3] Feeder tab [1] [2] [3] Click on this tab or on the curing part on the machine or on the feeder part on the machine diagram to go on feeder setting tab. (Refer to Chapter Feeder tab) User Manual - 163 - - Konica Minolta MGI JETvarnish 3D One | MGI JETvarnish 3D One User Manual - Page 164
JETVARNISH 3D One 12.4.5.3 Feeder tab Please refer to the Paper Feeder section 12.4.5.4 Printer tab [1] [2] 100 [3] 100 100 [4] [5] [1] Paper thickness [2] Printing belt speed adjustment [3] Printing belt vacuum adjustment User Manual Display/edit the thickness of the loaded substrate The - Konica Minolta MGI JETvarnish 3D One | MGI JETvarnish 3D One User Manual - Page 165
JETVARNISH 3D One [4] Substrate length [5] Varnish circuit diagram Display the length of the substrate. Display the varnish circuit diagram. User Manual - 165 - - Konica Minolta MGI JETvarnish 3D One | MGI JETvarnish 3D One User Manual - Page 166
JETVARNISH 3D One 12.4.5.5 Curing tab [1] [1] Paper Exit Tray fan adjustment [2] Curing unit location [3] Curing power management User Manual [3] [2] You can adjust the power of the blowing fan over the Paper Exit Tray Adjust to a value which assists the sheets in stacking correctly. • DRY 1: - Konica Minolta MGI JETvarnish 3D One | MGI JETvarnish 3D One User Manual - Page 167
JETVARNISH 3D One 12.4.6 Monitoring screen [1] [2] [1] Machine settings [2] Printing management Refer to Chapter Feeder, Printer and Curing settings. Display the name of the printing file. Display the quantity to print. Click to pause the printing Click to stop the printing User Manual - 167 - - Konica Minolta MGI JETvarnish 3D One | MGI JETvarnish 3D One User Manual - Page 168
JETVARNISH 3D One 12.4.7 Machine start button ④ The "PRINT/PAUSE" button ④ starts blinking in green when the operator clicks on the "Print starting" button ( machine goes in printing position and the belt starts to turn, then the Paper Feeder starts the page feeding process. User Manual - 168 - - Konica Minolta MGI JETvarnish 3D One | MGI JETvarnish 3D One User Manual - Page 169
JETVARNISH 3D One 12.5 Printing summary 12.5.1 Summary window [1] Printing summary [2] Close button [3] Details icon 12.6 History [1] [2] [1] Job history listing: [2] History settings User Manual Total substrate to print Total printed substrate Total time to print Total varnish consumption for the - Konica Minolta MGI JETvarnish 3D One | MGI JETvarnish 3D One User Manual - Page 170
JETVARNISH 3D One [3] File preview A blue day means that at least, a printing was done this day. • Paper size: format of paper used (Refer to Chapter 0 Position) • Mode: the varnish used. 3D • Consumption: quantity of varnish used for the printing [5] Access the job Click to this icon to access - Konica Minolta MGI JETvarnish 3D One | MGI JETvarnish 3D One User Manual - Page 171
- 171 - User Manual STARTING TIME 08/02/2018 14:59:02:729 08/02/2018 15:00:42:033 True True True True True True True True True False False False False False False False OVERLAP 1 1 1 1 1 1 1 3 3 3 3 3 3 3 3 3 3 3 3 3 3 JETVARNISH 3D One Sample of a job history listing as an Excel format (csv) - Konica Minolta MGI JETvarnish 3D One | MGI JETvarnish 3D One User Manual - Page 172
JETVARNISH 3D One Meaning of all fields/columns Column A B C D E Meaning Starting time Ending time Requested number of pages Truly printed pages Drop number (thickness) F Print bar number (3D One has only one bar) G Paper Format H Paper width I Paper Height J Job path K User L Camera - Konica Minolta MGI JETvarnish 3D One | MGI JETvarnish 3D One User Manual - Page 173
JETVARNISH 3D One 12.7 Supervision menu [1] [2] [3] [1] Range selection [2] Date selection [3] Chart selection You can select for the supervision chart a range of 1 Day, 1 chart) Pie chart (Refer to Chapter 12.7.1 Pie Chart) Excel export (Refer to Chapter 12.7.2 Excel export) User Manual - 173 - - Konica Minolta MGI JETvarnish 3D One | MGI JETvarnish 3D One User Manual - Page 174
JETVARNISH 3D One 1.1.1 Bar chart [1] [2] [1] Supervision chart [2] Scrolling buttons [3] Chart settings [3] [4] Display a chart for the consumption of varnish or the varnish or production in number of sheets Select the operator to monitoring his consumption and production User Manual - 174 - - Konica Minolta MGI JETvarnish 3D One | MGI JETvarnish 3D One User Manual - Page 175
JETVARNISH 3D One 12.7.1 Pie chart [1] [1] Pie chart: Operator distribution pie chart for the selected range User Manual - 175 - - Konica Minolta MGI JETvarnish 3D One | MGI JETvarnish 3D One User Manual - Page 176
JETVARNISH 3D One 12.7.2 Excel export [1] [2] [1] [3] [1] Date selection [2] Summary export information selection [3] Job per job export information selection [4] Export User Manual [4] [4] Select the dates between which you want to export information Select which information you want to export: • - Konica Minolta MGI JETvarnish 3D One | MGI JETvarnish 3D One User Manual - Page 177
JETVARNISH 3D One 12.8 Settings menu 12.8.1 General settings tab [2] [5] [1] [3] [4] [7] [6] [8] [9] [10] [11] [1] Import Folder [2] Cleaning Alerts [3] Enable Incoming Alerts will be available in the print settings dialogue. Saves changes to settings before exiting. User Manual - 177 - - Konica Minolta MGI JETvarnish 3D One | MGI JETvarnish 3D One User Manual - Page 178
JETVARNISH 3D One 12.8.2 VDP settings The VPD settings are only related to the optional Variable Data Printing when installed. To learn more about the Flow Edition, please refer to the external document which is generic to all JETvarnish machines: "JV3D Series - VDP User Manual". User Manual - 178 - Konica Minolta MGI JETvarnish 3D One | MGI JETvarnish 3D One User Manual - Page 179
JETVARNISH 3D One 12.8.3 AIS settings tab [4] [1] [2] [5] [3] The AIS settings are related to the AIS SmartScanner default parameters: [1] This panel is displaying the default parameters for Max. Pattern & Default X and Y margins as described in the "AIS SmartScanner User Manual". [2] This panel - Konica Minolta MGI JETvarnish 3D One | MGI JETvarnish 3D One User Manual - Page 180
JETVARNISH 3D One 12.8.4 PF settings tab PF is the nickname of the Paper Feeder. This table shows the print speed table for a representative number of papers. This screen is not used on the JETVARNISH 3D One. *Please do not alter any settings on this page. User Manual - 180 - - Konica Minolta MGI JETvarnish 3D One | MGI JETvarnish 3D One User Manual - Page 181
JETVARNISH 3D One 12.8.5 About/information tab [1] [2] This tab is mainly to inform about the status of key components: [1] List of all installed MGI software and their respective versions [2] PC Performance Workstation - main hardware components In case of trouble when calling the hotline, this - Konica Minolta MGI JETvarnish 3D One | MGI JETvarnish 3D One User Manual - Page 182
JETVARNISH 3D One not provided (only possible when running the PC Cost Calculator), only the manual input of the average ink coverage and page format are used for these have been done during the usage of the Varnish container. MGI is not liable for the accuracy of the Cost Calculator information - Konica Minolta MGI JETvarnish 3D One | MGI JETvarnish 3D One User Manual - Page 183
JETVARNISH 3D One [1] [2] [6] [3] [7] [1] File name [2] Close button [4] [5] Eiffel Tower 3D effects.tif Display the name of the file Click on this button to close the Cost Calculator • File size: File size in Megabyte (Mo in French) • Date: Date of creation of the file User Manual - 183 - - Konica Minolta MGI JETvarnish 3D One | MGI JETvarnish 3D One User Manual - Page 184
JETVARNISH 3D One [5] Thickness adjustment Display a chart showing the percentage of each varnish shade (corresponding with grayscale shade) You can adjust the thickness of varnish you want by using this slider. [6] Cost information [7] Total cost Total Price: 0.08 € • Ink coverage: Covered - Konica Minolta MGI JETvarnish 3D One | MGI JETvarnish 3D One User Manual - Page 185
JETVARNISH 3D One 12.10 The MGI Spot Varnish Editor The Spot Varnish Editor is an embedded graphic file editor software. It can be accessed by double-clicking the file to be - Konica Minolta MGI JETvarnish 3D One | MGI JETvarnish 3D One User Manual - Page 186
JETVARNISH 3D One Move tool Zoom tool Selection tools Selected tools User Manual Used to move the image Used to zoom into a selected area Used to make a rectangle selection of the image Used to make a selection using a magic - Konica Minolta MGI JETvarnish 3D One | MGI JETvarnish 3D One User Manual - Page 187
JETVARNISH 3D One Image tools Used to fill a selection area according to a color percentage. Mainly used upon file misprocessing (90% black but not the printing substrate format. This function trims or enlarges the working zone without modifying the image (maybe trimmed). User Manual - 187 - - Konica Minolta MGI JETvarnish 3D One | MGI JETvarnish 3D One User Manual - Page 188
JETVARNISH 3D One Used to adjust the stretch of the printing substrate due to image stretching during printing. This stretch can be defined in length (printing substrate feed direction) or width. Used to adjust a trapeze effect on the global file. User Manual Used to set a general skew to the - Konica Minolta MGI JETvarnish 3D One | MGI JETvarnish 3D One User Manual - Page 189
JETVARNISH 3D One Script Text History Shortcuts User Manual This function is used to apply an existed script created for that machine on that type of printing substrate. • Variable data: lookup of page one then production following application of this script to all pages to be printed. To save a - Konica Minolta MGI JETvarnish 3D One | MGI JETvarnish 3D One User Manual - Page 190
JETVARNISH 3D One New utility A new multimedia tool is available to show the main functions of the Spot Varnish Editor: The Spot Varnish Editor Interactive Guide digit ID that you have to transfer to MGI by phone (+33 1 45 21 06 60) or by email to hotline ([email protected]). If you need to do a - Konica Minolta MGI JETvarnish 3D One | MGI JETvarnish 3D One User Manual - Page 191
JETVARNISH 3D One 12.12 Automatic cleaning of the print heads [1] [3] [2] [5] [4] [1] Print heads selection You can select the entire print head by clicking , with the possibility to select which print heads to clean. A wiping is mandatory to be able to print again. User Manual - 191 - - Konica Minolta MGI JETvarnish 3D One | MGI JETvarnish 3D One User Manual - Page 192
JETVARNISH 3D One Once the start button is clicking to following window appear: Confirm your is mandatory to be able to print again. Before starting a purge, select the duration of this one. You can select between Short (3 seconds), Medium (5 seconds) Long (8 seconds) or Custom (choose from - Konica Minolta MGI JETvarnish 3D One | MGI JETvarnish 3D One User Manual - Page 193
. Wiping Wiping can be done after a print head cleaning. and is mandatory after a purge of the JETVARNISH 3D ONE printing system. Wiping is common to all print heads of the machine. To make a wiping: - Take out unit is in position the message for wiping can be acknowledge. User Manual - 193 - - Konica Minolta MGI JETvarnish 3D One | MGI JETvarnish 3D One User Manual - Page 194
JETVARNISH 3D One Once the wiping is validated. the machine moves in wiping position. Wait until the wiping is completed. [3] Depressurization display The actual and standard value of depressurization into the Air/Varnish circuit. [4] Starting and Stopping button [5] Close icon User Manual - 194 - Konica Minolta MGI JETvarnish 3D One | MGI JETvarnish 3D One User Manual - Page 195
JETVARNISH 3D One 13 The Pilot interface The Pilot interface shows different menus or screens corresponding to either a user selection or F.D [M.S] [O.S] [O.S] F.D F.D 13.1.2 Errors from E533 to E563 Error E533 Error E538 Error E560 Error E561 Error E562 Error E563 User Manual - 195 - - Konica Minolta MGI JETvarnish 3D One | MGI JETvarnish 3D One User Manual - Page 196
JETVARNISH 3D One 13.1.3 Errors from E564 to E575 Error E564 Error E565 Error E566 Error E567 Error E568 Error E569 Error E570 Error E571 Error E572 Error E573 Error E574 Error E575 User Manual - 196 - - Konica Minolta MGI JETvarnish 3D One | MGI JETvarnish 3D One User Manual - Page 197
JETVARNISH 3D One 13.1.4 Errors from E578 to E581 Error E578 Error E579 Error E580 Error E581 User Manual - 197 - - Konica Minolta MGI JETvarnish 3D One | MGI JETvarnish 3D One User Manual - Page 198
JETVARNISH 3D One 14 MGI AIS SmartScanner System Please refer to a separate User Manual - MGI AIS SmartScanner User Manual User Manual - 198 - - Konica Minolta MGI JETvarnish 3D One | MGI JETvarnish 3D One User Manual - Page 199
15 Linear or coaxial lighting? 15.1 Linear lighting By default, the JETVARNISH 3D One comes with the AIS SmartScanner having a linear lighting. This is the perfect lighting method for the image acquisition is no longer accurate and/or the keypoints are impossible to find. User Manual - 199 - - Konica Minolta MGI JETvarnish 3D One | MGI JETvarnish 3D One User Manual - Page 200
lighting When ordered from factory or as a retro-fit option, the JETVARNISH 3D One may come with an additional coaxial lighting system specially designed for metallic only. The color of this light is really white JETVARNISH 3DS / 3D One Operator Side [O.S] - cross section User Manual - 200 - - Konica Minolta MGI JETvarnish 3D One | MGI JETvarnish 3D One User Manual - Page 201
JETVARNISH 3D One The following pictures show how a highly reflective object (a metallic ruler) reacts when lighted by the two lighting methods: Linear lighting Coaxial lighting a) Linear lighting When using the linear lighting diffusion onto a reflective object, this one is seen with blurry - Konica Minolta MGI JETvarnish 3D One | MGI JETvarnish 3D One User Manual - Page 202
following steps have to be followed in order to register a job to be varnished and it covers the simplest working method for operating the JETVARNISH 3D ONE. 1- Load a paper pile into the Paper Feeder 2- Select the file to be printed in standard mode Select the folder in which the file was located - Konica Minolta MGI JETvarnish 3D One | MGI JETvarnish 3D One User Manual - Page 203
JETVARNISH 3D One 3- Check that the file and printing substrate feed are consistent In the correct direction given by the preview on the JVTi (if this is it if it does not exist. 5- In the position tab, set the image position (left or right or file position in center). 4 5 User Manual - 203 - - Konica Minolta MGI JETvarnish 3D One | MGI JETvarnish 3D One User Manual - Page 204
JETVARNISH 3D One 6- The profile is used to automate the setting part (thickness printing mode, machine in the tiff file). 8- In the Quality tab, please select the printing mode: 2D, 3D or custom, according to the user application. This parameter sets the inkjet print head overlap as a - Konica Minolta MGI JETvarnish 3D One | MGI JETvarnish 3D One User Manual - Page 205
scanner is to run in "Full Scanner Mode" With a standard JETVARNISH 3D One, the "Special Substrate" mode is not showing up. It more about the AIS SmartScanner, please refer to an external User Manual "JV3D Serie - AIS SmartScanner User Manual". 10- Set the Quantity of printing at 1 sheet. - Konica Minolta MGI JETvarnish 3D One | MGI JETvarnish 3D One User Manual - Page 206
JETVARNISH 3D One 13- Select the Printer tab and set the following parameters - Z1 = 30% - Z2 = 0% - Z3 = 0% - Paper thickness = must be check the following parameters - Dry 1 = 30% (default value) - Dry 2 = 100% (default value) - Paper Exit Tray fan = 0% (default value) User Manual - 206 - - Konica Minolta MGI JETvarnish 3D One | MGI JETvarnish 3D One User Manual - Page 207
JETVARNISH 3D One 15- Once theses parameters are set, you can click on the green flashing button ④ ④ 16- The Paper Feeder picks up over the purge tray. The equipment goes in "Idle mode" and is waiting for another job. (only with the JETVARNISH 3D One S1 Pilot firmware ≥ 1.28). User Manual - 207 - - Konica Minolta MGI JETvarnish 3D One | MGI JETvarnish 3D One User Manual - Page 208
lower dyne level substrates improves the quality of thin lines whereas smooth flat surfaces are degraded. For the JETVARNISH 3D ONE, the minimum Dyne level should reach 34. Make sure the dyne level using a dyne pen in be now improved when installing the option CTS Corona module. User Manual - 208 - - Konica Minolta MGI JETvarnish 3D One | MGI JETvarnish 3D One User Manual - Page 209
JETVARNISH 3D One 17.3 Dyne pen results Result of tests using dyne pens from the BOUSSEY-CONTROL Please refer to the "JETVARNISH 3D One - Customer Expectation Guide" which has more details on this topic. User Manual - 209 - - Konica Minolta MGI JETvarnish 3D One | MGI JETvarnish 3D One User Manual - Page 210
JETVARNISH 3D One 18 PERIODICAL MAINTENANCE 18.1 Operator cleaning table COMPONENTS Printheads are out the equipment before cleaning. Monthly n/a Every 6 months n/a *Flush is the official MGI Cleaning Liquid - PN: 8484S **isopropyl alcohol is also known under the name "IPA". This liquid - Konica Minolta MGI JETvarnish 3D One | MGI JETvarnish 3D One User Manual - Page 211
JETVARNISH 3D One 18.2 : Use only cleaning solutions and cleaning foam validated by MGI. Use only one foam per head. Do not use a used foam goggles or face shield. The only cleaning solution certified for the JETVARNISH 3D ONE printheads is: Part Name JET Series - PRINTHEAD CLEANING FLUSH LIQUID - Konica Minolta MGI JETvarnish 3D One | MGI JETvarnish 3D One User Manual - Page 212
JETVARNISH 3D One How to properly handle the cleaning materials and clean the IJ print heads User Manual - 212 - - Konica Minolta MGI JETvarnish 3D One | MGI JETvarnish 3D One User Manual - Page 213
container Waster container Printhead Cleaning container JETVARNISH 3D One container storage cabinet - [M.S] JETVARNISH 3D One Configuration - The left position is not covered by the warranty or the Service Contract. The customer will be fully charged to repair the equipment. User Manual - 213 - - Konica Minolta MGI JETvarnish 3D One | MGI JETvarnish 3D One User Manual - Page 214
JETVARNISH 3D One Since September 2019, the container storage location is wearing a sticker warning the operators about this risk. Maintenance Side [M.S] User Manual - 214 - - Konica Minolta MGI JETvarnish 3D One | MGI JETvarnish 3D One User Manual - Page 215
JETVARNISH 3D One 18.4 Printing belt cleaning - Locate a cured varnish area on the printing belt. - Apply a very strong tape on this varnish layer. - Remove the tape, please find another tape with a stronger glue. - Repeat the operation for all area covered by cured varnish. User Manual - 215 - - Konica Minolta MGI JETvarnish 3D One | MGI JETvarnish 3D One User Manual - Page 216
JETVARNISH 3D One 18.5 Cleaning of the top cell reflectors [1] [2] [1] Printing belt [2] Reflector Caution: Use only cleaning solution and cleaning foam validated by MGI. ATTENTION! DO NOT USE FLUSH - on the printing belt. Skin and Hand protections: Eye protection User Manual - 216 - - Konica Minolta MGI JETvarnish 3D One | MGI JETvarnish 3D One User Manual - Page 217
JETVARNISH 3D One Move the printing belt [1] to reveal a reflector [2]. Use a cleaning foam stick with cleaning solution on it and apply on the reflector [2] solution on the printing belt [1]. Make move the printing belt [1] to access to the other reflector [2] and clean it. User Manual - 217 - - Konica Minolta MGI JETvarnish 3D One | MGI JETvarnish 3D One User Manual - Page 218
JETVARNISH 3D One 19 TROUBLESHOOTING 19.1 Error codes The error messages are color coded. GREEN - This is an information. Operator has nothing to do, the equipment is the same color. The status message in the JVTi is displayed in this same color (same example below) 14/09/2017 User Manual - 218 - - Konica Minolta MGI JETvarnish 3D One | MGI JETvarnish 3D One User Manual - Page 219
JETVARNISH 3D One This error code list is used within the JVTi - extract done Not used E530- Purge in progress E531- Cleaning all printing heads E532- Cleaning one printing head E533- Paper on belt(s) E534- Manual stop printing E535- Print head moving E536- Cleaning in progress E537- Filling ink in - Konica Minolta MGI JETvarnish 3D One | MGI JETvarnish 3D One User Manual - Page 220
JETVARNISH 3D One 542 543 544 545 546 547 548 549 550 551 552 553 554 555 556 557 558 559 560 574 575 576 577 578 579 580 581 582 583 584 585 586 587 588 589 590 591 592 593 594 595 User Manual E542- Feeder not in Auto mode E543- Not used E544- Not used E545- Not used E546- Not used E547- Not used - Konica Minolta MGI JETvarnish 3D One | MGI JETvarnish 3D One User Manual - Page 221
JETVARNISH 3D One 596 597 598 599 E596- Printer jam E597- LED jam E598- Stacker jam E599- C.T.S jam User Manual - 221 - - Konica Minolta MGI JETvarnish 3D One | MGI JETvarnish 3D One User Manual - Page 222
JETVARNISH 3D One 19.2 Abnormal images or Communication error troubleshooting Some random abnormal images are coming from communication failure between JVTi and IJ head control. Once the failure detected, JVTi shows the communication failure. Please follow the troubleshooting as below. • - Konica Minolta MGI JETvarnish 3D One | MGI JETvarnish 3D One User Manual - Page 223
JETVARNISH 3D One • (In case of "No varnish") Check & clean the top cell reflectors. For the procedure refer to the "Periodical maintenance" section. on JVTi and the actual substrate. • Finish the current production and close the JVTi with "Lock the application" User Manual - 223 - - Konica Minolta MGI JETvarnish 3D One | MGI JETvarnish 3D One User Manual - Page 224
JETVARNISH 3D One Thenm restart the JVTi. * If you cannot launch the JVTim, check the following JVTi software and related service are not running in the task manager. • If you still have the failure after restarting JVTi, shutdown the JVTi again. User Manual - 224 - - Konica Minolta MGI JETvarnish 3D One | MGI JETvarnish 3D One User Manual - Page 225
JETVARNISH 3D One • Then turn OFF and ON the 24V panel switch to reset the related device like ICB, RCB, Scanner. Wait for 30 seconds to boot the RCB and ICBs. Then, launch the JVTi. • Even if done the solution, but the same problem continues to occur several times, Call your distributor for the - Konica Minolta MGI JETvarnish 3D One | MGI JETvarnish 3D One User Manual - Page 226
JETVARNISH 3D One 19.3 Other error messages A non-registered consumable can only be used up to 10% of its capacity. This message warns the user that a to 10% of its maximum capacity. This message warns the user that a consumable is not registered and hence can no longer print. User Manual - 226 - - Konica Minolta MGI JETvarnish 3D One | MGI JETvarnish 3D One User Manual - Page 227
JETVARNISH 3D One 19 sheets detection error message. No double sheets detected. Only one sheet passed between the transmitter and receiver. The receptor to a printing substrate length defined in the JVTi. Jams may occur if one of the jam detection sensor detects a printing substrate for more than a - Konica Minolta MGI JETvarnish 3D One | MGI JETvarnish 3D One User Manual - Page 228
JETVARNISH 3D One a substrate is on the printing belt? yes remove the substrate from the printing belt clear the error message and print again the jam in order to detect any issue increase the vacuum of the printing belt the jam occurs again? yes no change the substrate User Manual - 228 - - Konica Minolta MGI JETvarnish 3D One | MGI JETvarnish 3D One User Manual - Page 229
JETVARNISH 3D One 19.4.2 How to remove jam substrate First remove the jammed substrate indicated on the Pilot screen by a green or a red dot. The jam error message After all jammed sheets are ejected, acknowledge the error message by touching this button on the Pilot screen. User Manual - 229 - - Konica Minolta MGI JETvarnish 3D One | MGI JETvarnish 3D One User Manual - Page 230
JETVARNISH 3D One 19.5 Emergency stop procedure If an emergency button is activated, problem is solved, you can clear all the error messages following the next steps: 1. Release all emergency buttons 2. The power needs to be initialized: press the blue RUN button above the keyboard. User Manual - Konica Minolta MGI JETvarnish 3D One | MGI JETvarnish 3D One User Manual - Page 231
JETVARNISH 3D One 3. The printing system lost its position and need to be initialized. press the flashing blue RESET button next the keyboard 4. 5. You are ready to print again. User Manual - 231 - - Konica Minolta MGI JETvarnish 3D One | MGI JETvarnish 3D One User Manual - Page 232
JETVARNISH 3D One 19.6 Power failure procedure In case of power failure: Remove manually any sheets which were being printing. Caution: sheets between print head and curing module number 2 : (Please ask your local trained technician how to do this) Call a trained technician! User Manual - 232 - - Konica Minolta MGI JETvarnish 3D One | MGI JETvarnish 3D One User Manual - Page 233
can see a summary of these features in this screen. 4 features are really important to avoid troubleshoot and use fully the JETVARNISH 3D ONE: • Image size • Colors • Bits per pixels • Resolution 19.7.1 Image size Size of is upper than 360 x 360 dpi your image will be squeezed. User Manual - 233 - - Konica Minolta MGI JETvarnish 3D One | MGI JETvarnish 3D One User Manual - Page 234
JETVARNISH 3D One 19.8 Varnish image troubleshooting The following varnish image troubleshooting's are the most commonly encountered on the JETVARNISH 3D ONE. For all examples. please note that the CMYK and varnish prints are those below: CMYK print Varnish print 19.8.1 Problem Manual - 234 - - Konica Minolta MGI JETvarnish 3D One | MGI JETvarnish 3D One User Manual - Page 235
JETVARNISH 3D One 19.8.2 Problem varnish thickness between 15/21 and 31 microns) or to 3D (for a varnish thickness between 36 and 100/116 microns dents. then the problem is effectively a pixel overlap problem. 19.8.3 Problem 3 - Dots appear problem on matte lamination. run a test on - Konica Minolta MGI JETvarnish 3D One | MGI JETvarnish 3D One User Manual - Page 236
JETVARNISH 3D One 7. Increase the varnish thickness on that substrate so as to cover the phenomenon of dots. 19.8.4 Problem 4 - Lines are present on the print page at a given position 19.8.4.1 Explanation Inkjet .Run purging and cleaning so as to remove dust from the print head. User Manual - 236 - - Konica Minolta MGI JETvarnish 3D One | MGI JETvarnish 3D One User Manual - Page 237
JETVARNISH 3D One 19.8.5 Problem 5 - More and more lines are present on the print 19.8.5.1 Explanation Air bubbles are present in the varnish system. 19.8.5.2 that of the printing substrate used. 14.Check that the side vacuum handle corresponds to the printing substrate width. User Manual - 237 - - Konica Minolta MGI JETvarnish 3D One | MGI JETvarnish 3D One User Manual - Page 238
JETVARNISH 3D One 15.Reduce the printing substrate vacuum under the inkjet print heads. 19.8.7 Problem 5 - Varnish " print heads and the printing substrate. CAUTION: Print heads are consumables; their price is much higher than the job to be printed. If the printing substrate is User Manual - 238 - - Konica Minolta MGI JETvarnish 3D One | MGI JETvarnish 3D One User Manual - Page 239
JETVARNISH 3D One 19.9 Too dark or too light image - metallized substrate When trying to do an acquisition onto a metallized substrate, you are getting of the "Linear or Coaxial lightings" to understand the issue and the solution for handling metallized/foiled substrates. User Manual - 239 - - Konica Minolta MGI JETvarnish 3D One | MGI JETvarnish 3D One User Manual - Page 240
pipe Inkjet print head purging pipe Inkjet print head support height sensor Inkjet print head-ICB ribbon cable Intermediate tank JETVARNISH 3D ONE JVTi Level sensor (Floating switch) Long format/Banner print heads. Pipes intended to purge the manifold and intermediate tank. User Manual - 240 - - Konica Minolta MGI JETvarnish 3D One | MGI JETvarnish 3D One User Manual - Page 241
JETVARNISH 3D One Name MGI support used to accurately position one part in relation to Plate to which the print head supports and print heads are attached. Flat metal plate which supports the printing belt. Venting the printing substrate front edge detector. Guide to lock up the printing substrate - Konica Minolta MGI JETvarnish 3D One | MGI JETvarnish 3D One User Manual - Page 242
JETVARNISH 3D One Name Stack top cleat (stacker) Paper Exit Tray Surface energy Three-way electro valve Transport ball recess Two-way electro valve Upper pile limit sensor UV curing LED UV curing unit UV dissipator Varnish filter Varnish pipes (black) Varnish print head support User Manual - 242 - - Konica Minolta MGI JETvarnish 3D One | MGI JETvarnish 3D One User Manual - Page 243
JETVARNISH 3D One 21 APPENDIX 21.1 EC Declaration of Conformity - JETVARNISH 3D One User Manual - 243 - - Konica Minolta MGI JETvarnish 3D One | MGI JETvarnish 3D One User Manual - Page 244
JETVARNISH 3D One 21.2 EC Declaration of Conformity - Universal Feeder User Manual - 244 - - Konica Minolta MGI JETvarnish 3D One | MGI JETvarnish 3D One User Manual - Page 245
JETVARNISH 3D One 21.3 RoHS Declaration of Compliance (EU & China) - JETVARNISH 3D One User Manual - end - - 245 -
-
 1
1 -
 2
2 -
 3
3 -
 4
4 -
 5
5 -
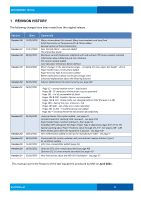 6
6 -
 7
7 -
8
-
9
-
10
-
11
-
12
-
13
-
14
-
15
-
16
-
17
-
18
-
19
-
20
-
21
-
22
-
23
-
24
-
25
-
26
-
27
-
28
-
29
-
30
-
31
-
32
-
33
-
34
-
35
-
36
-
37
-
38
-
39
-
40
-
41
-
42
-
43
-
44
-
45
-
46
-
47
-
48
-
49
-
50
-
51
-
52
-
53
-
54
-
55
-
56
-
57
-
58
-
59
-
60
-
61
-
62
-
63
-
64
-
65
-
66
-
67
-
68
-
69
-
70
-
71
-
72
-
73
-
74
-
75
-
76
-
77
-
78
-
79
-
80
-
81
-
82
-
83
-
84
-
85
-
86
-
87
-
88
-
89
-
90
-
91
-
92
-
93
-
94
-
95
-
96
-
97
-
98
-
99
-
100
-
101
-
102
-
103
-
104
-
105
-
106
-
107
-
108
-
109
-
110
-
111
-
112
-
113
-
114
-
115
-
116
-
117
-
118
-
119
-
120
-
121
-
122
-
123
-
124
-
125
-
126
-
127
-
128
-
129
-
130
-
131
-
132
-
133
-
134
-
135
-
136
-
137
-
138
-
139
-
140
-
141
-
142
-
143
-
144
-
145
-
146
-
147
-
148
-
149
-
150
-
151
-
152
-
153
-
154
-
155
-
156
-
157
-
158
-
159
-
160
-
161
-
162
-
163
-
164
-
165
-
166
-
167
-
168
-
169
-
170
-
171
-
172
-
173
-
174
-
175
-
176
-
177
-
178
-
179
-
180
-
181
-
182
-
183
-
184
-
185
-
186
-
187
-
188
-
189
-
190
-
191
-
192
-
193
-
194
-
195
-
196
-
197
-
198
-
199
-
200
-
201
-
202
-
203
-
204
-
205
-
206
-
207
-
208
-
209
-
210
-
211
-
212
-
213
-
214
-
215
-
216
-
217
-
218
-
219
-
220
-
221
-
222
-
223
-
224
-
225
-
226
-
227
-
228
-
229
-
230
-
231
-
232
-
233
-
234
-
235
-
236
-
237
-
238
-
239
-
240
-
241
-
242
-
243
-
244
-
245
 |
 |

Version 2.7
22/05/2023
F
Available for the JETVARNISH 3D One:
•
Gen.1
•
Gen.2
•
Gen.3
User Manual
JETVARNISH 3D One
EN
Original instructions