Konica Minolta bizhub 283 bizhub 223/283/363/423 PKI Security Operations User - Page 45
TCP/IP Setting Function - ip address
 |
View all Konica Minolta bizhub 283 manuals
Add to My Manuals
Save this manual to your list of manuals |
Page 45 highlights
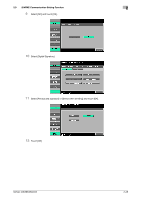
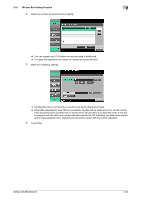
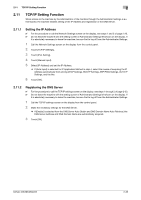
2.11 TCP/IP Setting Function 2 2.11 TCP/IP Setting Function When access to the machine by the Administrator of the machine through the Administrator Settings is authenticated, the machine enables setting of the IP Address and registration of the DNS Server. 2.11.1 Setting the IP Address 0 For the procedure to call the Network Settings screen on the display, see steps 1 and 2 of page 2-26. 0 Do not leave the machine with the setting screen of Administrator Settings left shown on the display. If it is absolutely necessary to leave the machine, be sure first to log off from the Administrator Settings. 1 Call the Network Settings screen on the display from the control panel. 2 Touch [TCP/IP Settings]. 3 Touch [IPv4 Setting]. 4 Touch [Manual Input]. 5 Select [IP Address] and set the IP Address. % If [Auto Input] is selected for IP Application Method in step 4, select the means of acquiring the IP Address automatically from among DHCP Settings, BOOTP Settings, ARP/PING Settings, AUTO IP Settings, and the like. 6 Touch [OK]. 2.11.2 Registering the DNS Server 0 For the procedure to call the TCP/IP settings screen on the display, see steps 1 through 2 of page 2-33. 0 Do not leave the machine with the setting screen of Administrator Settings left shown on the display. If it is absolutely necessary to leave the machine, be sure first to log off from the Administrator Settings. 1 Call the TCP/IP settings screen on the display from the control panel. 2 Make the necessary settings for the DNS Server. % If [Enable] is selected from the DNS Server Auto Obtain and DNS Domain Name Auto Retrieval, the DNS Server Address and DNS Domain Name are automatically acquired. 3 Touch [OK]. bizhub 423/363/283/223 2-33
-
 1
1 -
2
-
3
-
4
-
5
-
6
-
7
-
8
-
9
-
10
-
11
-
12
-
13
-
14
-
15
-
16
-
17
-
18
-
19
-
20
-
21
-
22
-
23
-
24
-
25
-
26
-
27
-
28
-
29
-
30
-
31
-
32
-
33
-
34
-
35
-
36
-
37
-
38
-
39
-
 40
40 -
 41
41 -
 42
42 -
 43
43 -
 44
44 -
 45
45 -
 46
46 -
 47
47 -
 48
48 -
 49
49 -
 50
50 -
51
-
52
-
53
-
54
-
55
 |
 |