Konica Minolta bizhub C550 bizhub C203/C253/C353/C451/C550/C650, bizhub 361/42 - Page 16
ID & Print Delete Time, Document Delete Time Setting
 |
View all Konica Minolta bizhub C550 manuals
Add to My Manuals
Save this manual to your list of manuals |
Page 16 highlights
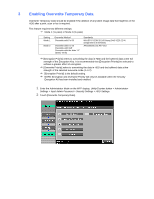
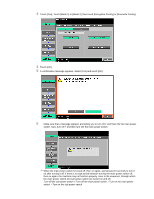
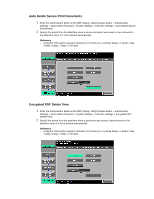
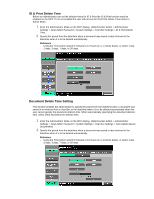
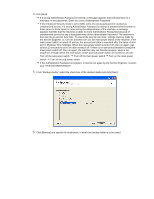
ID & Print Delete Time Before an Administrator can set the deletion times for ID & Print the ID & Print function must be enabled on the MFP. If it is not enabled the user will not see the ID & Print Delete Time button in Admin Mode. 1 Enter the Administrator Mode on the MFP display, Utility/Counter button > Administrator Settings > Input Admin Password > System Settings > User Box Settings > ID & Print Delete Time. 2 Specify the period from the date/time when a document was saved or last retrieved to the date/time when it is to be deleted automatically. Reference - Using the Time button specify 5 minutes to 12 hours (on a 1-minute basis), or select 1 day, 2 days, 3 days, 7 days, or 30 days. Document Delete Time Setting This function enables the administrator to specify the period from the date/time when a document was saved in or retrieved from a User Box to the date/time when it is to be deleted automatically when the user cannot specify the document deletion time. When automatically specifying the document deletion time, select [Yes] and select the deletion time. 1 Enter the Administrator Mode on the MFP display, Utility/Counter button > Administrator Settings > Input Admin Password > System Settings > User Box Settings > Auto Delete Secure Documnents. 2 Specify the period from the date/time when a document was saved or last retrieved to the date/time when it is to be deleted automatically. Reference - Using the Time button specify 5 minutes to 12 hours (on a 1-minute basis), or select 1 day, 2 days, 3 days, 7 days, or 30 days.
-
 1
1 -
2
-
3
-
4
-
5
-
6
-
7
-
8
-
9
-
10
-
 11
11 -
 12
12 -
 13
13 -
 14
14 -
 15
15 -
 16
16 -
 17
17 -
 18
18 -
 19
19 -
 20
20 -
 21
21 -
22
-
23
-
24
-
25
-
26
-
27
-
28
 |
 |
