Konica Minolta magicolor 8650DN User Guide - Page 35
Reminder
 |
View all Konica Minolta magicolor 8650DN manuals
Add to My Manuals
Save this manual to your list of manuals |
Page 35 highlights
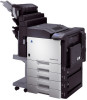
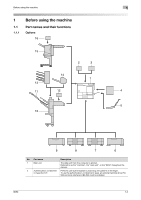
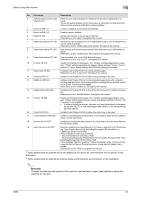
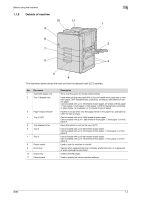
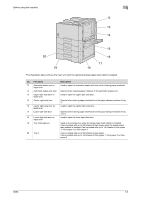
Before using the machine 1 No. Part name Description 3 Authentication unit (IC card Performs user authentication by reading the information registered on IC type) AU-201 cards. To use the authentication unit (IC card type), an optional hard disk drive HD- 508 and local interface kit EK-603 must be installed. 4 Mount kit MK-711 Used for installing, local interface kit EK-603. 5 Mount kit MK-713 Used for banner printing. 6 Desk DK-505 Allows this machine to be set up on the floor. Referred to as the "desk" throughout the manual. 7 Paper feed cabinet PC-106 The top tray can be loaded with up to 500 sheets of paper, and the bottom tray can be used as storage. Referred to as the "single paper feed cabinet" throughout the manual. 8 Paper feed cabinet PC-205 Both the top and bottom trays can each be loaded with up to 500 sheets of paper. Referred to as the "double paper feed cabinet" throughout the manual. 9 Paper feed cabinet PC-406 Can be loaded with up to 2,500 sheets of paper. Referred to as the "tray 4 (LCT)" throughout the manual. 10 Finisher FS-519 Feeds out finished printed pages. The "Collate" setting (separating by copy set), "Offset" setting (separating by pages), Staple settings ("Corner" and "2 position"), Center Staple setting, and Half-Fold setting are available. 11 Output tray OT-602 Installed onto finisher FS-519 to divide printed pages. Referred to as the "output tray" throughout the manual. 12 Punch kit PK-515 Installed onto finisher FS-519 to allow hole punching to be used. 13 Mailbin kit MT-502 Installed onto finisher FS-519 to divide printed pages (only with computer printing) and feed them into the appropriate tray assigned to a specific individual or group. Collects printed pages. Referred to as the "mailbin kit" throughout the manual. 14 Saddle stitcher SD-505 Installed onto finisher FS-519 so that prints can be bound or folded at the center. Referred to as the "saddle stitcher" throughout the manual. 15 Finisher FS-609 Feeds out finished printed pages. The "Collate" setting (separating by copy set), "Offset" setting (separating by pages), and Staple settings ("Corner" and "2 position") are available. • In order to install the finisher, the main unit must be installed on the desk, on the tray 4 (LCT), on the single paper feed cabinet, or on the double paper feed cabinet. 16 Punch kit PK-501 Installed onto finisher FS-609 to allow hole punching to be used. 17 Local interface kit EK-603*1 Used for connecting the authentication unit (biometric type) and the authentication unit (IC card type). 18 Security kit SC-503*2 Installed to encode the data saved on the hard disk so that the hard disk can be used more safely. 19 Hard disk drive HD-508*2 Must be installed when using Security Print, Save in User Box, Font Downloading, Color Profile, Direct Print (including Encrypted PDF User Box), or PageScope Direct Print (Utility). Areas available to users are as follows. - Secure Print/Save in User Box: 31GB - Font Downloading/Color Profile/Direct Print (including Encrypted PDF User Box)/PageScope Direct Print (Utility): 3GB If the message "Memory overflow" frequently appears while you are printing using the Sort or Banner Printing functions, a hard disk will need to be installed. Referred to as the "HDD" throughout the manual. *1 Parts marked with an asterisk are to be installed to the mount kit, and therefore are not shown in the illustration. *2 Parts marked with an asterisk are internal options and therefore are not shown in the illustration. 2 Reminder To keep the features and quality of the machine, use the desk or paper feed cabinet to place the machine on the floor. 8650 1-3
-
 1
1 -
2
-
3
-
4
-
5
-
6
-
7
-
8
-
9
-
10
-
11
-
12
-
13
-
14
-
15
-
16
-
17
-
18
-
19
-
20
-
21
-
22
-
23
-
24
-
25
-
26
-
27
-
28
-
29
-
 30
30 -
 31
31 -
 32
32 -
 33
33 -
 34
34 -
 35
35 -
 36
36 -
 37
37 -
 38
38 -
 39
39 -
 40
40 -
41
-
42
-
43
-
44
-
45
-
46
-
47
-
48
-
49
-
50
-
51
-
52
-
53
-
54
-
55
-
56
-
57
-
58
-
59
-
60
-
61
-
62
-
63
-
64
-
65
-
66
-
67
-
68
-
69
-
70
-
71
-
72
-
73
-
74
-
75
-
76
-
77
-
78
-
79
-
80
-
81
-
82
-
83
-
84
-
85
-
86
-
87
-
88
-
89
-
90
-
91
-
92
-
93
-
94
-
95
-
96
-
97
-
98
-
99
-
100
-
101
-
102
-
103
-
104
-
105
-
106
-
107
-
108
-
109
-
110
-
111
-
112
-
113
-
114
-
115
-
116
-
117
-
118
-
119
-
120
-
121
-
122
-
123
-
124
-
125
-
126
-
127
-
128
-
129
-
130
-
131
-
132
-
133
-
134
-
135
-
136
-
137
-
138
-
139
-
140
-
141
-
142
-
143
-
144
-
145
-
146
-
147
-
148
-
149
-
150
-
151
-
152
-
153
-
154
-
155
-
156
-
157
-
158
-
159
-
160
-
161
-
162
-
163
-
164
-
165
-
166
-
167
-
168
-
169
-
170
-
171
-
172
-
173
-
174
-
175
-
176
-
177
-
178
-
179
-
180
-
181
-
182
-
183
-
184
-
185
-
186
-
187
-
188
-
189
-
190
-
191
-
192
-
193
-
194
-
195
-
196
-
197
-
198
-
199
-
200
-
201
-
202
-
203
-
204
-
205
-
206
-
207
-
208
-
209
-
210
-
211
-
212
-
213
-
214
-
215
-
216
-
217
-
218
-
219
-
220
-
221
-
222
-
223
-
224
-
225
-
226
-
227
-
228
-
229
-
230
-
231
-
232
-
233
-
234
-
235
-
236
-
237
-
238
-
239
-
240
-
241
-
242
-
243
-
244
-
245
-
246
-
247
-
248
-
249
-
250
-
251
-
252
-
253
-
254
-
255
-
256
-
257
-
258
-
259
-
260
-
261
-
262
-
263
-
264
-
265
-
266
-
267
-
268
-
269
-
270
-
271
-
272
-
273
-
274
-
275
-
276
-
277
-
278
-
279
-
280
-
281
-
282
-
283
-
284
-
285
-
286
-
287
-
288
-
289
-
290
-
291
-
292
-
293
-
294
-
295
-
296
-
297
-
298
-
299
-
300
-
301
-
302
-
303
-
304
-
305
-
306
-
307
-
308
-
309
-
310
-
311
-
312
-
313
-
314
-
315
-
316
-
317
-
318
-
319
-
320
-
321
-
322
-
323
-
324
-
325
-
326
-
327
-
328
-
329
-
330
-
331
-
332
-
333
-
334
-
335
-
336
-
337
-
338
-
339
-
340
-
341
-
342
-
343
-
344
-
345
-
346
-
347
-
348
-
349
-
350
-
351
-
352
-
353
-
354
-
355
-
356
-
357
-
358
-
359
-
360
-
361
-
362
-
363
-
364
-
365
-
366
-
367
-
368
-
369
-
370
-
371
-
372
-
373
-
374
-
375
-
376
-
377
-
378
-
379
-
380
-
381
-
382
-
383
-
384
-
385
-
386
-
387
-
388
-
389
-
390
-
391
-
392
-
393
-
394
-
395
-
396
-
397
-
398
-
399
-
400
-
401
-
402
-
403
-
404
-
405
-
406
-
407
-
408
-
409
-
410
-
411
-
412
-
413
-
414
-
415
-
416
-
417
-
418
-
419
-
420
-
421
-
422
-
423
-
424
-
425
-
426
-
427
-
428
-
429
-
430
-
431
-
432
-
433
-
434
-
435
-
436
-
437
-
438
-
439
-
440
-
441
-
442
-
443
-
444
-
445
-
446
-
447
-
448
-
449
-
450
-
451
-
452
-
453
-
454
-
455
-
456
-
457
-
458
-
459
-
460
-
461
-
462
-
463
-
464
-
465
-
466
-
467
-
468
-
469
-
470
-
471
-
472
-
473
-
474
-
475
-
476
-
477
-
478
-
479
-
480
-
481
-
482
-
483
-
484
-
485
-
486
-
487
-
488
-
489
-
490
-
491
-
492
-
493
-
494
-
495
-
496
-
497
-
498
-
499
-
500
-
501
-
502
-
503
-
504
-
505
-
506
-
507
-
508
-
509
-
510
-
511
-
512
-
513
-
514
-
515
-
516
-
517
-
518
-
519
-
520
-
521
-
522
-
523
-
524
-
525
-
526
-
527
-
528
-
529
-
530
-
531
-
532
-
533
-
534
-
535
-
536
-
537
 |
 |
