Kyocera KM-5230 Printing System G Instruction Hand Book - Page 23
Status Monitor for Windows 95 / Windows NT 4.0, System requirements, Installing the Status Monitor - service manual
 |
View all Kyocera KM-5230 manuals
Add to My Manuals
Save this manual to your list of manuals |
Page 23 highlights
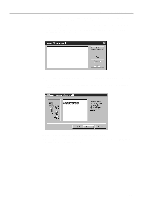
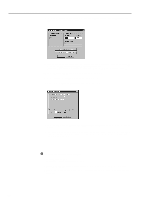
Server Configuration (2) Status Monitor for Windows 95 / Windows NT 4.0 The Status Monitor can be used with Internet Explorer 4.0 in the Client computer to manage print settings, change the order of print jobs and cancel print jobs. * For more detailed information regarding Status Monitor functions, refer to the On-Line Manual contained on the CD-ROM included with this product. 1 System requirements When using Windows 95, the system requirements are identical to those for the Windows 95 Printer Driver. When using Windows NT 4.0, the system requirements are identical to those for the Windows NT 4.0 Printer Driver. 2 Installing the Status Monitor software With the Printer Server installed, carry out the following procedure to install the Status Monitor. 1. Start up Windows NT 4.0. * Quit all other applications that may be open. 2. Insert the CD-ROM included with this product into a CD-ROM drive. 3. Click on Start in the Task Bar, use the mouse to point to Settings and click on Control Panel in the submenu that is displayed. The Control Panel window will open. 4. Double-click on Network and then click on Services. The Select Network Service window will open. 5. Select Microsoft Peer Web Server from the Network Service list and then click on OK. * If Microsoft Peer Web Server does not appear, it is possible that additional files from the Windows NT CD-ROM are needed. Insert the Windows NT CD-ROM into the CD drive. 6. Click on My Computer and double-click on the icon for the CD-ROM drive in which the CD-ROM was inserted. 7. Double-click on the Setup.exe file in the open window. 8. Click on Install Status Monitor. The installer will run and the Welcome window will open. Click on Next. 9. The Choose Destination Location window will open. Click on Next. 10. The Setup Complete window will open. Click on Finish. 3 Removing the Status Monitor software If you no longer plan to use this printer with your computer, you can remove the files related to this Status Monitor by carrying out the following procedure. 1. Start up Windows NT 4.0. * Quit all other applications that may be open. 2. Click on My Computer and then double-click on the icon for your hard disk. 3. Move the PRTG.htm and PRTG.cab files from the sub-directory labeled wwwroot under the InetPub directory to the trash can and delete them. 20
-
 1
1 -
2
-
3
-
4
-
5
-
6
-
7
-
8
-
9
-
10
-
11
-
12
-
13
-
14
-
15
-
16
-
17
-
 18
18 -
 19
19 -
 20
20 -
 21
21 -
 22
22 -
 23
23 -
 24
24 -
 25
25 -
 26
26 -
 27
27 -
 28
28 -
29
-
30
-
31
-
32
-
33
-
34
-
35
-
36
-
37
-
38
 |
 |
