Kyocera TASKalfa 3501i 3501i/4501i/5501i Quick Reference Guide
Kyocera TASKalfa 3501i Manual
 |
View all Kyocera TASKalfa 3501i manuals
Add to My Manuals
Save this manual to your list of manuals |
Kyocera TASKalfa 3501i manual content summary:
- Kyocera TASKalfa 3501i | 3501i/4501i/5501i Quick Reference Guide - Page 1
Further settings QUICKGuide 3501i / 4501i / 5501i E-Mail operation ENG ❶ Press the [ (Name)] to find the destination. Enter the name you search for. Confirm with [OK]. You may choose multiple destinations. Enter an e-mail address 5 Shortcut 6 Program Printed in China 302N95616002 Rev.1 2013.1 - Kyocera TASKalfa 3501i | 3501i/4501i/5501i Quick Reference Guide - Page 2
find the destination. Enter the name you search for. Confirm with [OK]. You may choose multiple destinations. If are displayed. For more details refer to the Operation Guide on the co-packed DVD. Status Status Scheduled Job Destination User Name Result InProcess 1/1 Detail Printing Jobs - Kyocera TASKalfa 3501i | 3501i/4501i/5501i Quick Reference Guide - Page 3
operation ENG Note: To activate the private printing from the PC, select the [Job] tab in the printer driver, select [Job storage (e-MPS)] checkbox, and then select [Private print] from [Type] list. Remove the checkmark from [Prompt for access code], and enter 4 digits number in [Specify access - Kyocera TASKalfa 3501i | 3501i/4501i/5501i Quick Reference Guide - Page 4
[Combine], [Density] or [Staple/Punch] (optional) in the sub menu from the main screen. ❺ Confirm all settings with [OK]. Zoom Off Combine Density Off Staple /Punch Quick Setup Org./ like more information on its functions or are having problems getting the machine to work properly, press the [ - Kyocera TASKalfa 3501i | 3501i/4501i/5501i Quick Reference Guide - Page 5
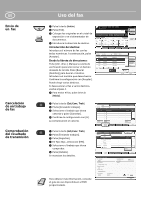
Configuración de escaneo Configuración adicional QUICKGuide 3501i / 4501i / 5501i Uso del e-mail ES ❶ Pulse la tecla [Inicio]. Buscar (Nombre)] para buscar el destino. Introduzca el nombre que desea buscar. Confirme la configuración con [Aceptar]. Puede elegir varios destinos. Introducción de una - Kyocera TASKalfa 3501i | 3501i/4501i/5501i Quick Reference Guide - Page 6
verificación para seleccionar el destino deseado de la lista. Pulse [Buscar (Nombre)] para buscar el destino. Introduzca el nombre que desea buscar. Confirme la configuración con [Aceptar]. Puede elegir varios destinos. Si desea enviar el fax a varios destinos, vuelva al paso 4. ❺ Para enviar el fax - Kyocera TASKalfa 3501i | 3501i/4501i/5501i Quick Reference Guide - Page 7
Detalle Eliminar Cerrar ❶ Pulse la tecla [Est./Canc. Trab]. ❷ Pulse [Imprimiendo trbjs]. ❸ Seleccione el trabajo que desea cancelar y pulse [Cancelar]. ❹ Confirme la configuración con [Sí]. El trabajo se cancela. Estado Estado Registrar Tipo tbjo. Todos Nro tbjo Hora aceptada Tipo Nombre de - Kyocera TASKalfa 3501i | 3501i/4501i/5501i Quick Reference Guide - Page 8
de documentos. ❹ Elija [Selección de papel], [Dúplex], [Zoom], [Combinar], [Densidad] o [Grapa/perf.] (opcional) en el submenú de la pantalla principal. ❺ Confirme la configuración con [Aceptar]. ❻ Introduzca el número de copias con las teclas numéricas. ❼ Pulse la tecla [Inicio] de color verde - Kyocera TASKalfa 3501i | 3501i/4501i/5501i Quick Reference Guide - Page 9
QUICKGuide 3501i / 4501i / 5501i E-MAILS FR Envoi Paramètres de numérisation Paramètres supplémentaires ❶ Appuyez sur la touche [Accueil]. ❷ Appuyez sur [Envoyer]. ❸ Placez les originaux sur la - Kyocera TASKalfa 3501i | 3501i/4501i/5501i Quick Reference Guide - Page 10
FR Envoi d'un fax Annulation d'un fax Vérifier le résultat de la transmission Télécopie ❶ Appuyez sur la touche [Accueil]. ❷ Appuyez sur [FAX]. ❸ Placez les originaux sur la glace d'exposition ou dans le chargeur de documents. ❹ Saisissez l'adresse du destinataire. Saisie de la destination: - Kyocera TASKalfa 3501i | 3501i/4501i/5501i Quick Reference Guide - Page 11
Impression privée Annuler une impression Impression FR Note: Pour activer l'impression privée à partir de l'ordinateur, sélectionnez l'onglet [Travail] dans le pilot d'imprimante, cochez la case [Mise en mémoire des travaux (e-MPS)], puis sélectionnez [Impression privée] dans la liste [Type]. Dé - Kyocera TASKalfa 3501i | 3501i/4501i/5501i Quick Reference Guide - Page 12
Normal 0 Densité Désactivé Agrafe/perfo Raccourci 2 Raccourci 3 Raccourci 4 Raccourci 5 Raccourci 6 Install. rapide Orig./Papier/ Finition Qualité de l'image Mise en page/ édition Avancé Paramétrage Programme Aide Une touche [Aide] se trouve sur le panneau de commande de la machine. Si vous
-
 1
1 -
 2
2 -
 3
3 -
 4
4 -
 5
5 -
 6
6 -
 7
7 -
8
-
9
-
10
-
11
-
12
 |
 |

QUICK
Guide
3501i / 4501i / 5501i
ENG
Printed in China
302N95616002 Rev.1 2013.1
E-Mail operation
Sending
❶
Press the [
Home
] key.
❷
Press [Send].
❸
Place the originals on the platen or in
the document processor.
❹
Enter the destination address.
From the address book:
Press [Address Book]. Press the checkbox
to select the desired destination from the
list. Press [Search (Name)] to find the
destination. Enter the name you search
for. Confirm with [OK].
You may choose multiple destinations.
Enter an e-mail address:
Press [E-mail Addr Entry] and [E-mail
Address]. Enter the E-Mail address on the
touch screen. After that press [OK].
If you want to send the e-mail to several
destinations, go back to step 4.
❺
To send the e-mail press the [
Start
] key.
Scan settings
❶
Press the [
Home
] key.
❷
Press [Send].
❸
Press [Color/Image Quality].
❹
Press [Color Selection].
❺
Choose the Color to be used.
❻
Confirm with [OK].
Further
settings
❶
Press the [
Home
] key.
❷
Press [Send].
❸
Press [Quick Setup].
Choose an item to be changed. After
changing confirm with [OK].
To enter a file name press [Advanced
Setup]. Press [File Name Entry] and
change the name. Confirm with [OK].
❹
Press [Destination] to return.
Destination
Detail
Address
Book
Folder Path
Entry
E-mail
Addr Entry
No.
1/100
AAA
BBB
CCC
DDD
FFF
GGG
HHH
III
JJJ
0004
0003
0005
0001
0002
0006
0007
0008
0009
0010
1/1
i-FAX
Addr Entry
FAX No.
Entry
WSD Scan
/DSM Scan
Destination
EEE
Detail/Edit
Delete
Recall
Chain
Direct
On Hook
Org./Sending
Data Format
Quick Setup
Destination
Color/
Image Quality
Advanced
Setup
Program
Enter Destination.
Address Book
Cancel
OK
Group
E-mail
Dest.
Search(Name)
Search(No.)
No.
Type
Name
Detail
Folder
Detail
Address Book
Sort
Addr Book
0001
0002
0005
0004
0003
ABCD
TUVW
Group1
Group2
Group3
Name
Add/Edit
Address Book
1/2
i-FAX
FAX
ABC
DEF
JKL
MNO
PQRS
TUV
WXYZ
GHI
0-9
E-mail
Address
Add a new e-mail destination.
Press [E-mail Address], then enter
the address using the keyboard screen.
E-mail Address Entry
Enter Destination.
Destination
Cancel
OK
Next Dest.
Add to Addr Book
Destination
Detail
ABCD
Address
Book
Folder Path
Entry
E-mail
Addr Entry
No.
1/100
AAA
BBB
CCC
DDD
FFF
GGG
HHH
III
JJJ
0004
0003
0005
0001
0002
0006
0007
0008
0009
0010
1/1
i-FAX
Addr Entry
FAX No.
Entry
WSD Scan
/DSM Scan
Destination
TUVW
192.168.188.120
Group1
Group1
EEE
Detail/Edit
Delete
Recall
Chain
Direct
On Hook
Org./Sending
Data Format
Quick Setup
Destination
Color/
Image Quality
Advanced
Setup
Program
Black & White
Grayscale
Color Selection
Full Color
Select scanning color.
Use [Auto Color] to automatically produce color originals
in full color and black & white originals in black & white.
Cancel
OK
Add Shortcut
Destination
Auto Color
(Color/B & W)
Auto Color
(Color/Gray)
100%
A4
A4
Preview
Original
Zoom
Send
:
:
:
Destination
Destination
1/1
File Format
Density
Normal 0
Scan
Resolution
2-sided/Book
Original
1-sided
Color
Selection
Auto Color
(Color/Gray)
ABCD
TUVW
Group1
Shortcut 1
Shortcut 2
Shortcut 3
Shortcut 4
Shortcut 5
Shortcut 6
PDF
300x300dpi
Org./Sending
Data Format
Quick Setup
Destination
Color/
Image Quality
Advanced
Setup
Program
Preview
100%
A4
A4
Preview
Original
Zoom
:
:
:
Sending Image
Send
Continuous
Scan
Off