Kyocera TASKalfa 4551ci Printing System (11),(12),(13),(14) Welcome Guide (Fie - Page 7
Step 1 - reviews
 |
View all Kyocera TASKalfa 4551ci manuals
Add to My Manuals
Save this manual to your list of manuals |
Page 7 highlights
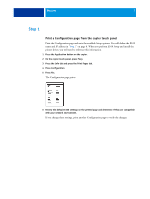
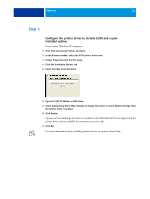
WELCOME 7 Step 1 Print a Configuration page from the copier touch panel Print the Configuration page and note the available Setup options. You will define the E100 name and IP address in "Step 2" on page 8. When you perform E100 Setup and install the printer driver, you will need to reference this information. 1 Press the Application button on the copier. 2 On the copier touch panel, press Fiery. 3 Press the Info tab and press the Print Pages tab. 4 Press Configuration. 5 Press Yes. The Configuration page prints. 6 Review the default E100 settings on the printed page and determine if they are compatible with your network environment. If you change these settings, print another Configuration page to verify the changes.
-
 1
1 -
 2
2 -
 3
3 -
 4
4 -
 5
5 -
 6
6 -
 7
7 -
 8
8 -
 9
9 -
 10
10 -
 11
11 -
 12
12 -
13
-
14
-
15
 |
 |
W
ELCOME
7
Step 1
Print a Configuration page from the copier touch panel
Print the Configuration page and note the available Setup options. You will define the E100
name and IP address in
“Step 2”
on page 8. When you perform E100 Setup and install the
printer driver, you will need to reference this information.
1
Press the Application button on the copier.
2
On the copier touch panel, press Fiery.
3
Press the Info tab and press the Print Pages tab.
4
Press Configuration.
5
Press Yes.
The Configuration page prints.
6
Review the default E100 settings on the printed page and determine if they are compatible
with your network environment.
If you change these settings, print another Configuration page to verify the changes.