Kyocera TASKalfa 4820w TASKalfa 2420w Setting up Accounting Operation Guide
Kyocera TASKalfa 4820w Manual
 |
View all Kyocera TASKalfa 4820w manuals
Add to My Manuals
Save this manual to your list of manuals |
Kyocera TASKalfa 4820w manual content summary:
- Kyocera TASKalfa 4820w | TASKalfa 2420w Setting up Accounting Operation Guide - Page 1
Setting up Accounting information from PrintNet Version A1 - Kyocera TASKalfa 4820w | TASKalfa 2420w Setting up Accounting Operation Guide - Page 2
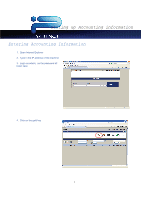
Setting up Accounting information Entering Accounting Information 1. Open Internet Explorer 2. Type in the IP address of the machine 3. Login as admin, as the password all lower case 4. Click on the gold key 1 - Kyocera TASKalfa 4820w | TASKalfa 2420w Setting up Accounting Operation Guide - Page 3
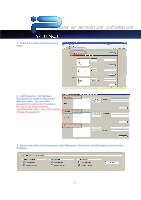
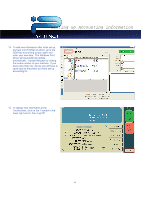
Setting up Accounting information 5. Check the Enable Unified Accounting button 6. Add Requesters, Job Numbers, Descriptions as needed hitting submit after each entry. You may enter passwords for each entry if necessary. Be sure not to delete the admin User/Requester entry. You may, however, change - Kyocera TASKalfa 4820w | TASKalfa 2420w Setting up Accounting Operation Guide - Page 4
10. Install the Windows Print Drivers and AutoCAD Drivers as directed. 11. Go to the "?" screen at the IPS user interface (touch screen). Select Service, enter password (if not known Permissions, shown above as -Manual Entry--. These are one time use fields for convenience at the touchscreen. 3 - Kyocera TASKalfa 4820w | TASKalfa 2420w Setting up Accounting Operation Guide - Page 5
initial set up, log back into PrintNet as admin, go to the Gold Key accounting screen again and enter your new data. The Windows Print Driver and AutoCAD will update automatically. Update Request by clicking the model number of your machine. If you have more than one device you will have - Kyocera TASKalfa 4820w | TASKalfa 2420w Setting up Accounting Operation Guide - Page 6
Notes: Setting up Accounting information
-
 1
1 -
 2
2 -
 3
3 -
 4
4 -
 5
5 -
 6
6
 |
 |
Version A1
Setting up Accounting
information from PrintNet