Kyocera TASKalfa 620 Scan System (H) Operation Guide (Setup Edition) - Page 17
Notes, Common Scan to PC] - Used when
 |
View all Kyocera TASKalfa 620 manuals
Add to My Manuals
Save this manual to your list of manuals |
Page 17 highlights
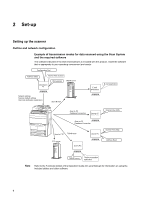
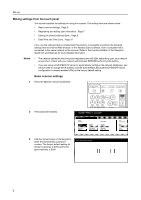
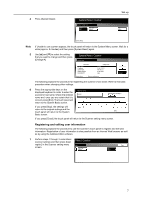
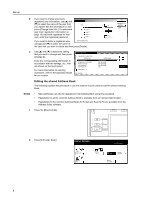
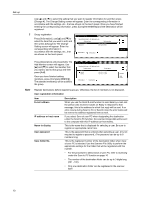
3 Enter your user number and then press e. [Enter]. Set-up Stop User number Clear (with #key) Enter Notes 4 5 6 • Your user number refers to the 3-digit number to the left of your user name as it appears in the screen when performing step 2 on page 8. For example, using the sample screen under step 2 on page 8 as an example, the user number for User A would be 001. • If you registered a password during user registration, enter the registered password. • If you change your user information, press [Change User Info.] in the User register/delete screen (step 2 of Registering and editing user information on page 7) and register the information as desired. Select the shared Address Book that you want to edit. [Common Send Email] ] - Used when transmitting an image as an attached file of E-mail. Edit Address Book Select the list to edi.t Common Send Email Common Scan to PC [Common Scan to PC] - Used when transmitting an image directly to a computer. [FTP Common Add. Book] - Address Book referred to when scanning to the FTP server. FTP Common Add. Book If you want to register a new destination in the Address Book, press [Register C new dest.]. If you want to register a new group of HI destinations, press [Register new PR group]. Z If you are registering a new destination, go to the next step. D e sti n ati o n Group A Group B User A User B User C Up Down End Co rre ct Dest. Info D e l e te Re g i ste r new dest. Re g i ste r new group # of register. 10/100 If you are registering a new group of destinations, proceed directly to step 7. If you want to change the information for a previously registered destination or to add a destination to a group, use [] and [] to select the name of the destination that you want to edit the information for. Then press [Correct Dest. Info] and change the information as desired. If you want to delete a registered destination, use [] and [] to select the name of the destination that you want to delete and then press [Delete]. The sample screen is the shared Address Book editing screen from the Scan to PC function. Destination registration New Dest. Register Registra.list:Scan to PC address book Setting item Setting value IP address or host name Name to display Save folder No. (Not specified) (Not specified) 001 Information Change # # o 9
-
 1
1 -
2
-
3
-
4
-
5
-
6
-
7
-
8
-
9
-
10
-
11
-
 12
12 -
 13
13 -
 14
14 -
 15
15 -
 16
16 -
 17
17 -
 18
18 -
 19
19 -
 20
20 -
 21
21 -
 22
22 -
23
-
24
-
25
-
26
-
27
-
28
-
29
-
30
-
31
-
32
-
33
-
34
-
35
-
36
-
37
-
38
-
39
-
40
-
41
-
42
-
43
-
44
 |
 |
