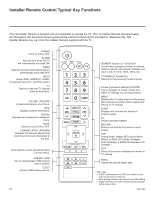
LG 26LD320H Setup Guide - Page 13
+ MENU Mode
 |
View all LG 26LD320H manuals
Add to My Manuals
Save this manual to your list of manuals |
Page 13 highlights
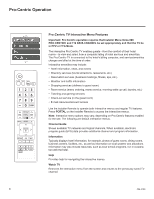
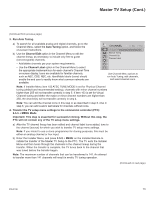
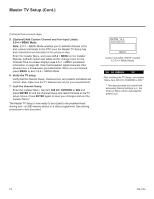
Master TV Setup (Cont.) (Continued from previous page) 3. Run Auto Tuning. a) To search for all available analog and digital channels, go to the Channel Menu, select the Auto Tuning option, and follow the on-screen instructions. b) Use the Channel Edit option in the Channel Menu to edit the channel lineup, as necessary, to include only free to guest (non-encrypted) channels. • Add/delete channels per your system requirements. • Use the Channel Label option in the Channel Menu to select the appropriate trademark/icon for each channel's Channel-Time on-screen display. Icons are available for familiar channels, such as ABC, CBS, NBC, etc. Identifiable labels (icons) should enable the end user to readily know what common networks are available. CHANNEL Auto Tuning Manual Tuning Channel Edit Channel Label Move Enter Use Channel Menu options to run Auto Tuning, edit channels, and select channel icons. Note: If Installer Menu item 103 ATSC TUNE MODE is set for Physical Channel tuning (default and recommended setting), channels with minor channel numbers higher than 255 will not transfer correctly in step 5. If item 103 is set for Virtual Channel tuning and either the major or minor channel numbers are higher than 255, the channel(s) will not transfer correctly in step 4. Note: You can add the channel icons in this step or as described in step 6. Also in step 6, you can add custom text labels for channels without icons. 4. Transfer the TV setup menu settings to the commercial controller (PTC): 2-5-5 + MENU Mode Important: This step is essential for successful cloning. Without this step, the PTC will not contain any of the TV setup menu settings. a) After the TV channel lineup has been edited and channel label icons added, tune to the channel (source) for which you wish to transfer TV setup menu settings. Note: If you intend to use a clone programmer for cloning purposes, this must be either an analog channel or Aux input. b) Enter the Installer Menu, and press 2-5-5 + MENU on the Installer Remote to initiate the transfer of the Master TV Setup to the PTC. The TV exits the Installer Menu and then tunes through the channels in the channel lineup during the transfer. When the transfer is complete, the TV tunes back to the channel that was tuned before the transfer began. Note: The maximum number of channels that can be transferred is 141. An attempt to transfer more than 141 channels will result in erratic TV tuning operation. (Continued on next page) 206-4186 13
-
 1
1 -
2
-
3
-
4
-
5
-
6
-
7
-
 8
8 -
 9
9 -
 10
10 -
 11
11 -
 12
12 -
 13
13 -
 14
14 -
 15
15 -
 16
16 -
 17
17 -
 18
18 -
19
-
20
-
21
-
22
-
23
-
24
-
25
-
26
-
27
-
28
-
29
-
30
-
31
-
32
-
33
-
34
-
35
-
36
-
37
-
38
-
39
-
40
-
41
-
42
-
43
-
44
-
45
-
46
-
47
-
48
-
49
-
50
-
51
-
52
-
53
-
54
-
55
-
56
-
57
-
58
-
59
 |
 |