LG 32LD325H User Manual - Page 46
Earthing, Wall Mount: Horizontal, Installation
 |
View all LG 32LD325H manuals
Add to My Manuals
Save this manual to your list of manuals |
Page 46 highlights
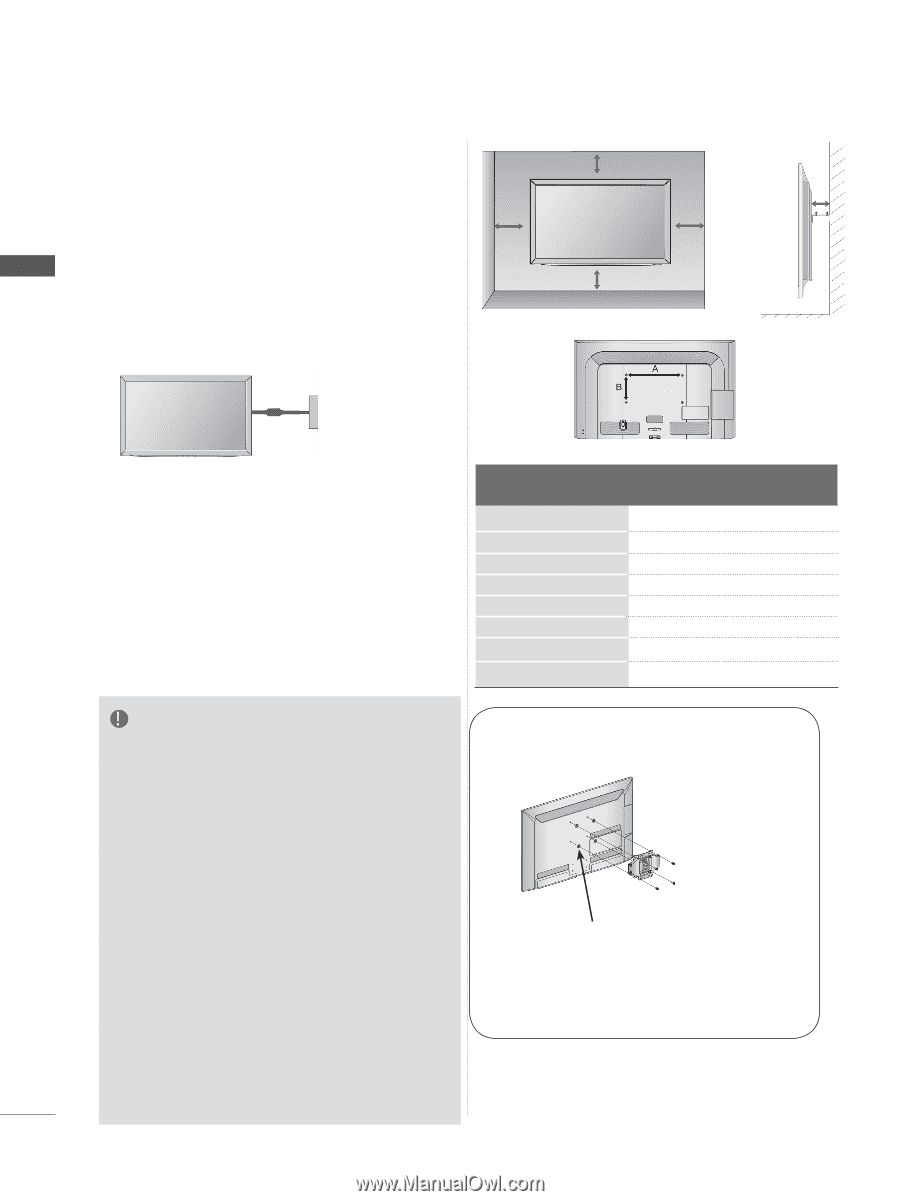
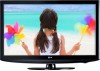
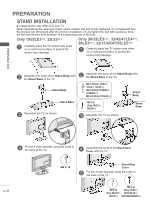
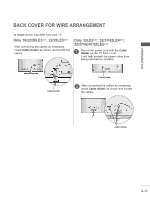
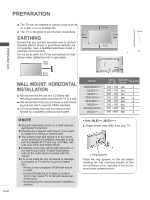
PREPARATION ■■ The TV can be installed in various ways such as on a wall, or on a desktop etc. ■■ The TV is designed to be mounted horizontally. 10 cm EARTHING Ensure that you connect the earth wire to prevent possible electric shock. If grounding methods are not possible, have a qualified electrician install a separate circuit breaker. Do not try to earth the TV by connecting it to telephone wires, lightening rods or gas pipes. Power Supply 10 cm 10 cm 10 cm 10 cm PREPARATION A-42 Circuit breaker WALL MOUNT: HORIZONTAL INSTALLATION ■■ We recommend the use of a LG Brand wall mounting bracket when mounting the TV to a wall. ■■ We recommend that you purchase a wall mounting bracket which supports VESA standard. ■■ LG recommends that wall mounting be performed by a qualified professional installer. NOTE ►►Should Install wall mount on a solid wall perpendicular to the floor. ►►Should use a special wall mount, if you want to install it to ceiling or slanted wall. ►►The surface that wall mount is to be mounted on should be of sufficient strength to support the weight of TV set; e.g. concrete, natural rock, brick and hollow block. ►►Installing screw type and length depends on the wall mount used. Further information, refer to the instructions included with the mount. ►►LG is not liable for any accidents or damage to property or TV due to incorrect installation: - Where a non-compliant VESA wall mount is used. - Incorrect fastening of screws to surface which may cause TV to fall and cause personal injury. - Not following the recommended Installation method. Model 19/22/26LE3*** 32LE3*** 32LE4*** 37/42LE4*** 22/26LE5*** 32LE5*** 37/42/47LE5*** 55LE5*** VESA (A * B) Standard Screw Quantity 100 * 100 M4 4 200 * 100 M4 4 200 * 100 M4 4 200 * 200 M6 4 100 * 100 M4 4 200 * 100 M4 4 200 * 200 M6 4 400 * 400 M6 4 < Only 26LE3***, 26LE5 Image shown may differ from your TV. 4-Ring spacers Place the ring spacers on the set before installing the wall mounting bracket so that the inclination of the backside of the set can be adjusted perpendicularly.
-
 1
1 -
2
-
3
-
4
-
5
-
6
-
7
-
8
-
9
-
10
-
11
-
12
-
13
-
14
-
15
-
16
-
17
-
18
-
19
-
20
-
21
-
22
-
23
-
24
-
25
-
26
-
27
-
28
-
29
-
30
-
31
-
32
-
33
-
34
-
35
-
36
-
37
-
38
-
39
-
40
-
 41
41 -
 42
42 -
 43
43 -
 44
44 -
 45
45 -
 46
46 -
 47
47 -
 48
48 -
 49
49 -
 50
50 -
 51
51 -
52
-
53
-
54
-
55
-
56
-
57
-
58
-
59
-
60
-
61
-
62
-
63
-
64
-
65
-
66
-
67
-
68
-
69
-
70
-
71
-
72
-
73
-
74
-
75
-
76
-
77
-
78
-
79
-
80
-
81
-
82
-
83
-
84
-
85
-
86
-
87
-
88
-
89
-
90
-
91
-
92
-
93
-
94
-
95
-
96
-
97
-
98
-
99
-
100
-
101
-
102
-
103
-
104
-
105
-
106
-
107
-
108
-
109
-
110
-
111
-
112
-
113
-
114
-
115
-
116
-
117
-
118
-
119
-
120
-
121
-
122
-
123
-
124
-
125
-
126
-
127
-
128
-
129
-
130
-
131
-
132
-
133
-
134
-
135
-
136
-
137
-
138
-
139
-
140
-
141
-
142
-
143
-
144
-
145
-
146
-
147
-
148
-
149
-
150
-
151
-
152
-
153
-
154
-
155
-
156
-
157
-
158
-
159
-
160
-
161
-
162
-
163
-
164
-
165
-
166
-
167
-
168
-
169
-
170
-
171
-
172
-
173
-
174
-
175
-
176
-
177
-
178
-
179
-
180
-
181
-
182
-
183
-
184
-
185
-
186
-
187
-
188
-
189
-
190
-
191
-
192
-
193
-
194
-
195
-
196
-
197
-
198
-
199
-
200
-
201
-
202
-
203
-
204
-
205
-
206
-
207
-
208
-
209
-
210
-
211
-
212
-
213
-
214
-
215
-
216
-
217
-
218
-
219
-
220
 |
 |