LG 47SL90 Owner's Manual (English) - Page 74
Picture Wizard
 |
UPC - 719192176218
View all LG 47SL90 manuals
Add to My Manuals
Save this manual to your list of manuals |
Page 74 highlights
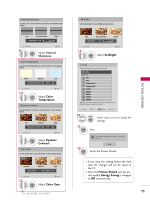
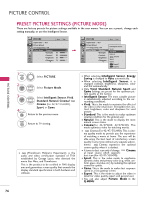
PICTURE CONTROL E PICTURE CONTROL 74 PICTURE WIZARD This feature lets you adjust the picture quality of the original image. Use this to calibrate the screen quality by adjusting the Black and White Level etc. You can calibrate the screen quality by easily following each step. When you adjust the image to L o w, Recommended or H i gh, you can see the example of the changes you made. PICTURE Move Enter Aspect Ratio : 16:9 Picture Wizard Energy Saving : Off Picture Mode : Standard • Backlight 70 • Contrast 90 • Brightness 50 • Sharpness 70 E 1 MENU Select PICTURE. 2 ENTER ENTER Select P i c t u r e W i z a r d. Picture Wizard With Picture Wizard, you can adjust the picture quality of the original image. G White Level Set the screen above identical to the Recommended sample below. Low Recommended E • Contrast 90 E High Previous 5 ENTER Next Adjust White Level. Color Set the screen above identical to the Recommended sample below. Low • Color Recommended 50 E E High Previous 6 ENTER Next Adjust Color. Tint Set the screen above identical to the Recommended sample below. Previous Next 3 ENTER Adjust Picture Wizard. Black Level Set the screen above identical to the Recommended sample below. Low • Tint Recommended 0 E R E High G Previous Next 7 ENTER Adjust T i n t. Horizontal Sharpness Set the screen above identical to the Recommended sample below. Low Recommended • Brightness 50 E High Previous 4 ENTER Next Adjust Black Level. Low Recommended E • H Sharpness 50 E High Previous Next 8 ENTER Adjust H o r i z o n t a l S h a r p n e s s.
-
 1
1 -
2
-
3
-
4
-
5
-
6
-
7
-
8
-
9
-
10
-
11
-
12
-
13
-
14
-
15
-
16
-
17
-
18
-
19
-
20
-
21
-
22
-
23
-
24
-
25
-
26
-
27
-
28
-
29
-
30
-
31
-
32
-
33
-
34
-
35
-
36
-
37
-
38
-
39
-
40
-
41
-
42
-
43
-
44
-
45
-
46
-
47
-
48
-
49
-
50
-
51
-
52
-
53
-
54
-
55
-
56
-
57
-
58
-
59
-
60
-
61
-
62
-
63
-
64
-
65
-
66
-
67
-
68
-
 69
69 -
 70
70 -
 71
71 -
 72
72 -
 73
73 -
 74
74 -
 75
75 -
 76
76 -
 77
77 -
 78
78 -
 79
79 -
80
-
81
-
82
-
83
-
84
-
85
-
86
-
87
-
88
-
89
-
90
-
91
-
92
-
93
-
94
-
95
-
96
-
97
-
98
-
99
-
100
-
101
-
102
-
103
-
104
-
105
-
106
-
107
-
108
-
109
-
110
-
111
-
112
-
113
-
114
-
115
-
116
-
117
-
118
-
119
-
120
-
121
-
122
-
123
-
124
-
125
-
126
-
127
-
128
-
129
-
130
-
131
-
132
-
133
-
134
-
135
-
136
-
137
-
138
-
139
-
140
 |
 |
