LG BHD-301 Owners Manual - Page 9
Notes - parts
 |
View all LG BHD-301 manuals
Add to My Manuals
Save this manual to your list of manuals |
Page 9 highlights
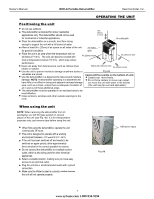
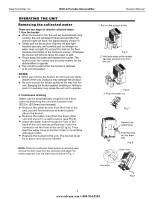
Heat Controller, Inc. BHD-G Portable Dehumidifier Owner's Manual OPERATING THE UNIT Removing the collected water There are two ways to remove collected water. 1. Use the bucket When the bucket is full, the unit will automatically stop running, the unit will beep 8 times and and the Full indicator light will flash, the digital display shows P2 . Slowly pull out the bucket. Grip the left and right handles securely, and carefully pull out straight so water does not spill. Do not put the tank on the floor because the bottom of the bucket is uneven. Otherwise the bucket will fall and cause the water to spill. Throw away the water and replace the bucket. The bucket must be in place and securely seated for the dehumidifier to operate. TThheeumnaitcwhilnl erew-siltlarret -wsthaernt wthheenbuthcekebtuisckretstisorreedstored in its correct position. NOTES: When you remove the bucket, do not touch any parts inside of the unit. Doing so may damage the product. Be sure to push the bucket gently all the way into the unit. Banging the bucket against anything or failing to push it in securely may cause the unit not to operate. 2. Continuous draining Water can be automatically emptied into a floor drain by attaching the unit with a water hose (O01.52min.m() (1n2omt min)c(lnuodteidnc).luded). Remove the water bucket from the front of the unit, you will find a section of hose located above the bucket. Remove the rubber plug from the back of the unit and store it in a safe location (see Fig.8). Insert the water hose through the hole in the back of the unit and securely press it oinntoo the connector on the front of the unit (Fig.9). Then lead the water hose to the floor drain or a suitable drainage lfoaccaitlioitny.. Replace the bucket in the unit. The bucket must be in place and securely seated. NOTE: When the continuous drain feature is not being NrreuuaOmbsttbTeaoeEdcvr:e,hpWtlrthuhehegemedbnboraaatvchiecnkekothchdvooeersnaretiidtnnfhrrueoahomidounrsltaehhdinoewrashciietnoohnlefftenrhaaeoestcmutrsoruehrthboaisebwnendncrooaitnpntbtlFnaueicegginhc.gst1tohhu.reosawednn,d in Fig.1. 1. Pull out the bucket a little. Fig.5 22..HHooldldbbooththssidideessooffththeebbuucckkeett sweicthureevlyenansdtrepnuglltiht ,oaunt dfropmull it thoeutufnroitm. the unit. Fig.6 3. Pour the water out. Fig.7 Remove the rubber plug Push the hose into the drain hole Fig.8 Drain hose Connector Fig.9 8 8 www.sylvane.com 1-800-934-9194
-
 1
1 -
2
-
3
-
 4
4 -
 5
5 -
 6
6 -
 7
7 -
 8
8 -
 9
9 -
 10
10 -
 11
11 -
 12
12
 |
 |
