LG BX286 User Guide - Page 9
Control Panel, Refer to the Power On/Off the Pro
 |
View all LG BX286 manuals
Add to My Manuals
Save this manual to your list of manuals |
Page 9 highlights
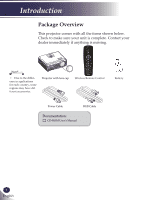
Introduction Control Panel 10 4 9 5 KEYSTONE 6 AUTO SOURCE 2 VOLUME 3 7 MENU 11 STILL 18 1 POWER Refer to the "Power On/Off the Pro- jector" section on pages 15~16. POWER LED Indicate the projector's status. 2 LAMP LED Indicate the projector's lamp status. 3 TEMP LED Indicate the projector's temperature status. 4 KEYSTONE Adjust the image to compensate for distortion caused by tilting the projector. 5 Four Direction- Use or or or to select items al Select Keys or make adjustments to your selection. 6 SOURCE Press "SOURCE" to select an input signal. 7 MENU Press "MENU" to launch the onscreen display (OSD) menu. To exit OSD, Press "MENU" again. 8 VOLUME Adjust to increase / decrease the volume. 9 OK Confirm your item selection. 10 AUTO Automatically synchronizes the projector to the input source. 11 STILL Pause the screen image. Press again to resume the screen image. 9 English English
-
 1
1 -
2
-
3
-
 4
4 -
 5
5 -
 6
6 -
 7
7 -
 8
8 -
 9
9 -
 10
10 -
 11
11 -
 12
12 -
 13
13 -
 14
14 -
15
-
16
-
17
-
18
-
19
-
20
-
21
-
22
-
23
-
24
-
25
-
26
-
27
-
28
-
29
-
30
-
31
-
32
-
33
-
34
-
35
-
36
-
37
-
38
-
39
-
40
-
41
-
42
-
43
-
44
-
45
-
46
-
47
-
48
-
49
-
50
-
51
-
52
-
53
-
54
-
55
-
56
-
57
-
58
-
59
 |
 |
