LG DLG9588SM Owners Manual
LG DLG9588SM Manual
 |
View all LG DLG9588SM manuals
Add to My Manuals
Save this manual to your list of manuals |
LG DLG9588SM manual content summary:
- LG DLG9588SM | Owners Manual - Page 1
ElectricandGasDryer DLE9577WIVl / DLG9588WIVl as it provides instructions Maintenance. and retain the at http://us.lge.com iiiiiiiin P/No.: 3828EL3003M - LG DLG9588SM | Owners Manual - Page 2
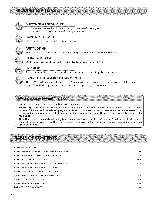
ELECTRICAL REQUIREMENTS FOR ELECTRIC DRYER ...PART& ELECTRICAL REQUIREMENTS FOR GAS DRYERS ...PART7. GAS REQUIREMENTS AND INSTRUCTIONS ...PART& EXHAUST REQUIREMENTS AND MAINTENANCE ...PARTg. OPERATING YOUR DRYER ...PART10. TROUBLESHOOTING GUIDE ...LG DRYER LIMITED WARRANTY ...2 3 4-6 7-14 15-16 17 - LG DLG9588SM | Owners Manual - Page 3
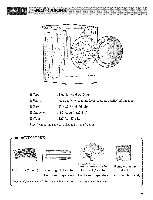
and Gas Dryer [] Rating [] Size Please refer to the rating label regarding detailed information. 27 x 29.9 x 38.7(inch) [] Capacity IEC 7.3cu.ft. (22.5 Ib) [] Weight : 127 Ibs (57.5 kg) Specifications are subject to change by manufacturer. ACCESSORIES Dryer rack (1 each) Stacking kit - LG DLG9588SM | Owners Manual - Page 4
SEEKING WARRANTY ASSISTANCE The Warranty for your Dryer is located at the end of this manual. Warranty Service is available by contacting your nearest LG Service Center. If this product is installed and operated per this manual, LG will repair or replace any parts defective in material or - LG DLG9588SM | Owners Manual - Page 5
drum is moving. 6) Do not install or store this appliance where it will be exposed to the weather. 7) Do not tamper with controls. 8) Do not repair or replace any part of the appliance or attempt any servicing unless specifically recommended in the user-maintenance instructions. 9) Do not use heat - LG DLG9588SM | Owners Manual - Page 6
, electric shock, property damage, personal injury or death when using this appliance, please follow all instructions and information, including those in this manual and instructions provided by your gas supplier. • Do not store or use any gasoline, dry-cleaning solvents any other flammable vapors - LG DLG9588SM | Owners Manual - Page 7
you review this entire manual before proceeding with any installation or use. More detailed instructions concerning electrical connections, gas connections, and exhaust requirements are provided in other parts of this manual. Choose a location with a solid floor for your dryer. Place the dryer at - LG DLG9588SM | Owners Manual - Page 8
concerning the placement of and clearances for your dryei: Please review this entire manual before proceeding with any installation. The door on your dryer can be installed to open either to the left or the right. Follow these instructions to reverse the direction in which your door opens: Door - LG DLG9588SM | Owners Manual - Page 9
Disassemble Remove the cap and screw on the right side of the control panel. Disassemble it by sliding down to the right for 1 inch. Assemble Connect the housing. Push the housing hook and disassemble the panel. Disassemble the deco by lifting it up slightly. Assemble the control panel by sliding - LG DLG9588SM | Owners Manual - Page 10
Assemble Fix the upper deco into the holes. Ill one hole gets fixed, the others will do automatically. Assemble the upper deco to the frame. ,% How to assemble the control panel and lower cover. First of all, put the left side of the panel into the left side of the frame. Assemble the upper deco - LG DLG9588SM | Owners Manual - Page 11
and gas accumulation, the dryer must be vented to the outdoors. Please follow the instructions (and all others in this manual) DRYER'S WARRANTY. TO WILL • ALTERNATE EXHAUST DIRECTIONS Knockout @ 2-2. Reconnect the duct to the blower housing and attach the duct to the base.(Duct is a SVC part - LG DLG9588SM | Owners Manual - Page 12
fluid. Refer to Part 7(page 20) 5. For LP (Liquefied Petroleum) gas connection, refer to this manual's section entitled Gas Requirements and Instructions. 12 Following are several warnings and instructions concerning making the electrical connection t_r electric dryers. More detailed information - LG DLG9588SM | Owners Manual - Page 13
with no load. Measuring Static pressure Confirming Heat Source in Gas Dryers Close the door to the dryer drum/drying compartment and, after completing all steps in this manual for proper installation of this dryer, start the dryer on a heat setting. After the dryer starts, the igniter will glow red - LG DLG9588SM | Owners Manual - Page 14
service and installation professional for assistance. The following instructions apply to any installation of the dryer in a manufactured or mobile home: 1) The gas dryer duct, vent, chimney, or other exhaust duct. 8) Make sure the dryer has adequate access to outside fresh air to ensure proper - LG DLG9588SM | Owners Manual - Page 15
the dryer and the height of installation makes the stacking procedure too risky for one person. This procedure should be performed by 2 or more experienced service personnel. Stackin9kit Place washer firmly on a stable, even and solid floor. Peel protective paper off the tape from the stacking kit - LG DLG9588SM | Owners Manual - Page 16
outlet. B. Uninstalling a gas dryer: 1) Shut off Gas 2) Unplug Power Cord 3) Disconnect Gas Line from Dryer 4) Pull away and loosen vent clamp. Disconnect venting. combo -- for dryer __ for washer/ combo Attach the double-sided tape of the bracket to the dryer as shown so the bent parts of the - LG DLG9588SM | Owners Manual - Page 17
circuit must be fused on both sides of the line). ELECTRICAL SERVICE FOR THE DRYER SHOULD BE OF MAXIMUM RATE VOLTAGE LISTED ON THE NAMEPLATE. DO NOT CONNECT DRYER TO 110, 115, OR 120 VOLT CIRCUIT. Heating elements are available for field installation in dryers which are to be connected to electrical - LG DLG9588SM | Owners Manual - Page 18
Review the following options to determine the appropriate electrical connection for your home: Use the instructions in this section if your home has a 4-wire receptacle (NEMA type 14-30R) and you will be using a UL listed, 120/240 volt minimum, 30 amp, dryer power supply cord. Use the instructions - LG DLG9588SM | Owners Manual - Page 19
neutral conductor. Prepare minimum 5ft(l.52m) of length in order for dryer to be replaced. First, strip 3 72 inches (8.9cm) of outer sheath from Connect red and black wire to the left and right terminal block screws. 3. Make sure that the strain relief screw is tightened and be sure that all terminal - LG DLG9588SM | Owners Manual - Page 20
codes or ordinances connection of a frame-grounding neutral wire, use the instructions section. do not allow the conductor to the under this _( 3- red and black wire to the left and right terminal block screws. 4. Make sure that the strain relief screw is tightened. and be sure that all terminal - LG DLG9588SM | Owners Manual - Page 21
additional instructions regarding electrical connections and requirements for gas dryers. manual, or if you are uncertain whether or not your laundry room meets these specifications, please have a qualified service person or company. Review your laundry room's electrical supply for any problems - LG DLG9588SM | Owners Manual - Page 22
Following are important instructions and information concerning the requirements for the gas supply and service for gas dryers. _ Important Warning: The gas supply and service for a gas dryer must comply with all local codes and ordinances. In the absence of any local codes or ordinances in your - LG DLG9588SM | Owners Manual - Page 23
dryer air into an enclosed and unventilated area, such as an attic, wall, ceiling, crawl space, chimney, gas Exhaust Requirements and Instructions: 1. Venting materials are not provided with the dryer and you as possible. Make sure to clean any old ducts before installing your new dryer. 3. Rigid - LG DLG9588SM | Owners Manual - Page 24
. Label all wires prior to disconnection when servicing the dryer, because wiring errors can cause serious injury to you and your dryer. 24 Cleaning the Lint Screen 1. Clean the lint filter either before drying each load or after drying each load. Always make sure the lint filter is clean before - LG DLG9588SM | Owners Manual - Page 25
Following are instructions for starting and using your new dryer. Please refer to specific sections of this manual for more detailed information. Important Warning: To reduce the risk of fire, electric shock, or injury to person, read this entire manual, including the Important Safety lnstr.ctions, - LG DLG9588SM | Owners Manual - Page 26
om being left in the dryer too long. Use the Air Dry Modifier for items that require drying without heat such as rubber, plastic Manual Dry, Time Dry and Rack Dry programs. EstimatedTimeRemaining • The Display shows the estimated time remaining. In addition to this, if the dryer has some problem - LG DLG9588SM | Owners Manual - Page 27
PROGRAM Press CUSTOM PROGRAM button, then press START/PAUSE. 1.0pen the door. Hold the dryer rack with both hands. 2. Put the dryer rack into the drum 3. Make sure Dryer RACK is evenly spaced right onto the drum inside and door rim. Don't use Rack for normal tumble drying. Rack Dry is shipped - LG DLG9588SM | Owners Manual - Page 28
in your laundry. When you select the wrinkle free option, the dryer will periodically tumble for up to three hours after the cycle has Dry 30 Control Use Temp. Control Option to select temperatures for the Manual Cycles. Press TEMP. CONTROL until the desired temperature setting glows. Temperature - LG DLG9588SM | Owners Manual - Page 29
U into dryer guadshut dool: See Loading. • Tuna the Daob to select the drying cycle you wguat. The preset setting for Sensor DU Cycles or Manual Cycles will weight of the load. • Avoid overloading the duel: Following these instructions cma help reduce your utility bill, prolong the life of your - LG DLG9588SM | Owners Manual - Page 30
by 1 minute interval. The MORE TIME or LESS TIME feature canbe used with Manual Dry, Time Dry and Rack Dry Cyc!es, • Press TEMR CONTROL until the press START/PAUSE within 10 minutes of selecting the cycle, the dryer automatically shuts off. • If you wish to end your drying cycle after pressing and replace. - LG DLG9588SM | Owners Manual - Page 31
ft se box/circuit breaker box and replace the fuse or reset the circuit breaker. (IMPORTANT: electric dryers generally use two fuses or breakers.) 2.Problem:My Dryer Doesn't Heat • Is the fuse blown, or is the Circuit breake r tripped'? • Is the gas supply or service blocked or off'? If the fuse - LG DLG9588SM | Owners Manual - Page 32
'? • Did you overload your dryer? • Did you place any paper Problem:The drying time is not consistent • Are you using consistent heat settings trod consistent load sizes'? The drying time for a load will vary depending on the heat setting, the type of heat used (electric, natural or LP gas - LG DLG9588SM | Owners Manual - Page 33
review of the appropriate sections Of this manual problem To avoid shrinkage, please carefully follow the care trod use instructions for your garment, because some fabrics will naturally shrink when washed. Other fabrics can be washed but will shrink when dried in a dryer. See the Owner's Manual - LG DLG9588SM | Owners Manual - Page 34
have product type (Dryer), model number, serial number, and ZiP code ready. The warranted 1-year of labor covers the cost of In-Home Service on all parts including the Drum Tub and Motor. THiSWARRANTY IS iN LiEUOF ANY OTHERWARRANTIES,EXPRESSOR iMPLIED, INCLUDING WITHOUTLiMITATiON, ANY WARRANTY OF
-
 1
1 -
 2
2 -
 3
3 -
 4
4 -
 5
5 -
 6
6 -
 7
7 -
8
-
9
-
10
-
11
-
12
-
13
-
14
-
15
-
16
-
17
-
18
-
19
-
20
-
21
-
22
-
23
-
24
-
25
-
26
-
27
-
28
-
29
-
30
-
31
-
32
-
33
-
34
 |
 |
ElectricandGasDryer
DLE9577WIVl
/
DLG9588WIVl
as it provides
instructions
Maintenance.
and
retain the
iiiiiiiin
P/No.:
3828EL3003M