LG LMX25981SB Owner's Manual (English) - Page 18
Connecting The Water Supply, Connecting The Water Lines - water filter
 |
UPC - 048231782692
View all LG LMX25981SB manuals
Add to My Manuals
Save this manual to your list of manuals |
Page 18 highlights
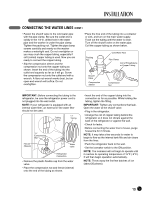
CONNECTING THE WATER SUPPLY wWARNING Connect to safe drinking water supply only. • The water pressure must be between 21 and 121 p.s.i. (1.5~8.5 kgf/cm2 ) on models without a water filter and between 43 and 121 p.s.i. (3~8.5 kgf/cm2) on models with a water filter. • If water pressure does not reach 21 psi (1.5kgf/cm2) or falls below, it is necessary to purchase a separate pressure pump for normal automatic icemaker and water dispensing operation. • It is recommended that the total length of the water feed tube does not exceed 26 ft. (8 m). • Install the water supply line where it will not be affected by heat. IMPORTANT: Read all directions thoroughly before you begin. • If operating the refrigerator before installing the water connection, turn the icemaker to the OFF position to prevent operation without water. • All installations must be in accordance with local plumbing code requirements. • Use copper tubing and check for leaks. • Install tubing only in areas where temperatures will remain above freezing. • It may take up to 24 hours for the icemaker to begin producing ice. CONNECTING THE WATER LINES IMPORTANT: Before connecting the tubing to the water line, unplug the refrigerator or disconnect the power. • Turn off the main water supply and open the nearest faucet to relieve pressure in the line. Opening an outside faucet may help drain water from the line in the house. • Find a 1/2-in. vertical COLD water pipe near the refrigerator. NOTE: A horizontal pipe will work, but the following precaution must be taken: drill on the top of the pipe, not the bottom. This will help keep water away from the drill and also keep normal sediment from collecting in the valve. 18 Tools Required • Standard screwdriver • 7/16-in. and 1/2-in. open-end wrenches or two adjustable wrenches • 1/4-in. nut driver • 1/4-in. drill bit • Hand drill or electric drill (properly grounded) NOTE: Refrigerator dealers offer a kit with a 1/4-in. saddle-type shutoff valve, a union, and copper tubing. Before purchasing, make sure a saddletype valve complies with local plumbing codes. Do not use a piercing-type or 3/16-in. saddle valve which reduces water flow and clogs more easily. NOTE: The Commonwealth of Massachusetts Plumbing Code 248CMR shall be adhered to. Saddle valves are illegal and use is not permitted in Massachusetts. Consult with your licensed plumber. Cold Water Supply • The icemaker water valve contains a flow washer which is used as a water pressure regulator. • The icemaker needs to be connected to a cold water line with water pressure between 21~121 psi (1.5~8.5 kgf/cm2) on models without a water filter and between 43 and 121 p.s.i. (3~8.5kgf/cm2) on models with a water filter. • To determine the length of copper tubing you will need, measure from the connection on the lower left rear of the refrigerator to the water pipe. Add 7 ft. (2.1 m) to allow for moving the refrigerator for cleaning. Use 1/4-in. O.D. (outside diameter) copper tubing. Be sure both ends of the copper tubing are cut square. • Using a drill, drill a 1/4-in. hole in the cold water pipe you have selected.
-
 1
1 -
2
-
3
-
4
-
5
-
6
-
7
-
8
-
9
-
10
-
11
-
12
-
 13
13 -
 14
14 -
 15
15 -
 16
16 -
 17
17 -
 18
18 -
 19
19 -
 20
20 -
 21
21 -
 22
22 -
 23
23 -
24
-
25
-
26
-
27
-
28
-
29
-
30
-
31
-
32
-
33
-
34
-
35
-
36
-
37
-
38
-
39
-
40
-
41
-
42
-
43
-
44
-
45
-
46
 |
 |