LG LTG4715BD Specification - Page 2
Quick Install & Clearances - manual
 |
View all LG LTG4715BD manuals
Add to My Manuals
Save this manual to your list of manuals |
Page 2 highlights
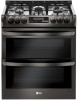
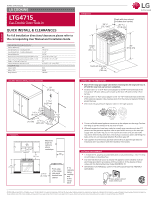
IMPORTANT HOME APPLIANCES LG COOKING LTG4715_ Gas Double Oven Slide-in QUICK INSTALL & CLEARANCES For full installation directions/clearances please refer to the corresponding User Manual and Installation Guide. DIMENSIONS/CLEARANCES/WEIGHT Cabinet Width (in) Overall Depth (in) - including handle Overall Height (in) - including backguard Overall Width (in) Oven Interior Dimensions (Upper) (in) (W x H x D) Oven Interior Dimensions (Lower) (in) (W x H x D) Height to Cooking Surface (in) Carton Dimensions (in) (W x H x D) POWER/RATINGS Amp at 120V kW at 120V Requirements 30" 28 15/16" 37 7/8" 29 7/8" 24 13/16" x 9 1/4" x 20" 24 13/16" x 14 1/4" x 20" 36" 31 31/32" x 51" x 30 17/32" 8.3A 996W 120 VAC DIMENSIONS 29 7/8" (75.7 cm) Depth with door closed (includes door handle) 28 15/16" (73.6 cm) Height 37 7/8" (96.2 cm) Depth with door open 40 9/16" (103 cm) 36" (91.4 cm) GAS PIPE AND ELECTRICAL OUTLET LOCATIONS CONNECTING THE RANGE TO GAS 30" (76.2 cm) 7 14/16" (20 cm) • Shut off the range gas supply valve before removing the old range and leave it off until the new hook-up has been completed.. • Install a male 1/2" or 3/4" flare union adapter to the NPT internal thread of the manual shut-off valve, taking care to back-up the shut-off valve to keep it from turning. • Install a male 1/2" flare union adapter to the 1/2" NPT internal thread at the inlet of the pressure regulator. Use a backup wrench on the pressureFlreexgibulelaCtoonrnefictttoirnHgootkoup prevent damage. • Check that the gas pressure regulator valve is in the open position. 1/2" Adapter Gas Flow into 5 9/10" (15 cm) 3 6/16" Pressure regulator Flex conn (6 ft. max. (8.5 cm) 6 11/16" Adapter 3" (7.6 cm) 17 15/16" (45.6 cm) (17 cm) 5 14/16" (15 cm) Lever's open position Lever's closed position 1/2" Adapter 1/2" or 3/4" Gas • pipe Connect a flexible metal appliance connector to the adapter on the range. Position the range to permit connection at the shut-off valve. Gas shutvalve • When all connections have been made, be sure all range controPlsreassruereinRtehguelaOtoFrFPosition position and the pressure regulator valve is open before turning on the main gas supply valve. Gas leaks may occur in the system and create a hazard. Gas leaks CLEARANCES may not be detected by smell alone. Check all gas connection joints and fittings for leaks with a non-corrosive leak detection fluid, then wipe off. (763.2030"c"m(76)(.726c3.m20")cm) 30" (76.2 cm)Minimum Minimum 15" (38.1 cm) 15" (38.1 cm) Maximum Mdaexpimthumfor dccaeabpibtnheinftoser ts aabbovoeve ccooutuetrteorptsops 13" 13" • Gas suppliers recommend you purchase and install a UL approved gasPrdesestuerecRteogru.lator Install and use in accordance with the installation instructions. ELECTRICAL REQUIREMENTS • 120 Volt, 60 Hz, properly grounded dedicated circuit protected by a 15 or 20 Amp circuit breaker, or slow blow fuse. • If an external electrical source is utilized, the appliance, when installed, must be 36" (91.4 cm) m) 2 8/16" (6.3 cm) 2 8/16" (6.3 cm) Front edge of the range 0" side panel To cabinets fcoarbwiFosfcnaoeiarfrddrtobtwefhnrionaetpmereadrtadnfngerogel mebcaboetaotlcohkkwetorpanagned0Tbc0cbcaaoo"aoe"ent obolldtTocohkikoanwwettobeopitpnseatnsd aratnthgee range bbaacckk electrically grounded in accordance with local codes or, in the absence of local codes, with the National Electrical Code, ANSI/NFPA 70. • IMPORTANT: FOR PERSONAL SAFETY, THIS APPLIANCE MUST BE PROPERLY GROUNDED. Preferred Method Ensure proper ground exists before use © 2018 LG Electronics USA, Inc. All rights reserved. "LG Life's Good" is a registered trademark of LG Corp. All other product and brand names are trademarks or registered trademarks of their respective owners. Design, features and specifications are subject to change without notice. Non-metric weights and measurements are approximate. Some features may require Internet access. Content and services may vary by product and are subject to change without notice. 8/22/18
-
 1
1 -
 2
2
 |
 |
