Lenovo H320 Lenovo H3 Series User Guide V1.0
Lenovo H320 Manual
 |
View all Lenovo H320 manuals
Add to My Manuals
Save this manual to your list of manuals |
Lenovo H320 manual content summary:
- Lenovo H320 | Lenovo H3 Series User Guide V1.0 - Page 1
Machine type: 10041-10049 H3 Series User Guide Version 1.0 2010.03 31043590 - Lenovo H320 | Lenovo H3 Series User Guide V1.0 - Page 2
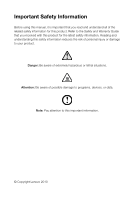
Before using this manual, it is important that you read and understand all of the related safety information for this product. Refer to the Safety and Warranty Guide that you received with programs, devices, or data. Note: Pay attention to this important information. © Copyright Lenovo 2010 - Lenovo H320 | Lenovo H3 Series User Guide V1.0 - Page 3
- Lenovo H320 | Lenovo H3 Series User Guide V1.0 - Page 4
System Recovery 16 2.6 Create Recovery Disc 16 Chapter 3 Using the Computer Software 17 3.1 Lenovo Dynamic Brightness system 18 3.2 Lenovo Eye Distance System 19 Chapter 4 System Maintenance and Recovery 21 4.1 Restoring the System 22 4.2 Backup and Restore 22 4.3 Cleaning Up the Disk 22 - Lenovo H320 | Lenovo H3 Series User Guide V1.0 - Page 5
Chapter 5 Troubleshooting and Confirming Setup 25 5.1 Troubleshooting Display Problems 26 5.2 Troubleshooting Audio Problems 27 5.3 Troubleshooting Software Problems 27 5.4 Troubleshooting Problems with Optical Drives and Hard Disks 28 5.5 Special considerations for troubleshooting Windows 29 - Lenovo H320 | Lenovo H3 Series User Guide V1.0 - Page 6
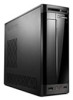
Using the Computer Hardware This chapter contains the following 1 topics: Computer hardware introduction 2 Information on computer connections Note: The descriptions in this chapter might vary from your computer, depending on computer models and configurations. 3 4 5 User Guide 1 - Lenovo H320 | Lenovo H3 Series User Guide V1.0 - Page 7
not to block any air vents on the computer. Blocked air vents can cause thermal problems. 1 2 3 4 5 6 Power switch Card reader modules (selected models) Optical drive Headphone connector Microphone connector USB ports (2) Note: This computer only can be placed in a vertical position. 2 User - Lenovo H320 | Lenovo H3 Series User Guide V1.0 - Page 8
chapter is different from your actual computer, the rear view configuration of your actual computer should be taken as final and binding Power connector PS/2 keyboard connector PS/2 mouse connector On-board VGA connector HDMI connector USB connectors (4) Ethernet connector Microphone connector Audio - Lenovo H320 | Lenovo H3 Series User Guide V1.0 - Page 9
are equipped with this connector. For more information about the graphics adapter, see the description below.) 1 2 3 4 5 6 7 8 10 9 11 12 13 Voltage selection switch (Some models are equipped with this switch) Power connector PS/2 keyboard connector PS/2 mouse connector HDMI connector On - Lenovo H320 | Lenovo H3 Series User Guide V1.0 - Page 10
connector Audio line-out connector Audio line-in connector PCI Express x1 adapter connector PCI Express x16 graphics adpter connector (Some models are equipped with this connector. For more information about the graphics adapter, see the description below.) 1.3 Connecting your computer Use - Lenovo H320 | Lenovo H3 Series User Guide V1.0 - Page 11
is equipped with a wireless keyboard or mouse, follow those installation instructions. 1.3.4 Connect the monitor cable to the monitor connector on the computer. • If you have a Video Graphics Array (VGA) Standard monitor, connect the cable to the connector as shown. Note: If your model has two - Lenovo H320 | Lenovo H3 Series User Guide V1.0 - Page 12
• If you have an HDMI monitor, your computer must have an adapter installed that supports the HDMI monitor. Connect the cable to the port as shown. 1.3.5 If you have audio devices, attach them using the following instructions. Audio line-in This connector receives audio signals from an external - Lenovo H320 | Lenovo H3 Series User Guide V1.0 - Page 13
Audio configuration instruction: (This instruction is only for PC models whose mainboard supports audio transforming from 2.0 stereo to 5.1 surround.) This model of computer supports transforming stereo sound into 5.1 surround sound. Use the following guides when connecting to the 5.1 surround audio - Lenovo H320 | Lenovo H3 Series User Guide V1.0 - Page 14
you have powered speakers with the speakers to audio line-out port on the computer. d. Connect the adapter to the power source. 1.3.8 If you have powered speakers without an c. Connect the speakers to audio line-out port on the computer. d. Connect the plug to the power source. Note: Some models - Lenovo H320 | Lenovo H3 Series User Guide V1.0 - Page 15
are shown. USB connector TV-Tuner connector Ethernet Use this connector to attach a device that requires a USB connection. Only supported on systems with optional TV tuner card. Use this connector to attach the computer to an Ethernettype local area network. 1.3.10 Connect the WiFi antenna to - Lenovo H320 | Lenovo H3 Series User Guide V1.0 - Page 16
If your computer is equipped with Memory Card Reader Connector, it is able to read/write data from CFI/CFII/MD SD/SD High Capacity/Memory Stick/Memory Stick Pro/MMC 1.3.13 Keyboard and Mouse (wired) LV T LV T LVT -- After entering Windows, press this key to launch the LVT (Lenovo Vantage Technology - Lenovo H320 | Lenovo H3 Series User Guide V1.0 - Page 17
compatible software, specially configured to run on this model of computer. F2 -- Your computer has the Lenovo Rescue System installed. To learn more about this program, turn on the computer, and when the Lenovo logo appears, press the F2 key and the Lenovo Rescue System will open. 12 User Guide - Lenovo H320 | Lenovo H3 Series User Guide V1.0 - Page 18
can recover the C drive of the computer to the factory default settings or to the last system backup status using OneKey Recovery. With this operation, all of the existing data on drive C will be lost, whereas 4 the content and format of the other partitions of the hard disk drive will remain - Lenovo H320 | Lenovo H3 Series User Guide V1.0 - Page 19
the service partition is deleted or damaged by someone other than authorized Lenovo servicers, Lenovo will not be liable for any losses arising there from in any way. 2.1 OneKey Recovery OneKey Recovery is an easy-to use application. You can use it to restore your computer to the system default or - Lenovo H320 | Lenovo H3 Series User Guide V1.0 - Page 20
In the Windows system, Click Start → All Programs → Lenovo → Lenovo Drivers and Application Installation. After starting the procedure, install all the drivers and software manually according to the prompts. Notes: 1. It is recommended not to install the software which is already on the computer - Lenovo H320 | Lenovo H3 Series User Guide V1.0 - Page 21
or the initial state. 2.6 Create Recovery Disc Create a bootable recovery disc from current system. These recovery discs are used to boot your computer and will guide you through the entire restoration process. In the Windows system, click Start → All Programs → Lenovo → Lenovo Rescue System. After - Lenovo H320 | Lenovo H3 Series User Guide V1.0 - Page 22
This chapter contains the following 1 topics: Lenovo Dynamic Brightness system 2 Lenovo Eye Distance System Note: The interface and function of each of these features are subject to the actual software that was shipped with the 3 computer model that you purchased. 4 5 User Guide 17 - Lenovo H320 | Lenovo H3 Series User Guide V1.0 - Page 23
computer equipped with a Lenovo PC camera and is available only after the camera is installed. Before using this software, do the following: 1) Click Start → All Programs → Lenovo USB2.0 UVC Camera → vmcap. 2) Select Options → Preview from the pop-up window to display the image in the video capture - Lenovo H320 | Lenovo H3 Series User Guide V1.0 - Page 24
PC camera, will be displayed in the video capture window. Adjust the position and pitch angle of the camera to ensure the whole face is displayed in the video capture window. To use this software, do the following: Click Start → All Programs → Lenovo → Lenovo Dynamic Brightness system. The default - Lenovo H320 | Lenovo H3 Series User Guide V1.0 - Page 25
default setting has been pre-selected. You can adjust the viewing distance according to your needs. Notes: 1. Ensure the lens of the camera is exposed and not covered. 2. Ensure your eyes are exposed and not covered. (The function that detects the distance between the user and monitor 20 User Guide - Lenovo H320 | Lenovo H3 Series User Guide V1.0 - Page 26
System Maintenance and Chapter Recovery This chapter contains the following 1 topics: Daily Maintenance and Tools Instructions 2 3 4 5 User Guide 21 - Lenovo H320 | Lenovo H3 Series User Guide V1.0 - Page 27
Restore. 2. Choose either the recommended restore point, or select a different recovery Restore. 2. Select the location for your backup. Click Next and follow the instructions to continue. 4.3 Cleaning Up the Disk Do the following periodically to clean up the disks and possibly enhance your computer - Lenovo H320 | Lenovo H3 Series User Guide V1.0 - Page 28
. Depending on the amount of defragmentation on the hard disk drive, this procedure can take a long time (sometimes more than one hour). 4.6 Performing Daily Maintenance Tasks Cleaning the computer components Because many of the computer components consist of sophisticated integrated circuit boards - Lenovo H320 | Lenovo H3 Series User Guide V1.0 - Page 29
. Only use products specifically designed for cleaning displays, and follow the instructions that are included with the product. The following are general methods for cleaning the components: • You can use a soft cloth to remove dust on the surface of the computer, the monitor, the printer, the - Lenovo H320 | Lenovo H3 Series User Guide V1.0 - Page 30
and Chapter Confirming Setup This chapter contains the following 1 topics: Troubleshooting and Problem Resolution 2 Note: The description of the TV-Tuner card in this manual is only used for the machines which have the TV-Tuner card. It does not apply to those machines that do not have - Lenovo H320 | Lenovo H3 Series User Guide V1.0 - Page 31
if you set your Lenovo® computer to the Windows Classic view. 5.1 Troubleshooting Display Problems Problem: Blank screen or no image is displayed on the monitor. Troubleshooting and problem resolution: 1. Check that the monitor has been turned on; if not, press the Power button. 2. Check to see - Lenovo H320 | Lenovo H3 Series User Guide V1.0 - Page 32
2. Move any interfering devices away from the computer. 3. If the problem persists, consult with Lenovo Service. 5.2 Troubleshooting Audio Problems Problem: No sound from integrated speakers. Troubleshooting and problem resolution: • Adjust the windows volume control - Double-click the speaker icon - Lenovo H320 | Lenovo H3 Series User Guide V1.0 - Page 33
and Hard Disks Problem: The Optical drive is unable to read a CD/DVD. Troubleshooting and problem resolution: 1. Check to determine if there is an optical drive icon in the resource manager of the operating system. If not, restart your computer. If there is still no icon, contact Lenovo Service - Lenovo H320 | Lenovo H3 Series User Guide V1.0 - Page 34
in troubleshooting system problems: 1. The serial number of the software. The serial number was shipped with the computer and was provided separately by the manufacturer. The Help Center is unable to retrieve this number. 2. The drivers for this computer model only support the Windows 7 system - Lenovo H320 | Lenovo H3 Series User Guide V1.0 - Page 35
• Before you can watch teletext programming, you must set the TV tuner input signal to analog. 30 User Guide
-
 1
1 -
 2
2 -
 3
3 -
 4
4 -
 5
5 -
 6
6 -
 7
7 -
8
-
9
-
10
-
11
-
12
-
13
-
14
-
15
-
16
-
17
-
18
-
19
-
20
-
21
-
22
-
23
-
24
-
25
-
26
-
27
-
28
-
29
-
30
-
31
-
32
-
33
-
34
-
35
 |
 |
Version 1.0
2010.03
User Guide
H3 Series
Machine type: 10041-10049
31043590