Lenovo IdeaCentre B510 Lenovo IdeaCentre B500 Hardware Maintenance Manual - Page 53
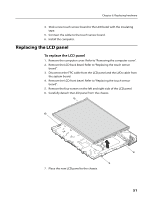
Replacing the LCD panel
 |
View all Lenovo IdeaCentre B510 manuals
Add to My Manuals
Save this manual to your list of manuals |
Page 53 highlights
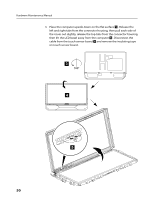
Chapter 8. Replacing hardware 4. Stick a new touch sensor board to the LCD bezel with the insulating tape. 5. Connect the cable to the touch sensor board. 6. Install the computer. Replacing the LCD panel To replace the LCD panel 1. Remove the computer cover. Refer to "Removing the computer cover". 2. Remove the LCD back bezel. Refer to "Replacing the touch sensor board". 3. Disconnect the FPC cable from the LCD panel and the LVDs cable from the system board. 4. Remove the LCD front bezel. Refer to "Replacing the touch sensor board". 5. Remove the four screws on the left and right side of the LCD panel. 6. Carefully detach the LCD panel from the chassis. 7. Place the new LCD panel to the chassis. 51
-
 1
1 -
2
-
3
-
4
-
5
-
6
-
7
-
8
-
9
-
10
-
11
-
12
-
13
-
14
-
15
-
16
-
17
-
18
-
19
-
20
-
21
-
22
-
23
-
24
-
25
-
26
-
27
-
28
-
29
-
30
-
31
-
32
-
33
-
34
-
35
-
36
-
37
-
38
-
39
-
40
-
41
-
42
-
43
-
44
-
45
-
46
-
47
-
 48
48 -
 49
49 -
 50
50 -
 51
51 -
 52
52 -
 53
53 -
 54
54 -
 55
55 -
 56
56 -
 57
57 -
 58
58 -
59
-
60
 |
 |
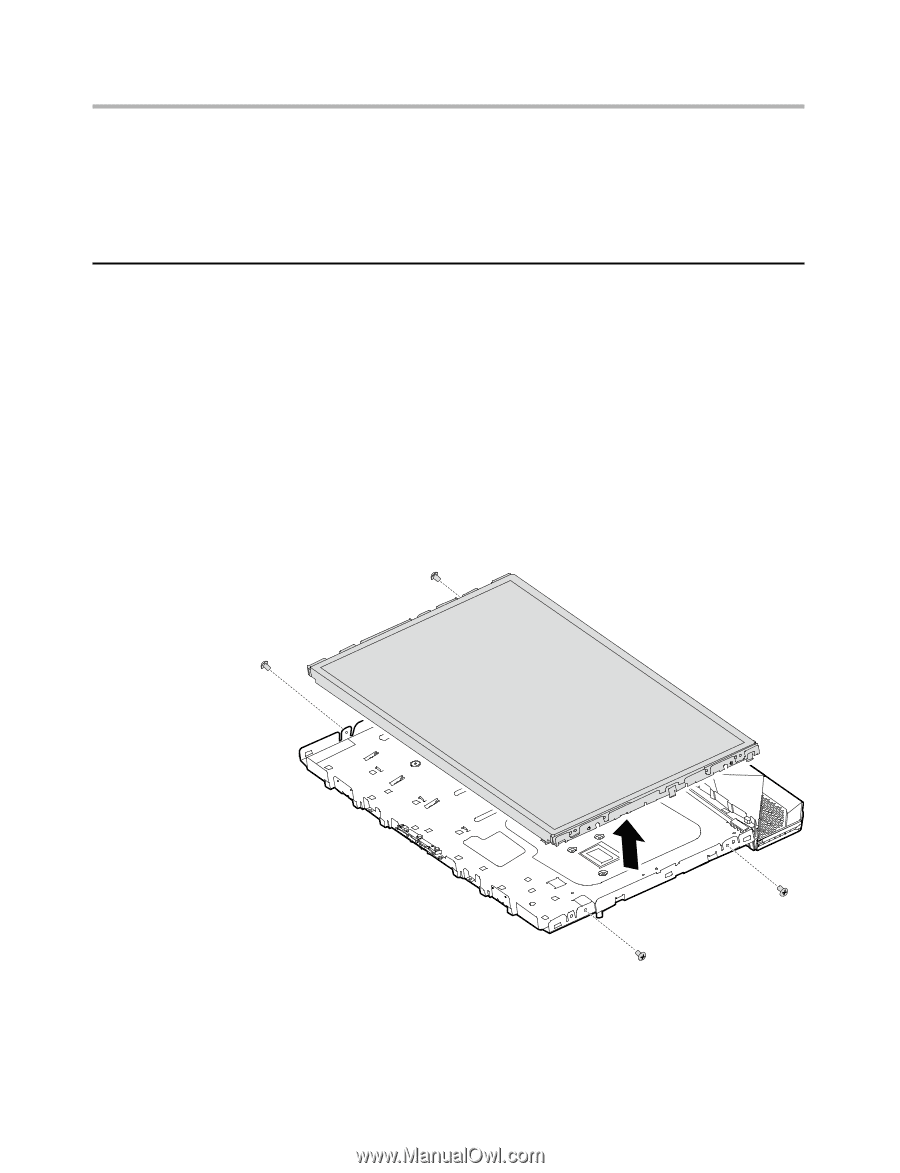
Chapter 8. Replacing hardware
51
4.
Stick a new touch sensor board to the LCD bezel with the insulating
tape.
5.
Connect the cable to the touch sensor board.
6. Install the computer.
Replacing the LCD panel
To replace the LCD panel
1.
Remove the computer cover. Refer to “Removing the computer cover”.
2.
Remove the LCD back bezel. Refer to “Replacing the touch sensor
board”.
3.
Disconnect the FPC cable from the LCD panel and the LVDs cable from
the system board.
4.
Remove the LCD front bezel. Refer to “Replacing the touch sensor
board”.
5.
Remove the four screws on the left and right side of the LCD panel.
6.
Carefully detach the LCD panel from the chassis.
7.
Place the new LCD panel to the chassis.