Lenovo ThinkPad 11e Chromebook Hardware Maintenance Manual - ThinkPad 11e Chro
Lenovo ThinkPad 11e Chromebook Manual
 |
View all Lenovo ThinkPad 11e Chromebook manuals
Add to My Manuals
Save this manual to your list of manuals |
Lenovo ThinkPad 11e Chromebook manual content summary:
- Lenovo ThinkPad 11e Chromebook | Hardware Maintenance Manual - ThinkPad 11e Chro - Page 1
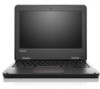
Hardware Maintenance Manual ThinkPad 11e Chromebook and ThinkPad Yoga 11e Chromebook - Lenovo ThinkPad 11e Chromebook | Hardware Maintenance Manual - ThinkPad 11e Chro - Page 2
and the product it supports, be sure to read the general information under Appendix A "Notices" on page 75. First Edition (May 2014) © Copyright Lenovo 2014. LIMITED AND RESTRICTED RIGHTS NOTICE: If data or software is delivered pursuant a General Services Administration "GSA" contract, use - Lenovo ThinkPad 11e Chromebook | Hardware Maintenance Manual - ThinkPad 11e Chro - Page 3
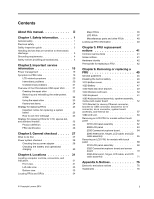
requirements 4 Safety notices (multilingual translations 4 Chapter 2. Important service information 19 Power management 19 Symptom-to-FRU index 19 LCD-related symptoms 20 Intermittent problems 20 Undetermined problems 21 Overview of the Chromebook USB repair shim . . 21 Creating the repair - Lenovo ThinkPad 11e Chromebook | Hardware Maintenance Manual - ThinkPad 11e Chro - Page 4
ii Hardware Maintenance Manual - Lenovo ThinkPad 11e Chromebook | Hardware Maintenance Manual - ThinkPad 11e Chro - Page 5
manual This manual contains service and reference information for the following ThinkPad® products. ThinkPad 11e Chromebook and ThinkPad Yoga® 11e Chromebook Machine types (MT) 20DB and 20DU Use this manual along with the advanced diagnostic tests to troubleshoot problems. Important: This manual - Lenovo ThinkPad 11e Chromebook | Hardware Maintenance Manual - ThinkPad 11e Chro - Page 6
iv Hardware Maintenance Manual - Lenovo ThinkPad 11e Chromebook | Hardware Maintenance Manual - ThinkPad 11e Chro - Page 7
that you must be familiar with before you service a ThinkPad notebook computer. • "General safety" on page 1 • "Electrical safety" on page 1 • "Safety inspection guide" on page 2 • "Handling devices that not use this type of mat to protect yourself from electrical shock. © Copyright Lenovo 2014 1 - Lenovo ThinkPad 11e Chromebook | Hardware Maintenance Manual - ThinkPad 11e Chro - Page 8
designed and built, required safety items were installed to protect users and service technicians from injury. This guide addresses only those items. You should use good judgment to identify potential safety hazards due to attachment of non-ThinkPad features or options not covered by this inspection - Lenovo ThinkPad 11e Chromebook | Hardware Maintenance Manual - ThinkPad 11e Chro - Page 9
following checklist at the beginning of every service task. Begin the checks with the specified for your computer. Go to: http://www.lenovo.com/serviceparts-lookup c. Insulation must not be frayed obvious non-ThinkPad alterations. Use good judgment as to the safety of any non-ThinkPad alterations. 7. - Lenovo ThinkPad 11e Chromebook | Hardware Maintenance Manual - ThinkPad 11e Chro - Page 10
this section are provided in the following languages: • English • Arabic • Brazilian Portuguese • French • German • Hebrew • Japanese • Korean • Spanish • Traditional Chinese DANGER DANGER DANGER 4 Hardware Maintenance Manual - Lenovo ThinkPad 11e Chromebook | Hardware Maintenance Manual - ThinkPad 11e Chro - Page 11
DANGER DANGER DANGER DANGER DANGER Chapter 1. Safety information 5 - Lenovo ThinkPad 11e Chromebook | Hardware Maintenance Manual - ThinkPad 11e Chro - Page 12
6 Hardware Maintenance Manual - Lenovo ThinkPad 11e Chromebook | Hardware Maintenance Manual - ThinkPad 11e Chro - Page 13
PERIGO PERIGO PERIGO PERIGO Chapter 1. Safety information 7 - Lenovo ThinkPad 11e Chromebook | Hardware Maintenance Manual - ThinkPad 11e Chro - Page 14
PERIGO PERIGO PERIGO PERIGO DANGER 8 Hardware Maintenance Manual - Lenovo ThinkPad 11e Chromebook | Hardware Maintenance Manual - ThinkPad 11e Chro - Page 15
DANGER DANGER DANGER DANGER DANGER DANGER Chapter 1. Safety information 9 - Lenovo ThinkPad 11e Chromebook | Hardware Maintenance Manual - ThinkPad 11e Chro - Page 16
DANGER VORSICHT VORSICHT VORSICHT VORSICHT 10 Hardware Maintenance Manual - Lenovo ThinkPad 11e Chromebook | Hardware Maintenance Manual - ThinkPad 11e Chro - Page 17
VORSICHT VORSICHT VORSICHT VORSICHT Chapter 1. Safety information 11 - Lenovo ThinkPad 11e Chromebook | Hardware Maintenance Manual - ThinkPad 11e Chro - Page 18
12 Hardware Maintenance Manual - Lenovo ThinkPad 11e Chromebook | Hardware Maintenance Manual - ThinkPad 11e Chro - Page 19
Chapter 1. Safety information 13 - Lenovo ThinkPad 11e Chromebook | Hardware Maintenance Manual - ThinkPad 11e Chro - Page 20
14 Hardware Maintenance Manual - Lenovo ThinkPad 11e Chromebook | Hardware Maintenance Manual - ThinkPad 11e Chro - Page 21
Chapter 1. Safety information 15 - Lenovo ThinkPad 11e Chromebook | Hardware Maintenance Manual - ThinkPad 11e Chro - Page 22
16 Hardware Maintenance Manual - Lenovo ThinkPad 11e Chromebook | Hardware Maintenance Manual - ThinkPad 11e Chro - Page 23
Chapter 1. Safety information 17 - Lenovo ThinkPad 11e Chromebook | Hardware Maintenance Manual - ThinkPad 11e Chro - Page 24
18 Hardware Maintenance Manual - Lenovo ThinkPad 11e Chromebook | Hardware Maintenance Manual - ThinkPad 11e Chro - Page 25
screen instructions to install the drivers. For additional assistance, customers might call the Lenovo Customer Support Center. Telephone numbers for the Lenovo Support Center are available at: http://www.lenovo.com/support/phone • Service training documents for Lenovo authorized service technicians - Lenovo ThinkPad 11e Chromebook | Hardware Maintenance Manual - ThinkPad 11e Chro - Page 26
"Intermittent problems" on page 20. Note: For a device not supported by diagnostic codes in the ThinkPad notebook computers, see the manual for that of TFT LCD technology, but excessive pixel problems can cause viewing concerns.If the LCD you are servicing has two or less visible defective pixels, - Lenovo ThinkPad 11e Chromebook | Hardware Maintenance Manual - ThinkPad 11e Chro - Page 27
all of the following devices: a. Non-ThinkPad devices b. Printer, mouse, and other external devices c. External diskette drive or optical drive d. Wireless cards 4. Turn on the computer. 5. Determine whether the problem has been solved. 6. If the problem does not recur, reconnect the removed devices - Lenovo ThinkPad 11e Chromebook | Hardware Maintenance Manual - ThinkPad 11e Chro - Page 28
Lenovo Support Web site at: http://www.lenovo.com/support to create a repair shim. A Lenovo service tool and follow the on-screen instructions to create the repair shim. 6. -protected. Before refreshing the Chromebook firmware, set the ROMs turn off the write-protect function, remove the - Lenovo ThinkPad 11e Chromebook | Hardware Maintenance Manual - ThinkPad 11e Chro - Page 29
turn off the write-protect function, the computer will be in Developer mode. In some cases, the computer might not in Developer mode after you turn firmware and image automatically. When prompted, choose "i" to install the shim to the computer. When the update process finishes service information 23 - Lenovo ThinkPad 11e Chromebook | Hardware Maintenance Manual - ThinkPad 11e Chro - Page 30
the servicing of Chromebook instructions on how to turn off the write-protect function, see "Removing and reinstalling the write-protect screw" on page 22. - Write-protect function is off: System cannot be finalized until the write-protect function is turned back on. 24 Hardware Maintenance Manual - Lenovo ThinkPad 11e Chromebook | Hardware Maintenance Manual - ThinkPad 11e Chro - Page 31
for replacing and servicing FRUs: • If you are instructed to replace a FRU but the replacement does not correct the problem, reinstall the (CTO) model This model provides the ability for a customer to configure a Lenovo solution from a Web Site, and have this configuration sent to fulfillment, where - Lenovo ThinkPad 11e Chromebook | Hardware Maintenance Manual - ThinkPad 11e Chro - Page 32
, do the following: 1. Go to: http://www.lenovo.com/support 2. Click Warranty & Services. 3. Click Check Warranty Status. 4. On the Warranty do the following: 1. Go to: http://www.lenovo.com/support 2. Click Parts & Accessories. 3. Follow the instructions on the screen to select product. 4. Click - Lenovo ThinkPad 11e Chromebook | Hardware Maintenance Manual - ThinkPad 11e Chro - Page 33
certified trained personnel should service the computer. Personnel repairing the Lenovo Chromebook computer must have completed the radiation, electrostatic discharge, or software errors. Consider replacing a FRU only when a problem recurs. If you suspect that a FRU is defective, clear the error log - Lenovo ThinkPad 11e Chromebook | Hardware Maintenance Manual - ThinkPad 11e Chro - Page 34
the installation of service Turn off the computer. 5. Disconnect the ac adapter and turn on the computer. If the computer can be turned on, it means the battery is functional. If you suspect a power problem correct continuity and installation. • If from the one you are servicing. 3. If the voltage is - Lenovo ThinkPad 11e Chromebook | Hardware Maintenance Manual - ThinkPad 11e Chro - Page 35
or an authorized builder. The system does not support unauthorized batteries or batteries designed for other systems. If an unauthorized battery or a battery designed for another systems is installed, the system will not charge. Attention: Lenovo has no responsibility for the performance or safety - Lenovo ThinkPad 11e Chromebook | Hardware Maintenance Manual - ThinkPad 11e Chro - Page 36
30 Hardware Maintenance Manual - Lenovo ThinkPad 11e Chromebook | Hardware Maintenance Manual - ThinkPad 11e Chro - Page 37
computer controls, connectors, and indicators. Front view Front view of the ThinkPad 11e Chromebook 1 2 3 4 11 10 5 6 7 8 9 1 Microphone 3 Camera 5 Security-lock slot 7 USB 3.0 connector 9 Power button 11 Touch pad 2 Camera-in-use indicator 4 Speakers 6 HDMI™ connector 8 Volume-control - Lenovo ThinkPad 11e Chromebook | Hardware Maintenance Manual - ThinkPad 11e Chro - Page 38
Off: The computer is off. Front view of the ThinkPad Yoga 11e Chromebook 12 3 12 4 11 10 5 6 7 8 9 1 Microphone 3 Camera 5 Security-lock slot 7 USB 3.0 connector 9 Power button 11 Touch pad 2 Camera-in-use indicator 4 Speakers 6 HDMI™ connector 8 Volume-control buttons 10 System-status - Lenovo ThinkPad 11e Chromebook | Hardware Maintenance Manual - ThinkPad 11e Chro - Page 39
3 Media card slot 5 Always On USB connector (USB 2.0 connector) 2 Wireless-status indicator2 4 Audio connector 6 Power connector 1: The illuminated dot in the ThinkPad logo works as a system-status indicator. Blinks for three times: The computer is initially connected to power. On: The computer is - Lenovo ThinkPad 11e Chromebook | Hardware Maintenance Manual - ThinkPad 11e Chro - Page 40
list of CRUs for your product in this Hardware Maintenance Manual. An electronic version of this manual can be found at http://www.lenovo.com/support. Click Guides & Manuals and then follow the on-screen instructions to find the manual for your product. You might be required to return the defective - Lenovo ThinkPad 11e Chromebook | Hardware Maintenance Manual - ThinkPad 11e Chro - Page 41
Major FRUs 13 12 c b a 11 10 1 2 3 4 5 6 7 8 9 Chapter 4. Locations 35 - Lenovo ThinkPad 11e Chromebook | Hardware Maintenance Manual - ThinkPad 11e Chro - Page 42
11 a b c 12 13 FRU descriptions LCD unit (see "LCD FRUs" on page 37) Keyboard Speaker assembly Keyboard bezel assembly Thermal fan System board assembly Hard disk drive bracket (available on ThinkPad Yoga 11e Chromebook reader board CRU ID ** N N N N N N ** N N N N 36 Hardware Maintenance Manual - Lenovo ThinkPad 11e Chromebook | Hardware Maintenance Manual - ThinkPad 11e Chro - Page 43
LCD FRUs For models without touch panel: 1 a 2 3 4 5 b 6 8 7 No. FRU descriptions 1 LCD bezel a Mylar screw caps (see "Miscellaneous parts and other FRUs" on page 40) 2 Camera/microphone board 3 LCD panel without touch function 4 Hinges CRU ID N N N N Chapter 4. Locations 37 - Lenovo ThinkPad 11e Chromebook | Hardware Maintenance Manual - ThinkPad 11e Chro - Page 44
No. FRU descriptions 5 Antenna kit 6 LED cable assembly 7 LCD rear cover assembly 8 LCD cable b Hinge rubbers (see "Miscellaneous parts and other FRUs" on page 40) CRU ID N N N N N 38 Hardware Maintenance Manual - Lenovo ThinkPad 11e Chromebook | Hardware Maintenance Manual - ThinkPad 11e Chro - Page 45
For models with touch panel: 1 a 8 2 3 4 b 5 6 7 No. FRU descriptions 1 LCD panel assembly with touch function a Mylar screw caps (see "Miscellaneous parts and other FRUs" on page 40) 2 Sensor board 3 Camera/microphone board 4 Hinges b Hinge rubbers (see "Miscellaneous parts and - Lenovo ThinkPad 11e Chromebook | Hardware Maintenance Manual - ThinkPad 11e Chro - Page 46
No No No CRU ID * * Looking up FRU information For detailed FRU information, including part numbers, descriptions, and substitution part numbers, go to http://www.lenovo.com/serviceparts-lookup. 40 Hardware Maintenance - Lenovo ThinkPad 11e Chromebook | Hardware Maintenance Manual - ThinkPad 11e Chro - Page 47
list of CRUs for your product in this Hardware Maintenance Manual. An electronic version of this manual can be found at http://www.lenovo.com/support. Click Guides & Manuals and then follow the on-screen instructions to find the manual for your product. You might be required to return the defective - Lenovo ThinkPad 11e Chromebook | Hardware Maintenance Manual - ThinkPad 11e Chro - Page 48
) • Logic card to plastic Turn an additional 180 degrees after the combination into a Chromebook and creates repair of the Chromebook. The HWID unauthorized parts are installed, you might not For example, if you install a different model of the see "Overview of the Chromebook USB repair shim" on page - Lenovo ThinkPad 11e Chromebook | Hardware Maintenance Manual - ThinkPad 11e Chro - Page 49
For CRU definition, see "Locating FRUs and CRUs" on page 34. For information about how to use the repair shim, see "Using the repair shim" on page 23. Chapter 5. FRU replacement notices 43 - Lenovo ThinkPad 11e Chromebook | Hardware Maintenance Manual - ThinkPad 11e Chro - Page 50
44 Hardware Maintenance Manual - Lenovo ThinkPad 11e Chromebook | Hardware Maintenance Manual - ThinkPad 11e Chro - Page 51
Service Provider install the CRU according to the warranty service for your product. If you intend on installing the CRU, Lenovo will ship the CRU to you. CRU information and replacement instructions by the numbers in square callouts. 5. When turning a screw, turn it in the direction as given by the - Lenovo ThinkPad 11e Chromebook | Hardware Maintenance Manual - ThinkPad 11e Chro - Page 52
instructions on the screen in addition to the instructions in this topic. 1. Turn +d. Note: If you are prompted to turn off the OS verification, press enter. forward key same time, then the Terminal window is displayed. at the 4. When prompted computer and the computer turns off immediately. The - Lenovo ThinkPad 11e Chromebook | Hardware Maintenance Manual - ThinkPad 11e Chro - Page 53
label 4 SIRIM label 6 Indonesia rating label 8 Brazil ANATEL label 10 FCC/IC label 1020 Battery Important notices for replacing a battery Attention: Lenovo has no responsibility for the performance or safety of unauthorized batteries, and provides no warranties for failures or damage arising out of - Lenovo ThinkPad 11e Chromebook | Hardware Maintenance Manual - ThinkPad 11e Chro - Page 54
could ignite or explode. 1 1 1 1 Step 1 Screw (quantity) M2 × L4 mm, flat-head, nylon-coated (4) 2 Color Black Torque 0.181 Nm (1.85 kgf-cm) 48 Hardware Maintenance Manual - Lenovo ThinkPad 11e Chromebook | Hardware Maintenance Manual - ThinkPad 11e Chro - Page 55
3 4 1030 Hard disk drive bracket Note: The hard disk drive bracket is only available on the ThinkPad Yoga 11e Chromebook. For access, remove this FRU: • "1010 Bottom cover" on page 46 Removal steps of the hard disk drive bracket 1 Chapter 6. Removing or replacing a FRU 49 - Lenovo ThinkPad 11e Chromebook | Hardware Maintenance Manual - ThinkPad 11e Chro - Page 56
-head, nylon-coated (1) Color Black Torque 0.181 Nm (1.85 kgf-cm) 2 When installing: Ensure that the hard disk drive bracket is firmly attached. 1040 Wireless LAN card For access mm, hexagon star head, nylon-coated (1) 50 Hardware Maintenance Manual Color Black Torque 0.181 Nm (1.85 kgf-cm) - Lenovo ThinkPad 11e Chromebook | Hardware Maintenance Manual - ThinkPad 11e Chro - Page 57
3 When installing: Attach the gray cable to the connector marked "MAIN" on the card, and attach the black cable to the connector marked "AUX". 1050 Keyboard For - Lenovo ThinkPad 11e Chromebook | Hardware Maintenance Manual - ThinkPad 11e Chro - Page 58
4 3 5 6 When installing: Ensure that the connector is attached firmly. 1060 Keyboard bezel assembly, speaker assembly, media-card-reader board For access, remove these "1020 Battery" on page 47 • "1030 Hard disk drive bracket" on page 49 • "1050 Keyboard" on page 51 52 Hardware Maintenance Manual - Lenovo ThinkPad 11e Chromebook | Hardware Maintenance Manual - ThinkPad 11e Chro - Page 59
Removal steps of the keyboard bezel assembly 1 1 Step 1 Screw cap Screw (quantity) M2 × L4 mm, flat-head shoulder, nylon-coated (2) 2 3 2 Color Black Torque 0.181 Nm (1.85 kgf-cm) 4 3 2 2 4 4 4 Step 2 3 4 Screw (quantity) M2.5 × L8 mm, flat-head, nylon-coated (4) M2 × L4 mm, flat-head - Lenovo ThinkPad 11e Chromebook | Hardware Maintenance Manual - ThinkPad 11e Chro - Page 60
5 5 5 5 Step 5 Screw (quantity) M2 × L4 mm, flat-head, nylon-coated (4) 6 Color Black Torque 0.181 Nm (1.85 kgf-cm) 7 8 54 Hardware Maintenance Manual - Lenovo ThinkPad 11e Chromebook | Hardware Maintenance Manual - ThinkPad 11e Chro - Page 61
9 9 9 9 10 9 9 9 9 When installing: Ensure that the connectors are attached firmly. Removal steps of the speaker assembly 1 1 Step 1 Screw (quantity) M2 × L3 mm, flat-head shoulder, nylon-coated (2) Color - Lenovo ThinkPad 11e Chromebook | Hardware Maintenance Manual - ThinkPad 11e Chro - Page 62
4 4 Removal steps of the media-card-reader board Step 1 Screw (quantity) M2 × L3 mm, flat-head, nylon-coated (2) 1 1 2 Color Black Torque 0.181 Nm (1.85 kgf-cm) 5 3 4 When installing: Ensure that the connector is attached firmly. 56 Hardware Maintenance Manual - Lenovo ThinkPad 11e Chromebook | Hardware Maintenance Manual - ThinkPad 11e Chro - Page 63
1070 Bracket for dummy Ethernet connector, bracket for USB connector, bracket for dc-in connector, dc-in connector, system board assembly, and thermal fan Important notices for handling the system board When handling the system board, read the following: • The system board has an accelerometer, - Lenovo ThinkPad 11e Chromebook | Hardware Maintenance Manual - ThinkPad 11e Chro - Page 64
4 3 3 Step 3 4 Screw (quantity) M2 × L4 mm, flat-head, nylon-coated (2) M2 × L5 mm, flat-head, nylon-coated (1) Color Black Black Torque 0.181 Nm (1.85 kgf-cm) 0.181 Nm (1.85 kgf-cm) 5 58 Hardware Maintenance Manual - Lenovo ThinkPad 11e Chromebook | Hardware Maintenance Manual - ThinkPad 11e Chro - Page 65
6 7 8 9 Chapter 6. Removing or replacing a FRU 59 - Lenovo ThinkPad 11e Chromebook | Hardware Maintenance Manual - ThinkPad 11e Chro - Page 66
10 11b 11d 11c 11a 12 13 When installing: Ensure that the connectors are attached firmly. 1080 LCD unit For access, remove these FRUs in order: • "1010 Bottom cover" on bracket for dc-in connector, dc-in connector, system board assembly, and thermal fan" on page 57 60 Hardware Maintenance Manual - Lenovo ThinkPad 11e Chromebook | Hardware Maintenance Manual - ThinkPad 11e Chro - Page 67
Removal steps of the LCD unit 1 1 1 1 1 1 1 1 2 2 3 3 33 3 Step 3 Screw (quantity) M2.5 × L5 mm, flat-head, nylon-coated (5) Color Black Torque 0.294 Nm (3.0 kgf-cm) Chapter 6. Removing or replacing a FRU 61 - Lenovo ThinkPad 11e Chromebook | Hardware Maintenance Manual - ThinkPad 11e Chro - Page 68
4 4 Removing an LCD FRU for models without touch panel This section provides instructions on how to remove an LCD FRU for models without touch panel. 2010 LCD bezel assembly For access, page 57 • "1080 LCD unit" on page 60 Removal steps of the LCD bezel assembly 1 1 62 Hardware Maintenance Manual - Lenovo ThinkPad 11e Chromebook | Hardware Maintenance Manual - ThinkPad 11e Chro - Page 69
Step 1 Screw cap Screw (quantity) M2.5 × L5 mm, flat-head, nylon-coated (2) Color Black 2 2 2 2 2 2 2 2 2 2 2 2 2 2 Torque 0.294 Nm (3.0 kgf-cm) 2 2 When installing: Ensure that all the latches are attached firmly. 2020 LCD panel For access, remove these FRUs in order: • "1010 Bottom - Lenovo ThinkPad 11e Chromebook | Hardware Maintenance Manual - ThinkPad 11e Chro - Page 70
L3 mm, flat-head, nylon-coated (4) Color Silver Torque 0.181 Nm (1.85 kgf-cm) 0 5 4 3 When installing: Ensure that the LCD connector is attached firmly. 2030 Camera/microphone board For access, remove these FRUs in order: • " on page 50 • "1050 Keyboard" on page 51 64 Hardware Maintenance Manual - Lenovo ThinkPad 11e Chromebook | Hardware Maintenance Manual - ThinkPad 11e Chro - Page 71
unit" on page 60 • "2010 LCD bezel assembly" on page 62 • "2020 LCD panel" on page 63 Removal steps of the camera/microphone board 3 1 2 When installing: Ensure that the connector is attached firmly. 2040 Antenna kit, hinges, LCD cable, and LED cable assembly For access, remove these FRUs in order - Lenovo ThinkPad 11e Chromebook | Hardware Maintenance Manual - ThinkPad 11e Chro - Page 72
Removal steps of the antenna kit, hinges, and LCD cable 2 2 2 1 2 1 1 1 1 1 1 1 3 3 1 3 3 3 3 Step 3 Screw (quantity) M2.5 × L3 mm, big-head, nylon-coated (6) Color Black Torque 0.294 Nm (3.0 kgf-cm) 66 Hardware Maintenance Manual - Lenovo ThinkPad 11e Chromebook | Hardware Maintenance Manual - ThinkPad 11e Chro - Page 73
4 4 4 4 5 6 6 7 When installing: When you install the wireless antenna kit, route the cables as shown in the following illustration. As you route the cables, ensure that they are not subject to any tension. Tension could cause the cables to be damaged by the cable guides, or a wire to be broken. - Lenovo ThinkPad 11e Chromebook | Hardware Maintenance Manual - ThinkPad 11e Chro - Page 74
Removal step of the LED cable assembly Removing an LCD FRU for models with touch panel This section provides instructions on how to remove an LCD FRU for models with touch panel. 3010 LCD panel assembly For access, speaker assembly, media-card-reader board" on page 52 68 Hardware Maintenance Manual - Lenovo ThinkPad 11e Chromebook | Hardware Maintenance Manual - ThinkPad 11e Chro - Page 75
• "1070 Bracket for dummy Ethernet connector, bracket for USB connector, bracket for dc-in connector, dc-in connector, system board assembly, and thermal fan" on page 57 • "1080 LCD unit" on page 60 Removal steps of the LCD panel assembly 1 1 Step 1 Screw cap Screw (quantity) M2.5 × L5 mm, flat- - Lenovo ThinkPad 11e Chromebook | Hardware Maintenance Manual - ThinkPad 11e Chro - Page 76
2 6 5 7 11 4 When installing: Ensure that the connectors are attached firmly. 3020 Camera/microphone board and sensor board For access, remove these FRUs in order: • "1010 and thermal fan" on page 57 • "1080 LCD unit" on page 60 • "3010 LCD panel assembly" on page 68 70 Hardware Maintenance Manual - Lenovo ThinkPad 11e Chromebook | Hardware Maintenance Manual - ThinkPad 11e Chro - Page 77
: Ensure that the connector is attached firmly. Removal steps of the sensor board 2 1 When installing: Ensure that the connector is attached firmly. 3030 Antenna kit, hinges, LCD cable, and LED cable assembly For access, remove these FRUs in order: • "1010 - Lenovo ThinkPad 11e Chromebook | Hardware Maintenance Manual - ThinkPad 11e Chro - Page 78
" on page 70 Removal steps of the antenna kit, hinges, LCD cable 2 2 2 1 2 1 1 1 1 1 1 1 1 3 3 3 3 Step 3 Screw (quantity) M2.5 × L3 mm, big-head, nylon-coated (4) 72 Hardware Maintenance Manual Color Black Torque 0.294 Nm (3.0 kgf-cm) - Lenovo ThinkPad 11e Chromebook | Hardware Maintenance Manual - ThinkPad 11e Chro - Page 79
4 4 5 6 6 7 When installing: When you install the wireless antenna kit, route the cables as shown in the following illustration. As you route the cables, ensure that they are not subject to any tension. Tension could cause the cables to be damaged by the cable guides, or a wire to be broken. Chapter - Lenovo ThinkPad 11e Chromebook | Hardware Maintenance Manual - ThinkPad 11e Chro - Page 80
a b a WLAN main antenna (gray) b WLAN auxiliary antenna (black) Removal step of the LED cable assembly 74 Hardware Maintenance Manual - Lenovo ThinkPad 11e Chromebook | Hardware Maintenance Manual - ThinkPad 11e Chro - Page 81
and verify the operation of any other product, program, or service. Lenovo may have patents or pending patent applications covering subject matter described document are not intended for use in implantation or other life support applications where malfunction may result in injury or death to - Lenovo ThinkPad 11e Chromebook | Hardware Maintenance Manual - ThinkPad 11e Chro - Page 82
corresponding information in the User Guide. EU Contact: Lenovo, Einsteinova 21, 851 01 Bratislava, Slovakia Trademarks The following terms are trademarks of Lenovo in the United States, other countries or both: Lenovo ThinkPad ThinkPad logo Yoga Chrome OS and Chromebook are trademarks of Google Inc - Lenovo ThinkPad 11e Chromebook | Hardware Maintenance Manual - ThinkPad 11e Chro - Page 83
- Lenovo ThinkPad 11e Chromebook | Hardware Maintenance Manual - ThinkPad 11e Chro - Page 84
Part Number: SP40A26992 Printed in (1P) P/N: SP40A26992 *1PSP40A26992*
-
 1
1 -
 2
2 -
 3
3 -
 4
4 -
 5
5 -
 6
6 -
 7
7 -
8
-
9
-
10
-
11
-
12
-
13
-
14
-
15
-
16
-
17
-
18
-
19
-
20
-
21
-
22
-
23
-
24
-
25
-
26
-
27
-
28
-
29
-
30
-
31
-
32
-
33
-
34
-
35
-
36
-
37
-
38
-
39
-
40
-
41
-
42
-
43
-
44
-
45
-
46
-
47
-
48
-
49
-
50
-
51
-
52
-
53
-
54
-
55
-
56
-
57
-
58
-
59
-
60
-
61
-
62
-
63
-
64
-
65
-
66
-
67
-
68
-
69
-
70
-
71
-
72
-
73
-
74
-
75
-
76
-
77
-
78
-
79
-
80
-
81
-
82
-
83
-
84
 |
 |
Hardware Maintenance Manual
ThinkPad 11e Chromebook and ThinkPad Yoga 11e Chromebook