Lenovo ThinkPad 390X Hardware Maintenance Manual (March 1999): ThinkPad 390E o - Page 86
LCD Panel ASM, Pull out the LCD Panel ASM.
 |
View all Lenovo ThinkPad 390X manuals
Add to My Manuals
Save this manual to your list of manuals |
Page 86 highlights
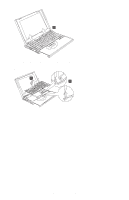
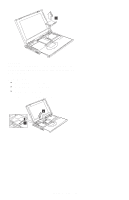
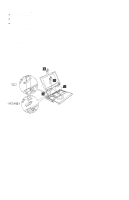
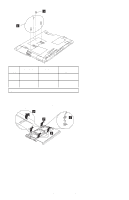
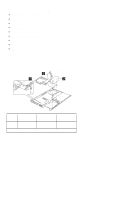
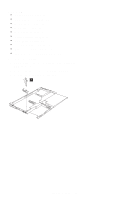
LCD Panel ASM "Battery ASM" on page 62 "Hard Disk Drive" on page 63 "Keyboard" on page 70 To remove the LCD Panel ASM: 1. Remove the two screws securing the LCD FPC cable. 2. Remove the LCD FPC cable. 3. Disconnect the LCD FPC cable from the lower case (12.1"). Disconnect the LCD FPC cable and LVDS board (13.3" and 14.1"). 4. Turn the notebook over; then remove four screws securing the LCD Panel ASM as shown. 5. Pull out the LCD Panel ASM. 76 ThinkPad 390E
-
 1
1 -
2
-
3
-
4
-
5
-
6
-
7
-
8
-
9
-
10
-
11
-
12
-
13
-
14
-
15
-
16
-
17
-
18
-
19
-
20
-
21
-
22
-
23
-
24
-
25
-
26
-
27
-
28
-
29
-
30
-
31
-
32
-
33
-
34
-
35
-
36
-
37
-
38
-
39
-
40
-
41
-
42
-
43
-
44
-
45
-
46
-
47
-
48
-
49
-
50
-
51
-
52
-
53
-
54
-
55
-
56
-
57
-
58
-
59
-
60
-
61
-
62
-
63
-
64
-
65
-
66
-
67
-
68
-
69
-
70
-
71
-
72
-
73
-
74
-
75
-
76
-
77
-
78
-
79
-
80
-
 81
81 -
 82
82 -
 83
83 -
 84
84 -
 85
85 -
 86
86 -
 87
87 -
 88
88 -
 89
89 -
 90
90 -
 91
91 -
92
-
93
-
94
-
95
-
96
-
97
-
98
-
99
-
100
-
101
-
102
-
103
-
104
-
105
-
106
-
107
-
108
-
109
-
110
-
111
-
112
-
113
-
114
-
115
-
116
-
117
-
118
-
119
-
120
-
121
-
122
-
123
-
124
-
125
-
126
-
127
-
128
-
129
-
130
 |
 |

LCD Panel ASM
±
“Battery ASM” on page
62
±
“Hard Disk Drive” on page
63
±
“Keyboard” on page
70
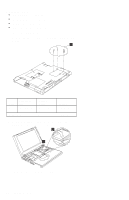
To remove the LCD Panel ASM:
1.
Remove the two screws securing the LCD FPC cable.
2.
Remove the LCD FPC cable.
3.
Disconnect the LCD FPC cable from the lower case
(12.1").
Disconnect the LCD FPC cable and LVDS board
(13.3" and 14.1").
4.
Turn the notebook over; then remove four screws
securing the LCD Panel ASM as shown.
5.
Pull out the LCD Panel ASM.
76
ThinkPad 390E